
Udemy Course: Spring & Hibernate for Beginners (including Spring Boot)
Reference: Udemy Course: Spring & Hibernate for Beginners (including Spring Boot)
Spring Overview
What’s new in Spring 5?
- Updated minimum requirements for java 8 or higher.
- Removed support for: Title, Velocity, Portlet, Guava etc.
- Updated Spring MVC to use new version of Servlet API 4.0.
- Added a new reactive programming framework: Spring WebFlux.
Spring 5 release notes: www.luv2code.com/spring-5-whats-new
Goals of Spring
- Lightweight development with Java POJOs(Plain-Old-Java-Objects)
- Dependency injection to promote loose coupling.
- Declarative programming with Aspect-Oriented-Programming (AOP)
- Minimize boilerplate Java code
Setting up your environment
Install Tomcat
Spring Inversion of Control - XML Configuration
Inversion of Control
Inversion of Control(IoC): The approach of the outsourcing the construction and management of objects.
In my words, we used to write code to control our program. But IoC gives the framework(spring) to control our program(bean)
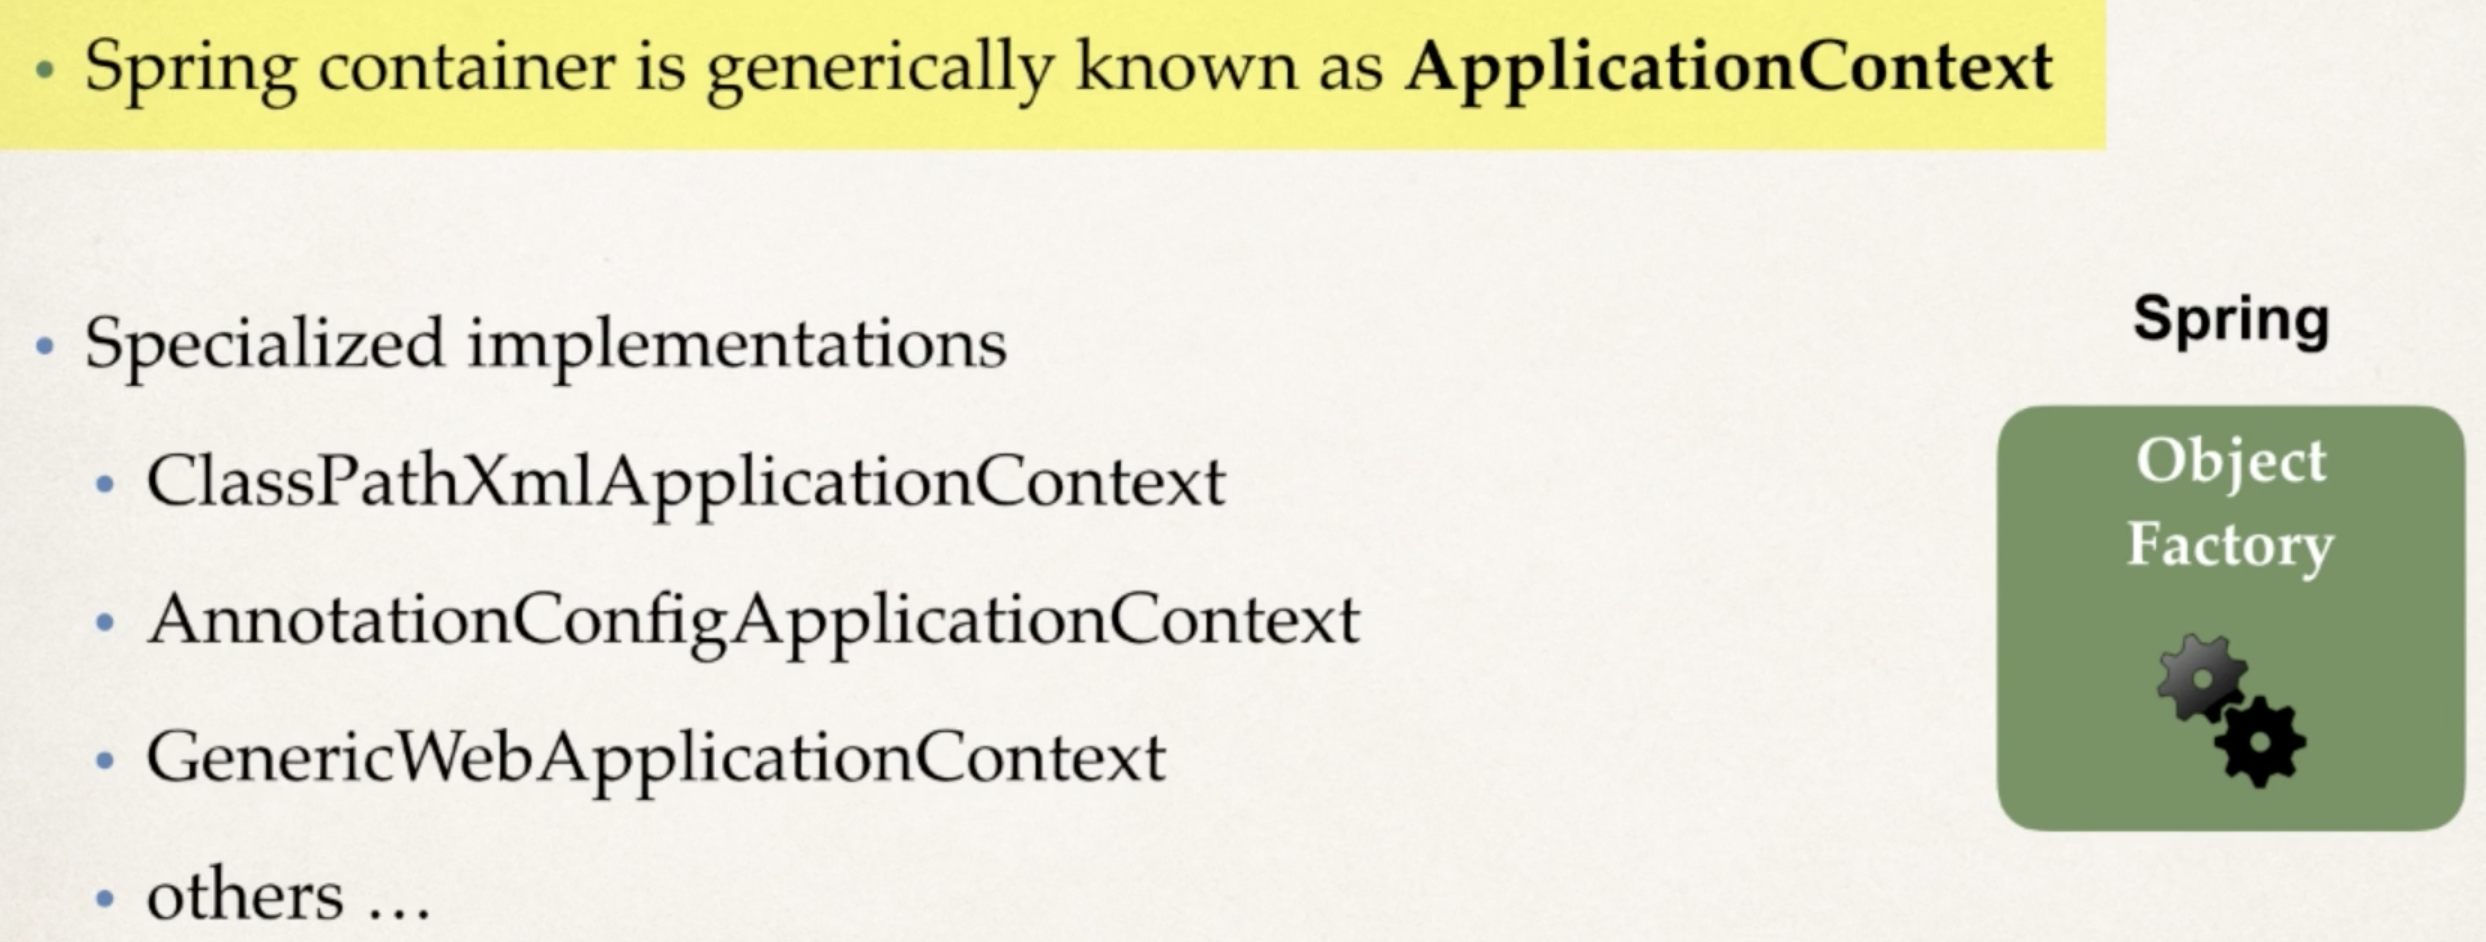
Spring Container
Spring Container has two main functions:
- Inversion of Control(IoC): Create and manage objects.
- Inject object’s dependencies: Dependency Injection.
Configuring Spring Container:
- XML Configuration file (legacy)
- Java Annotations (modern)
- Java code (modern)
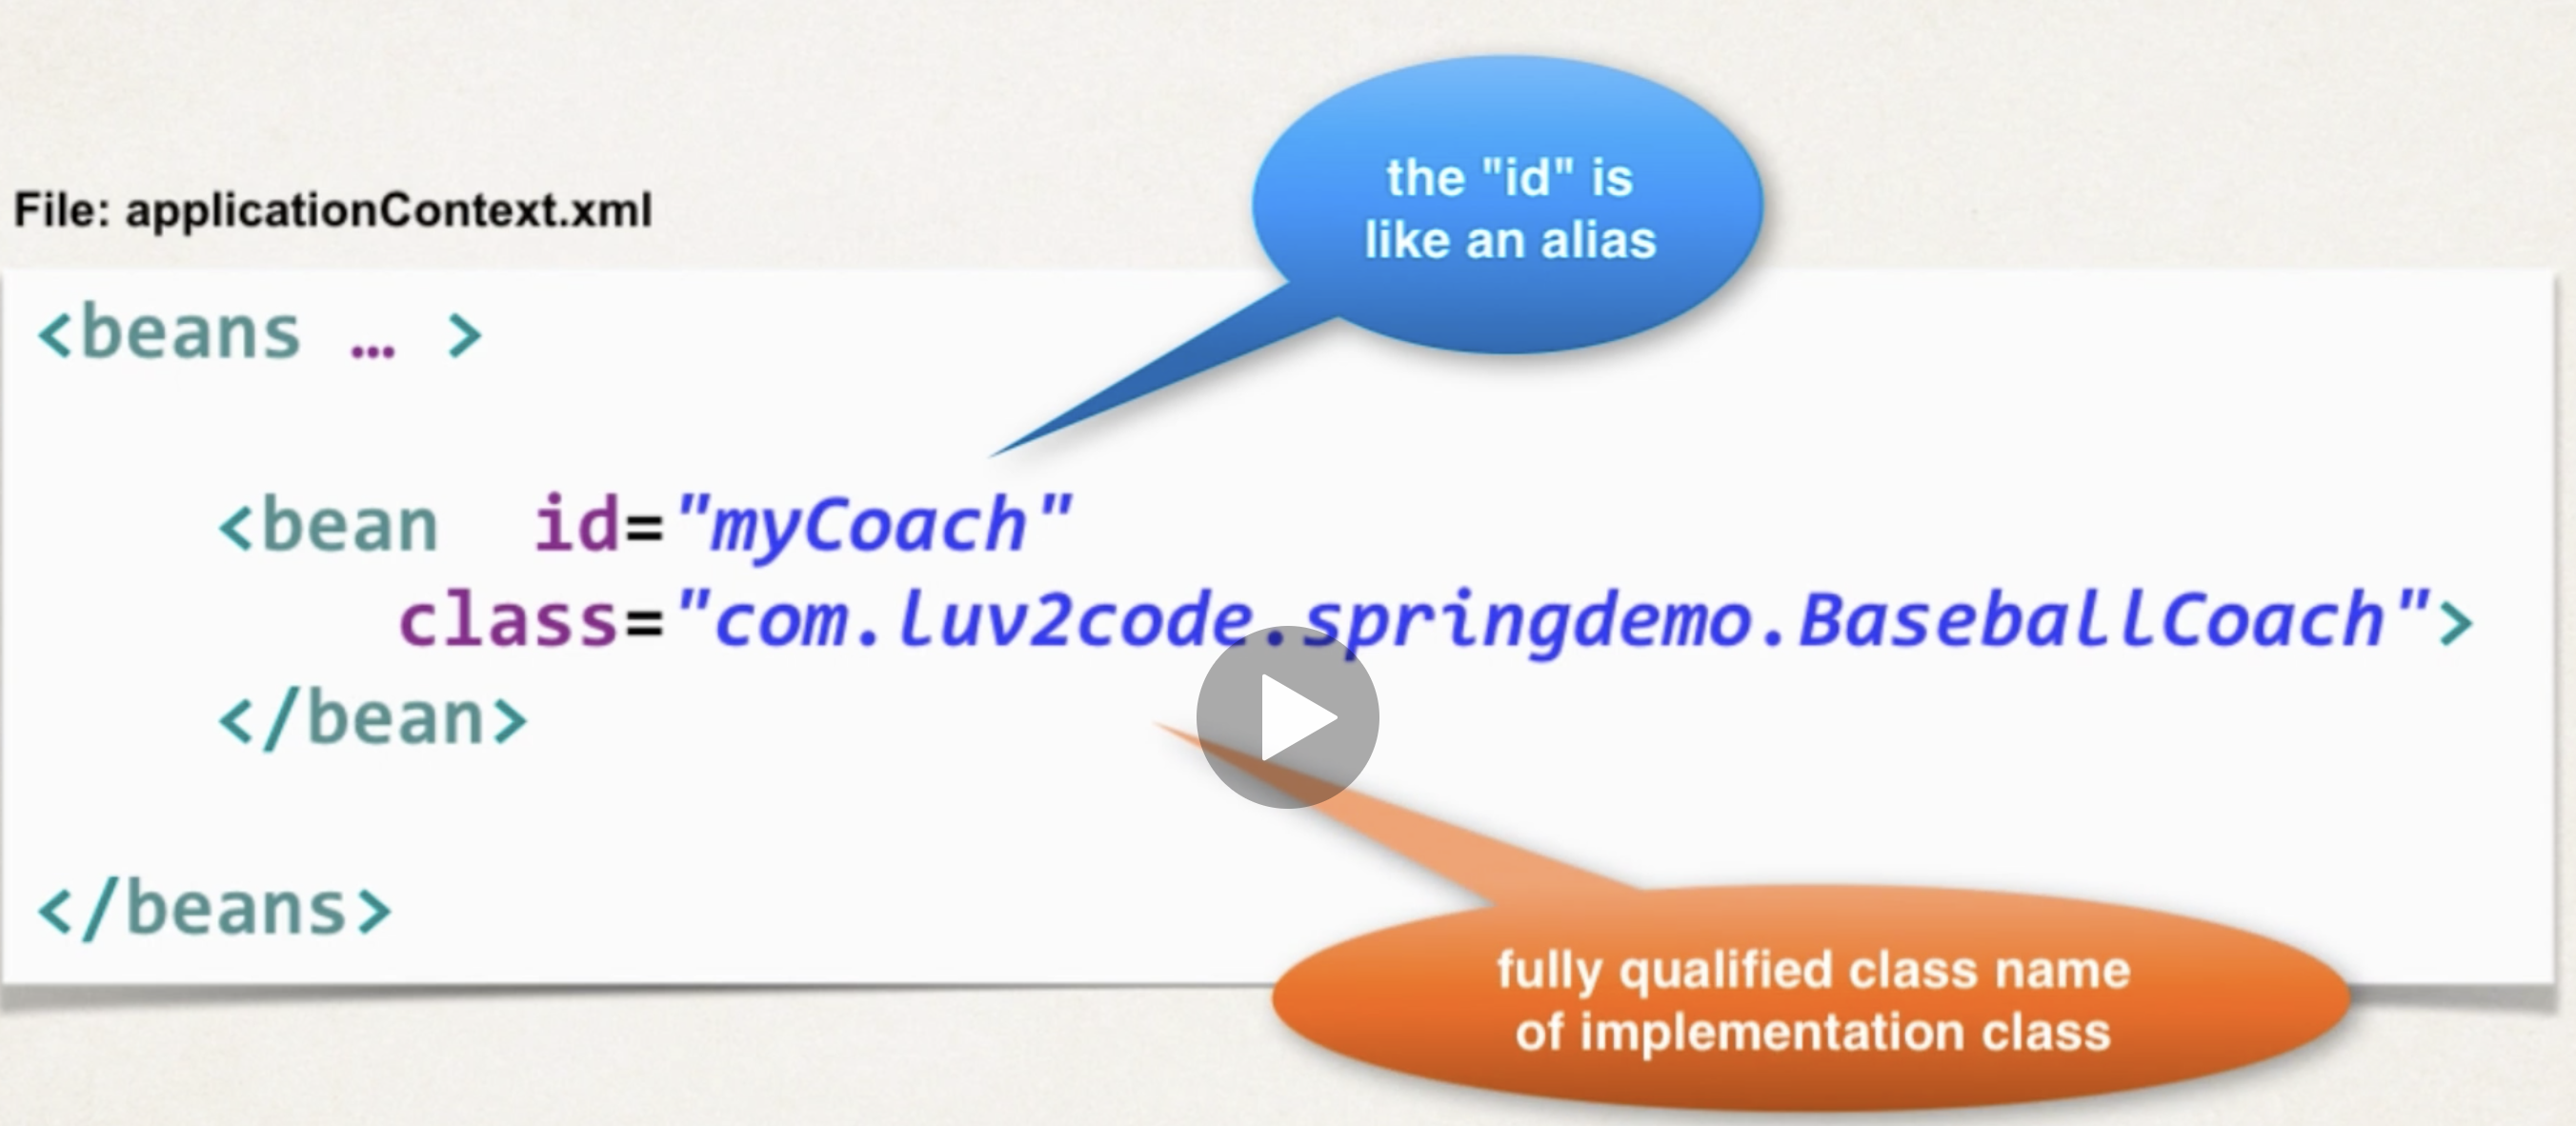
Spring Development Process
- Configure your Spring Beans
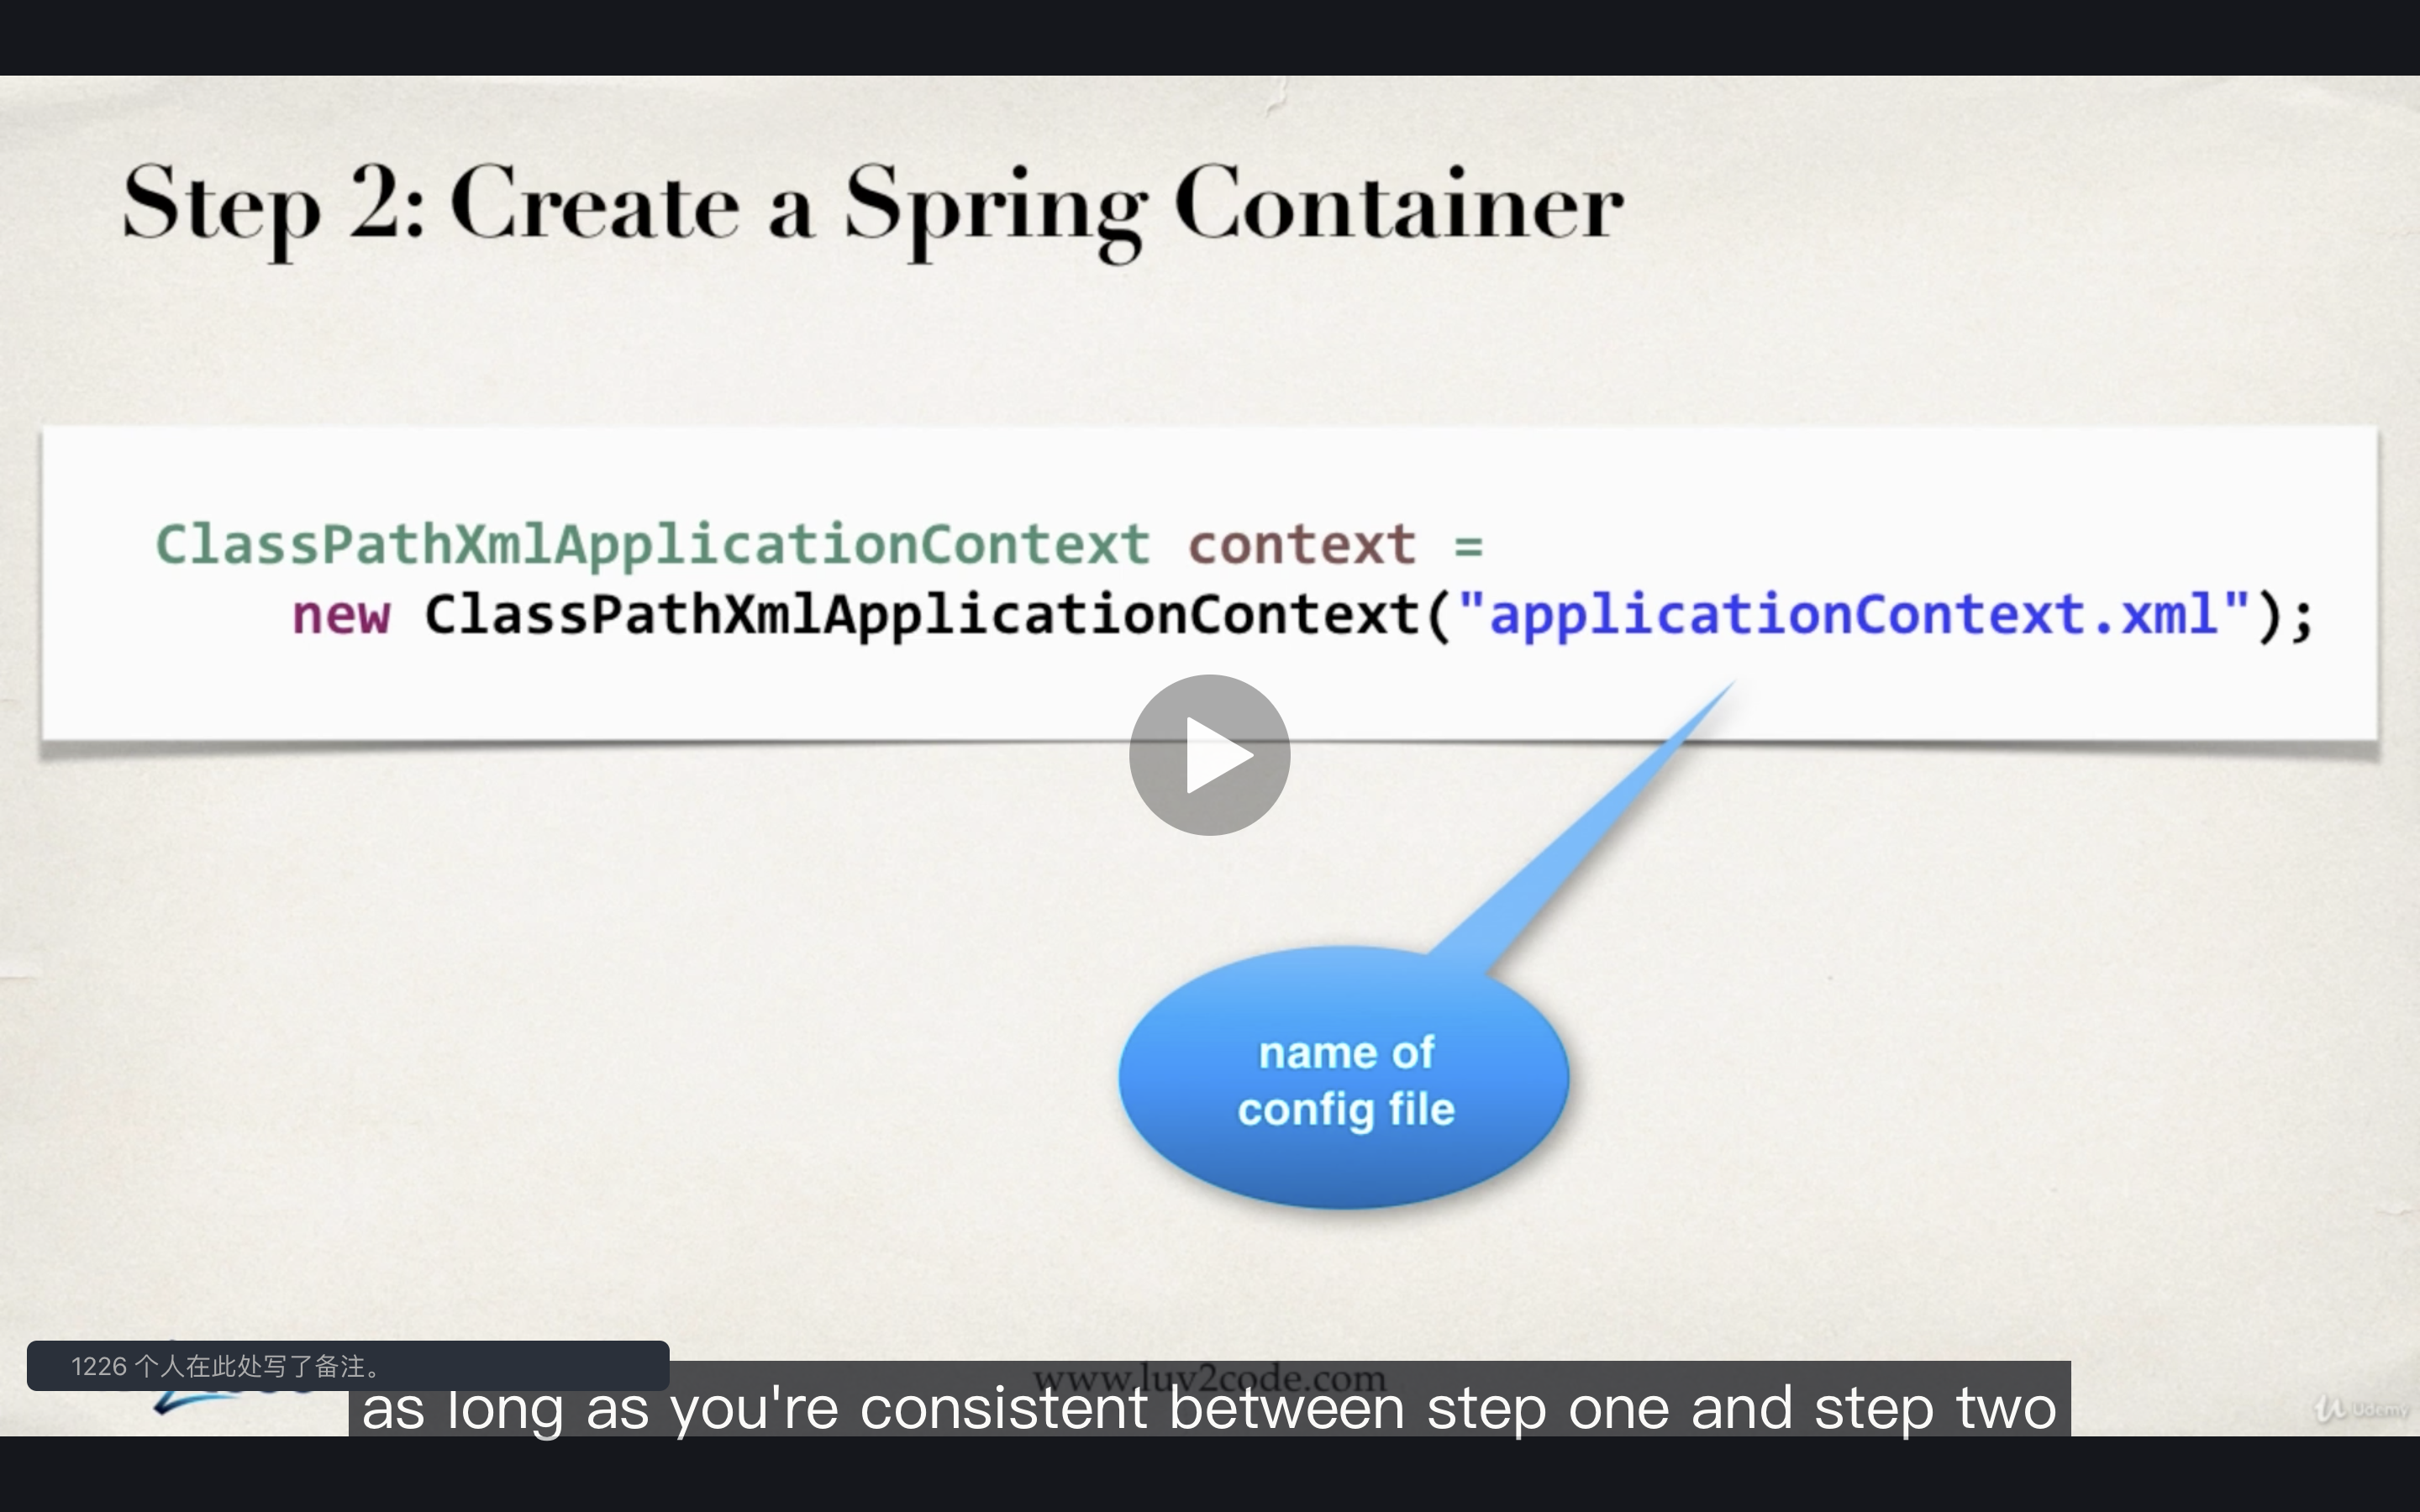
- Create a Spring Container
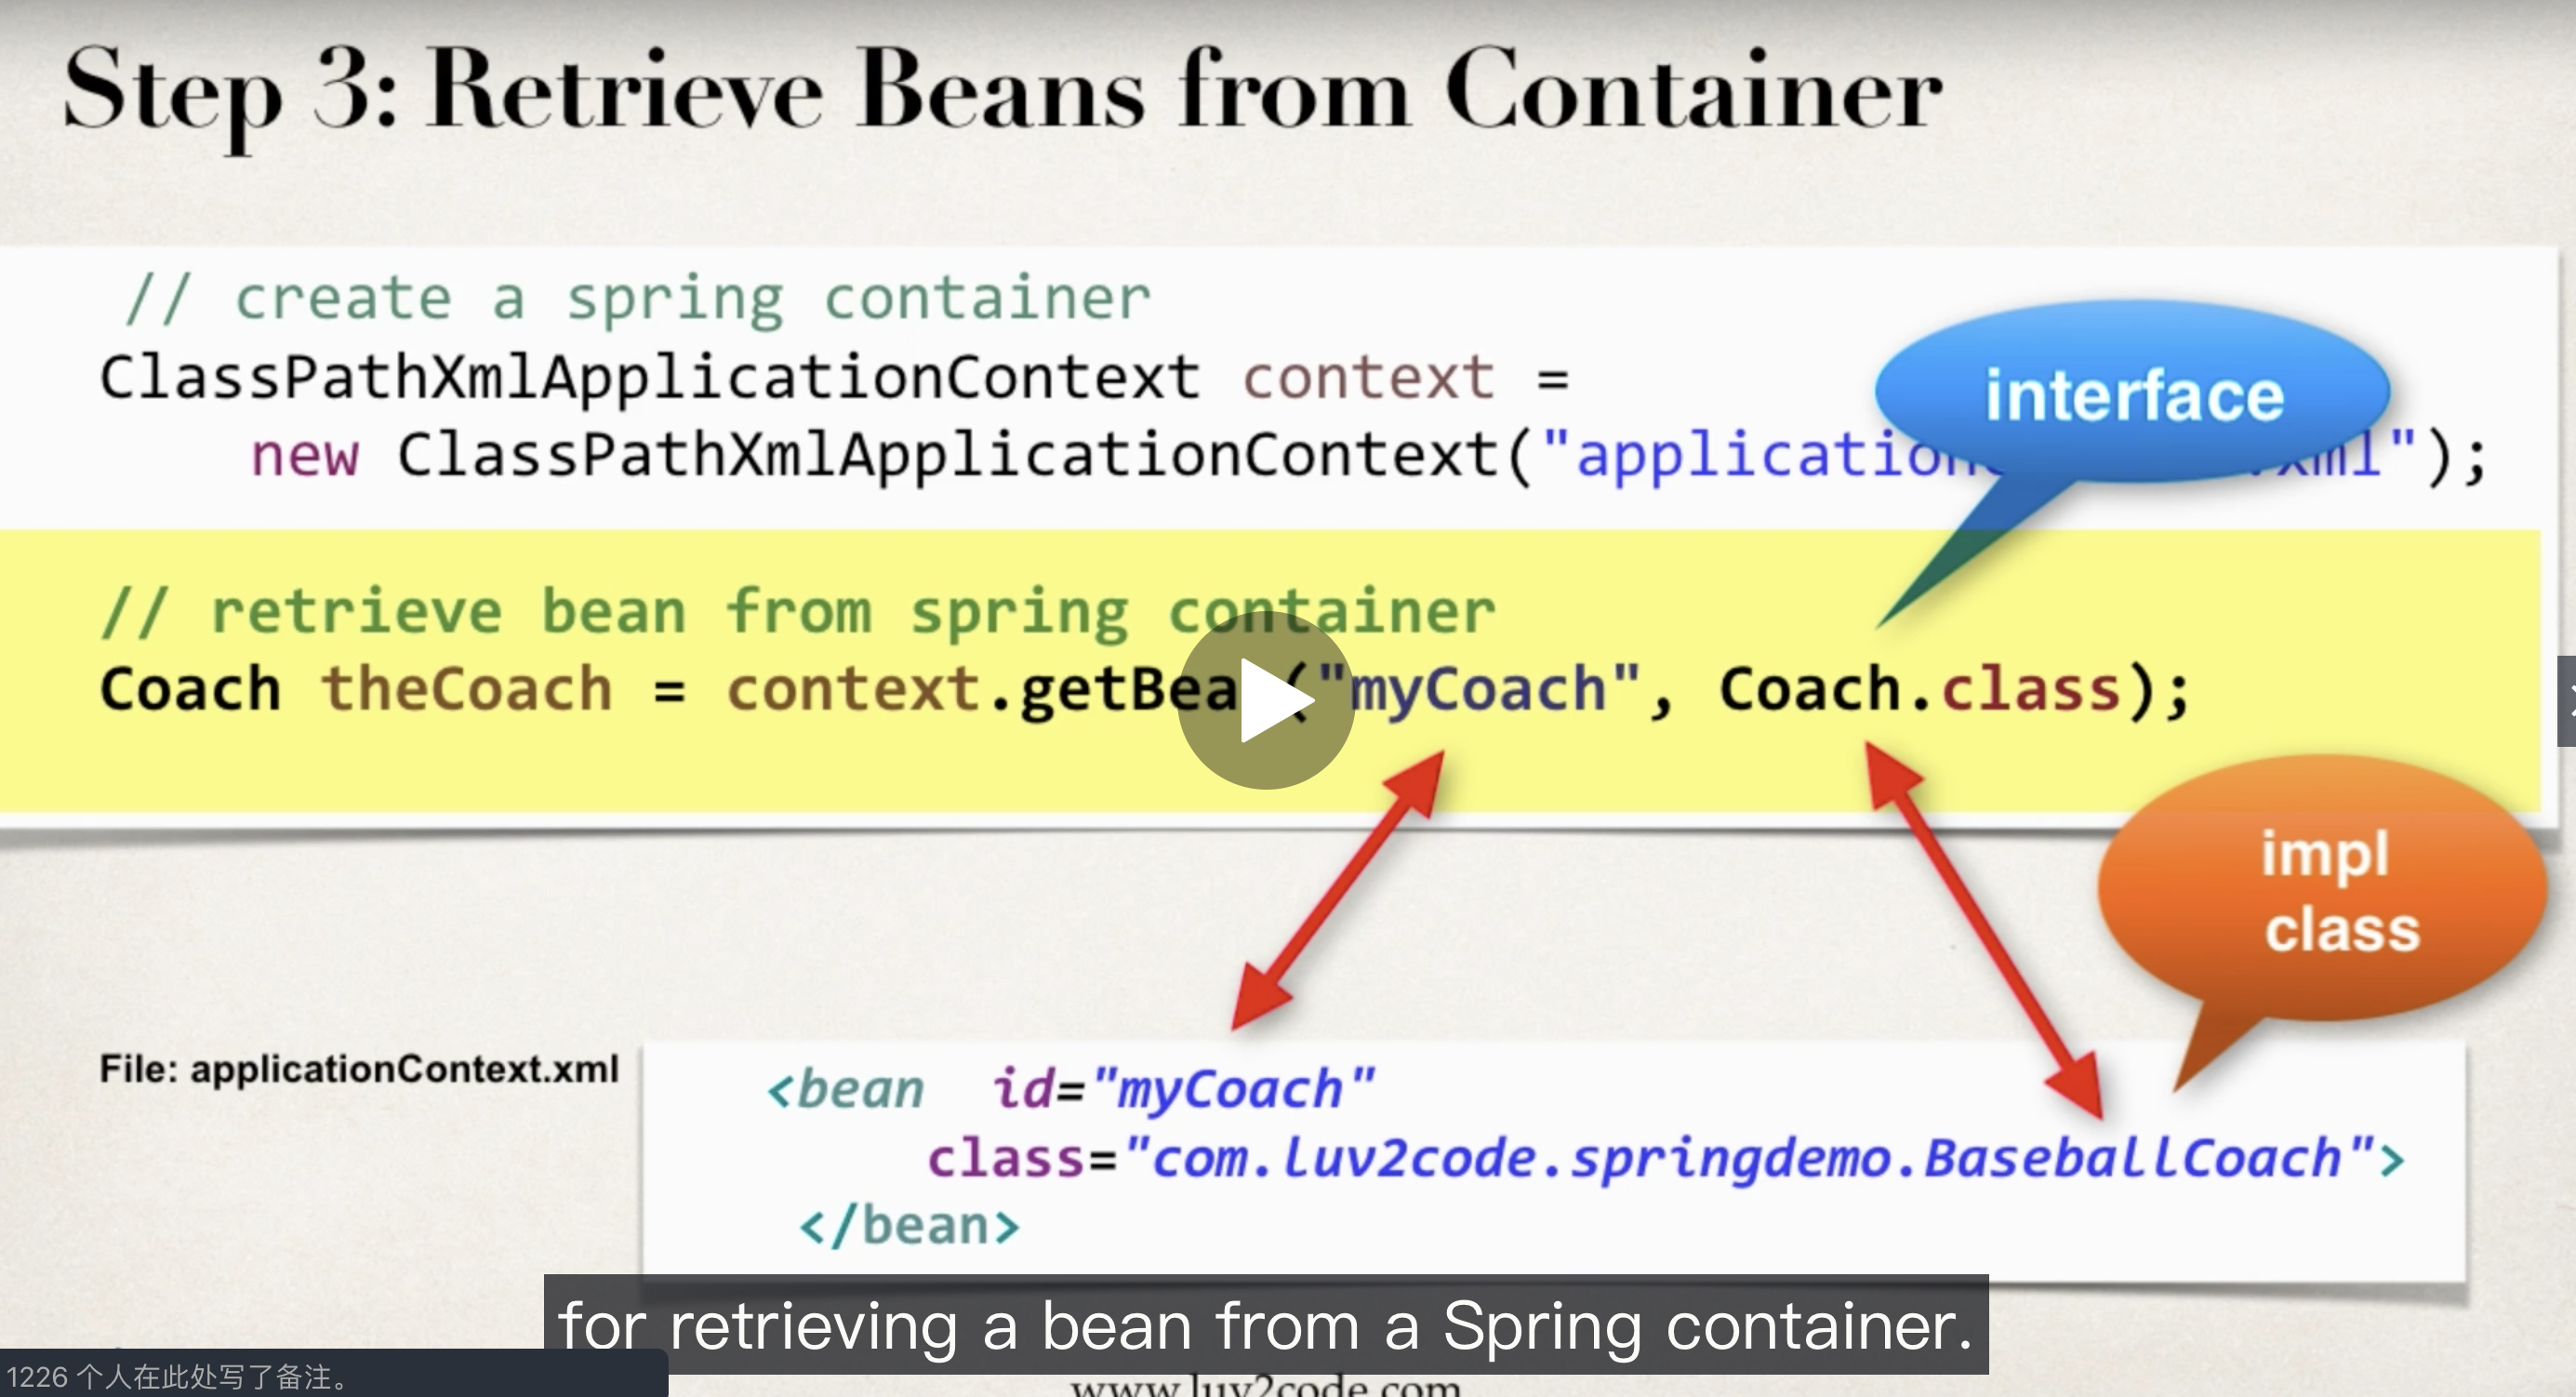
- Retrieve Beans from Spring Container

What is a Spring Bean?
A “Spring Bean” is simply a Java object.
When Java objects are created by the Spring Container, then Spring refers to them as “Spring Beans”.
Spring Beans are created from normal Java classes …. just like Java objects.
Spring Dependency Injection - XML Configuration
In my words, the framework(spring) will add all dependencies you need to the object.
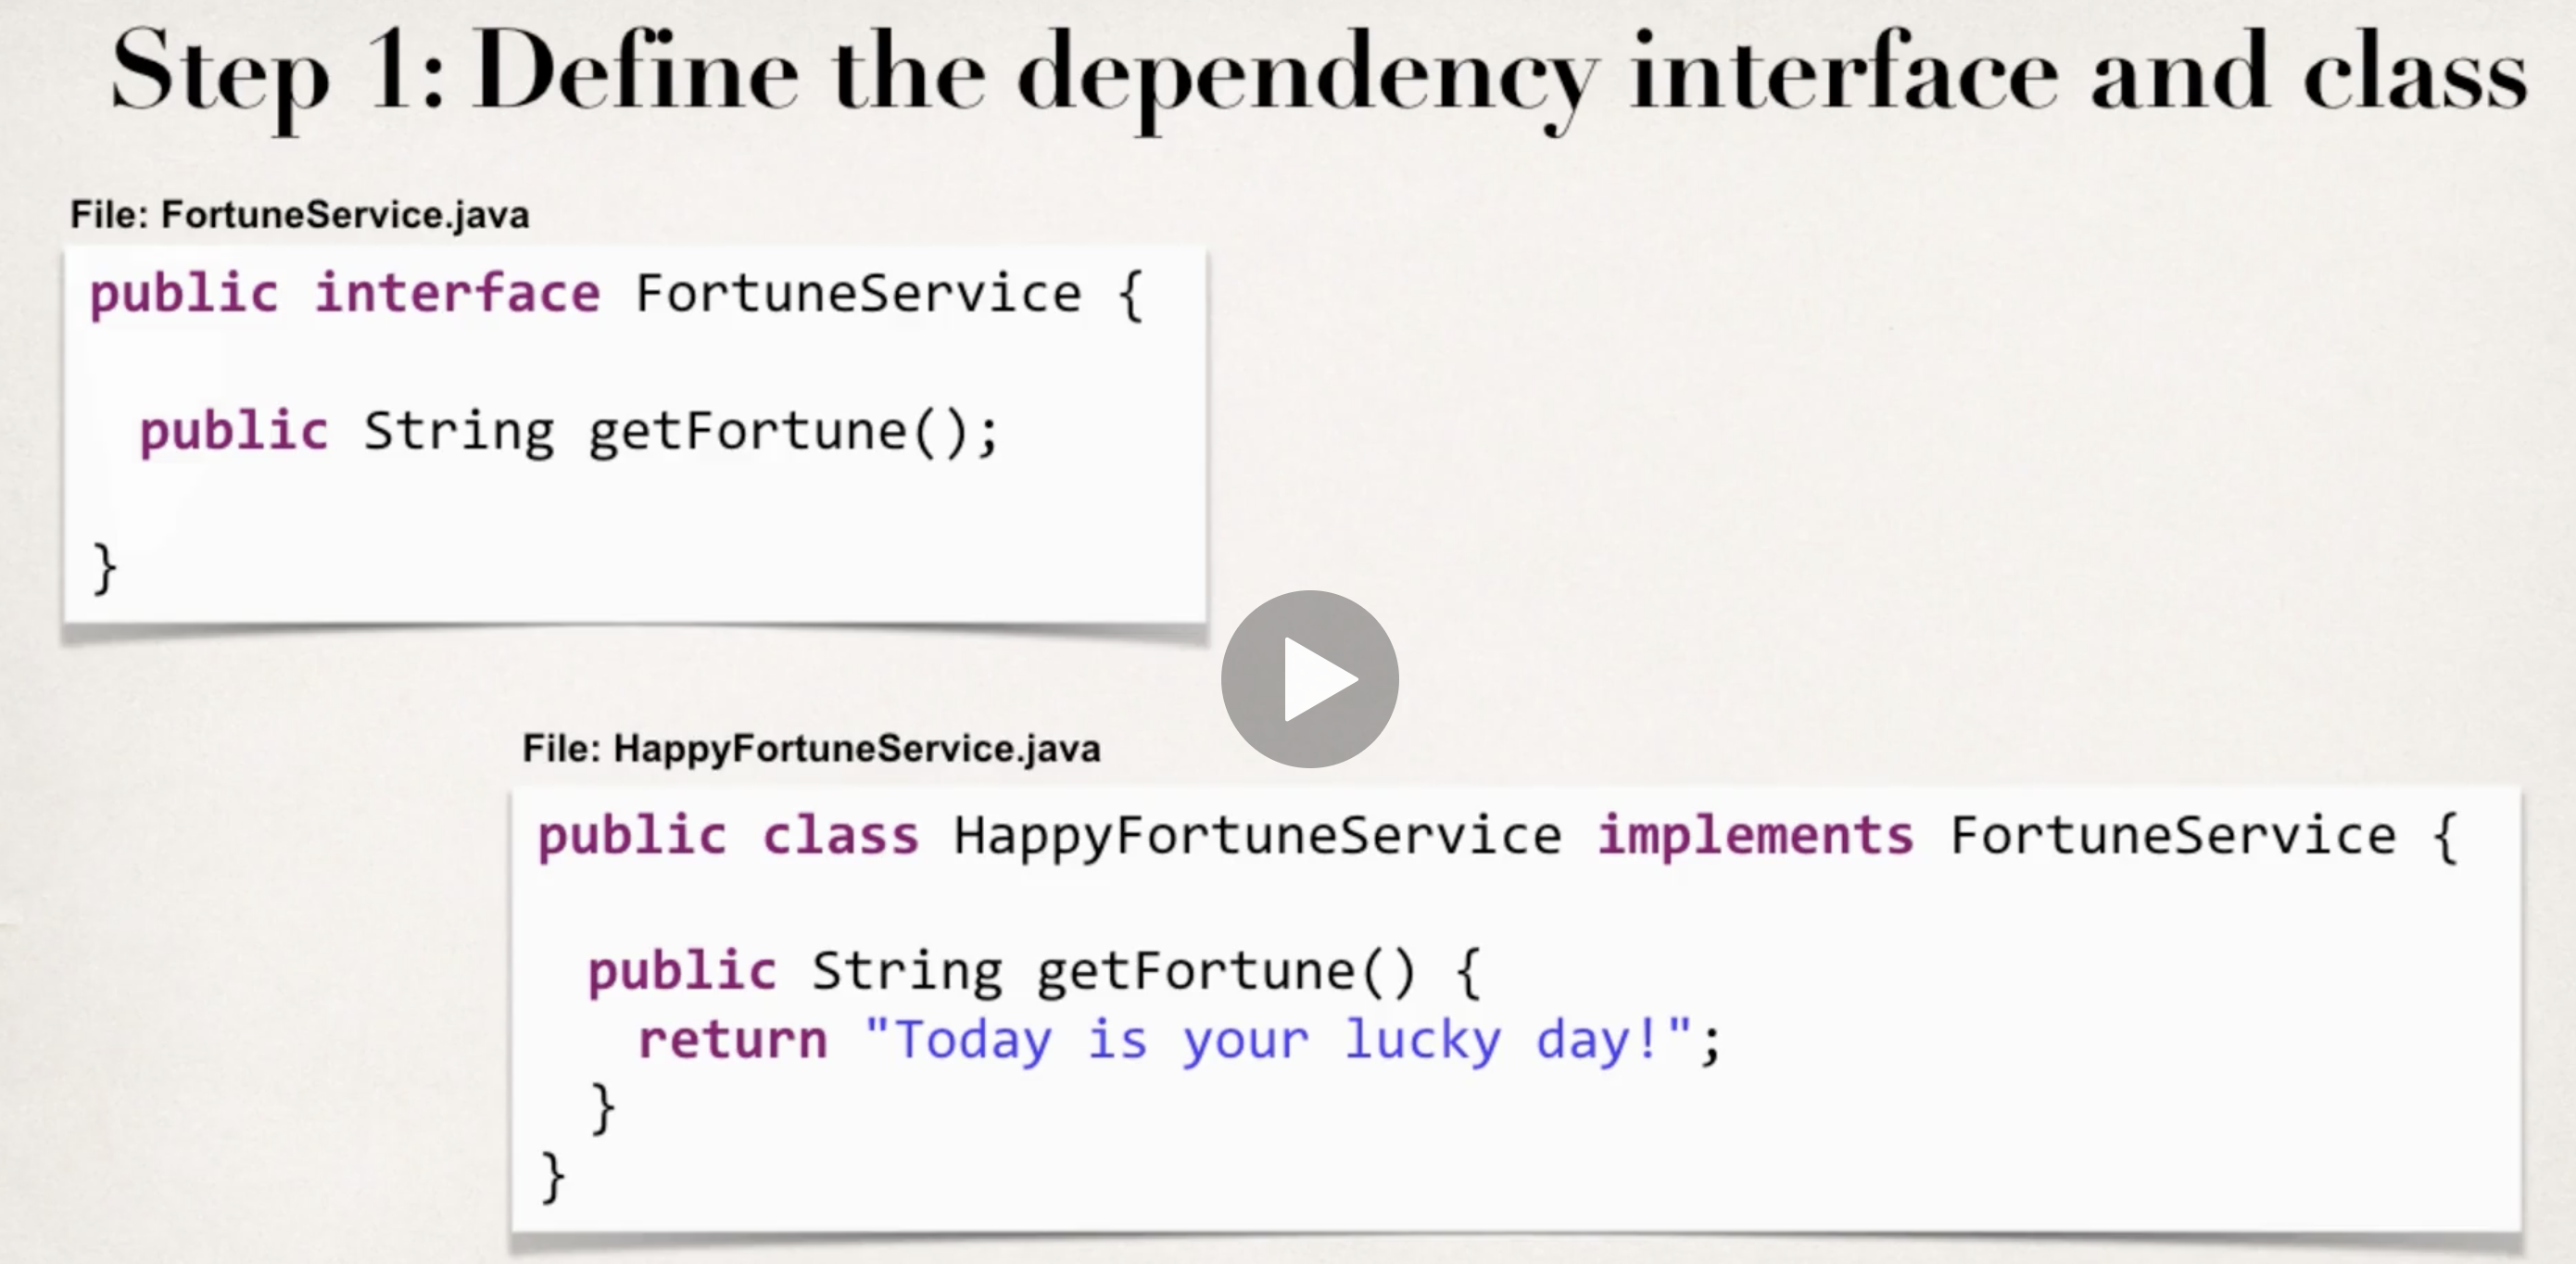
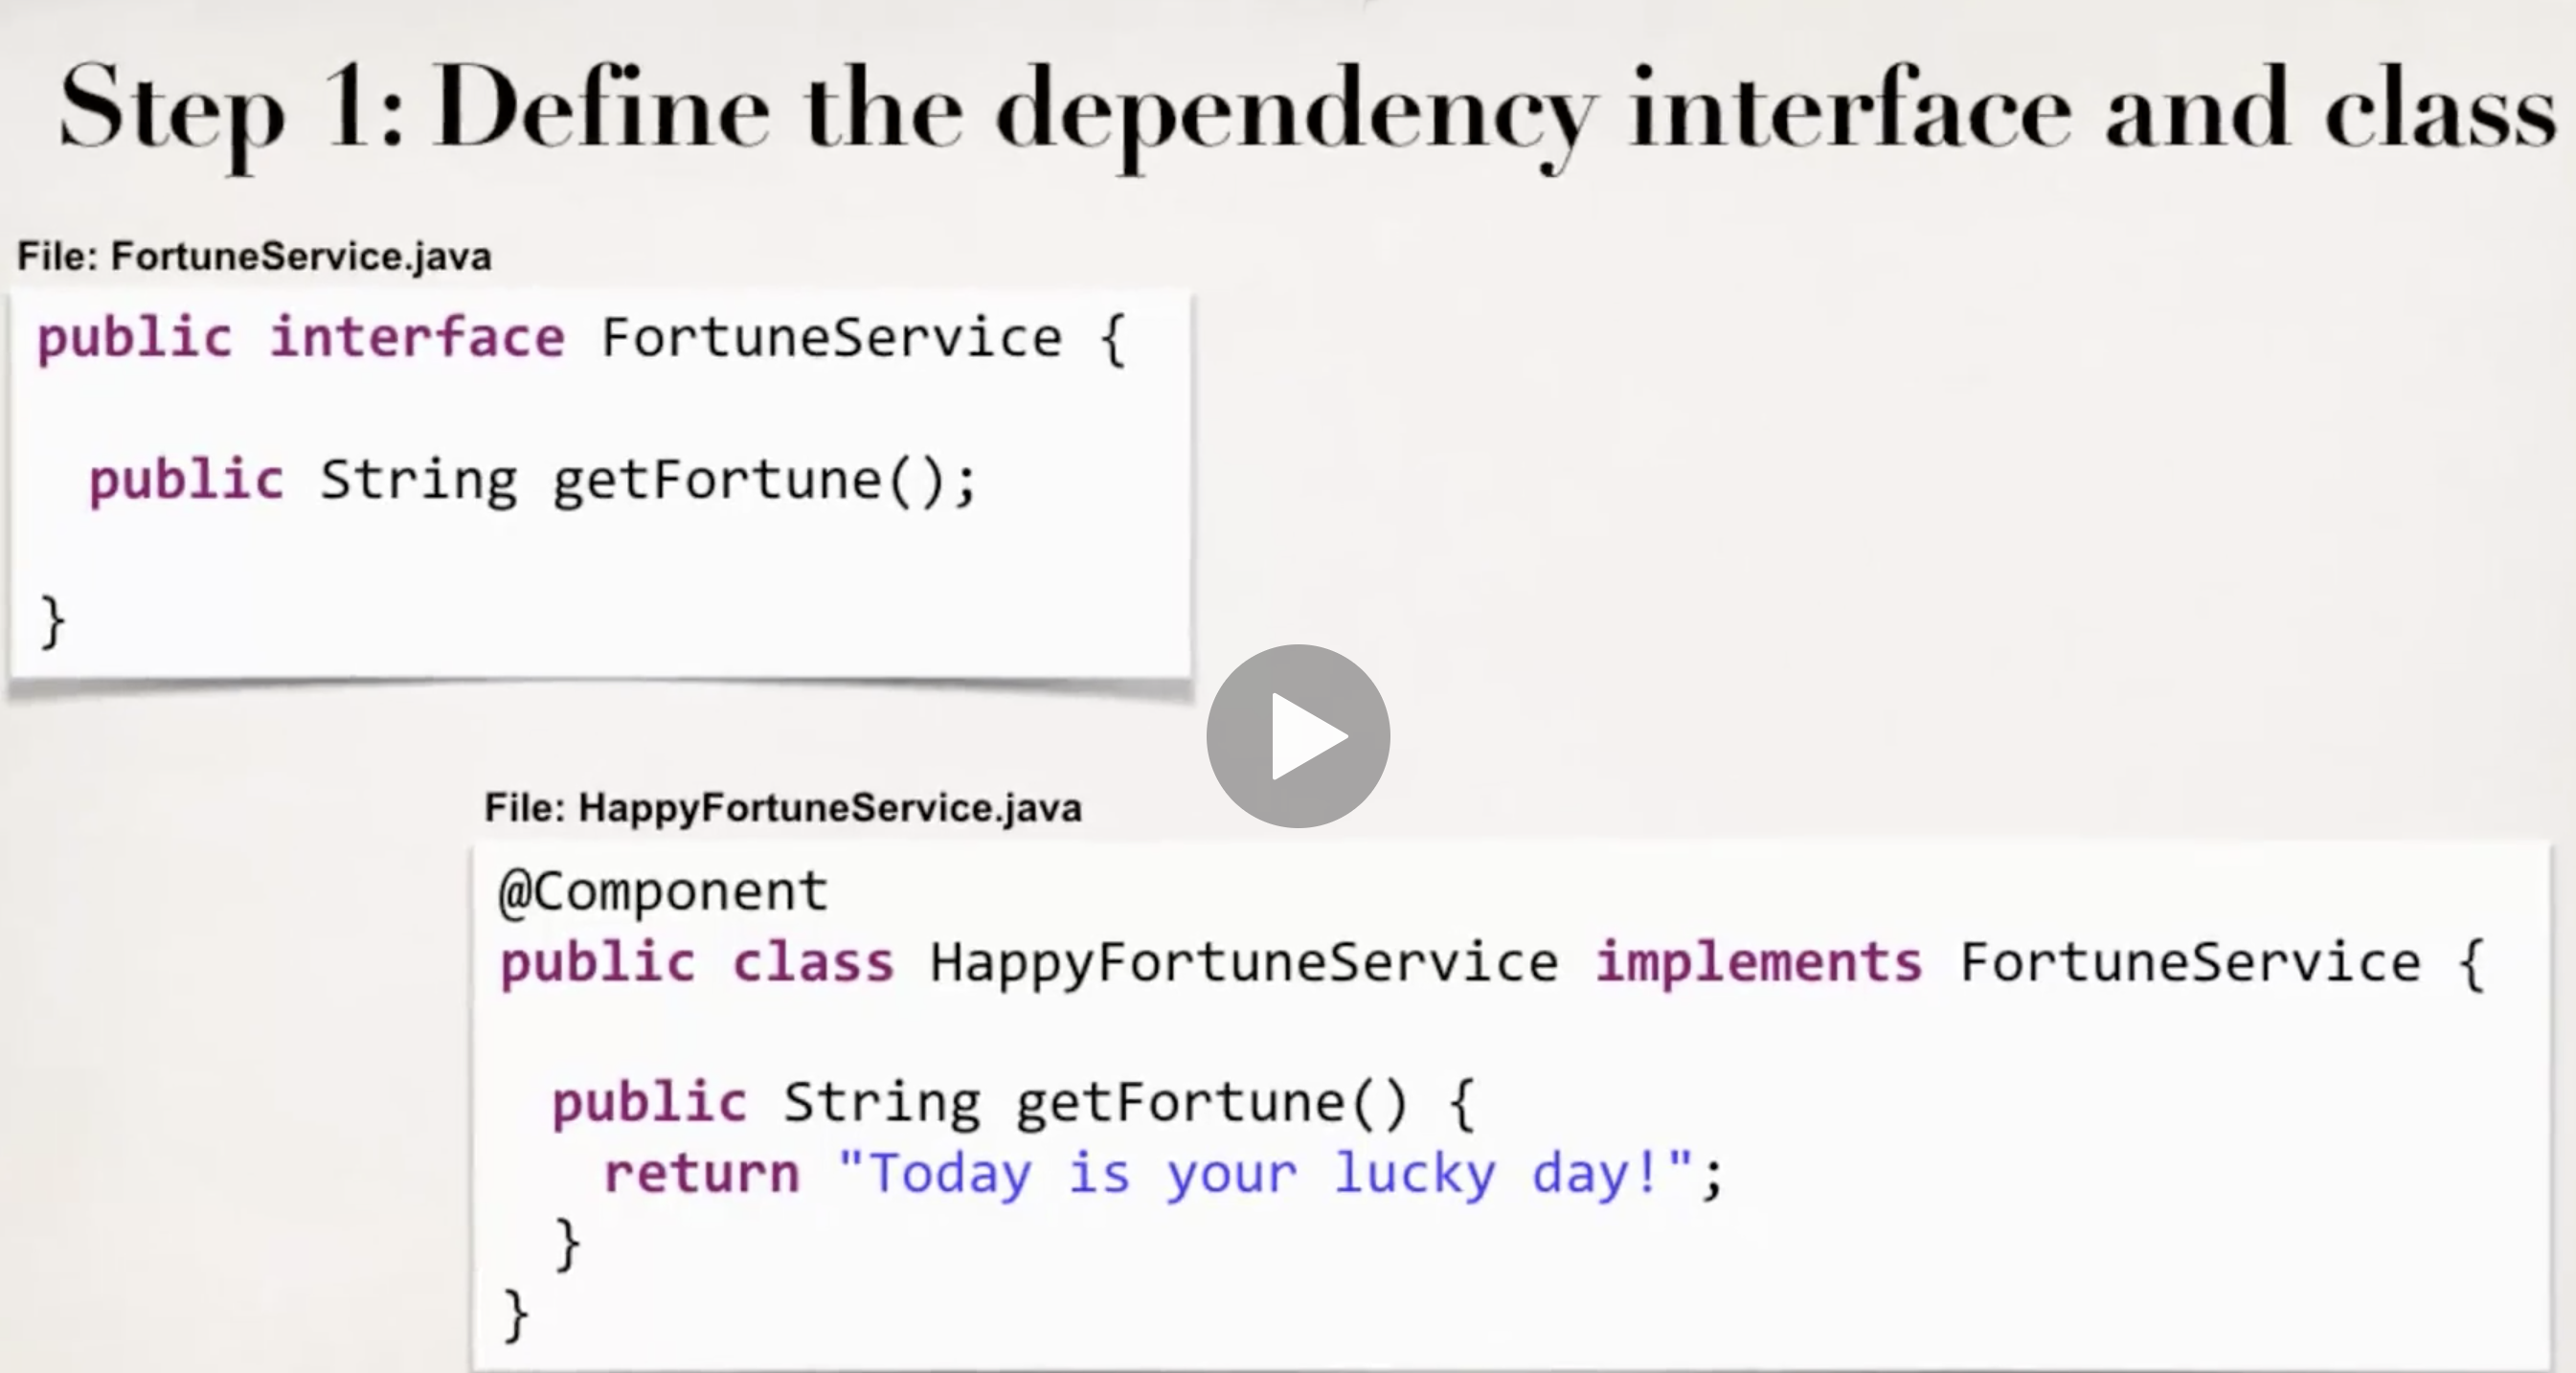
Spring Development Process - Constructor Injection
- Define the dependency interface and class
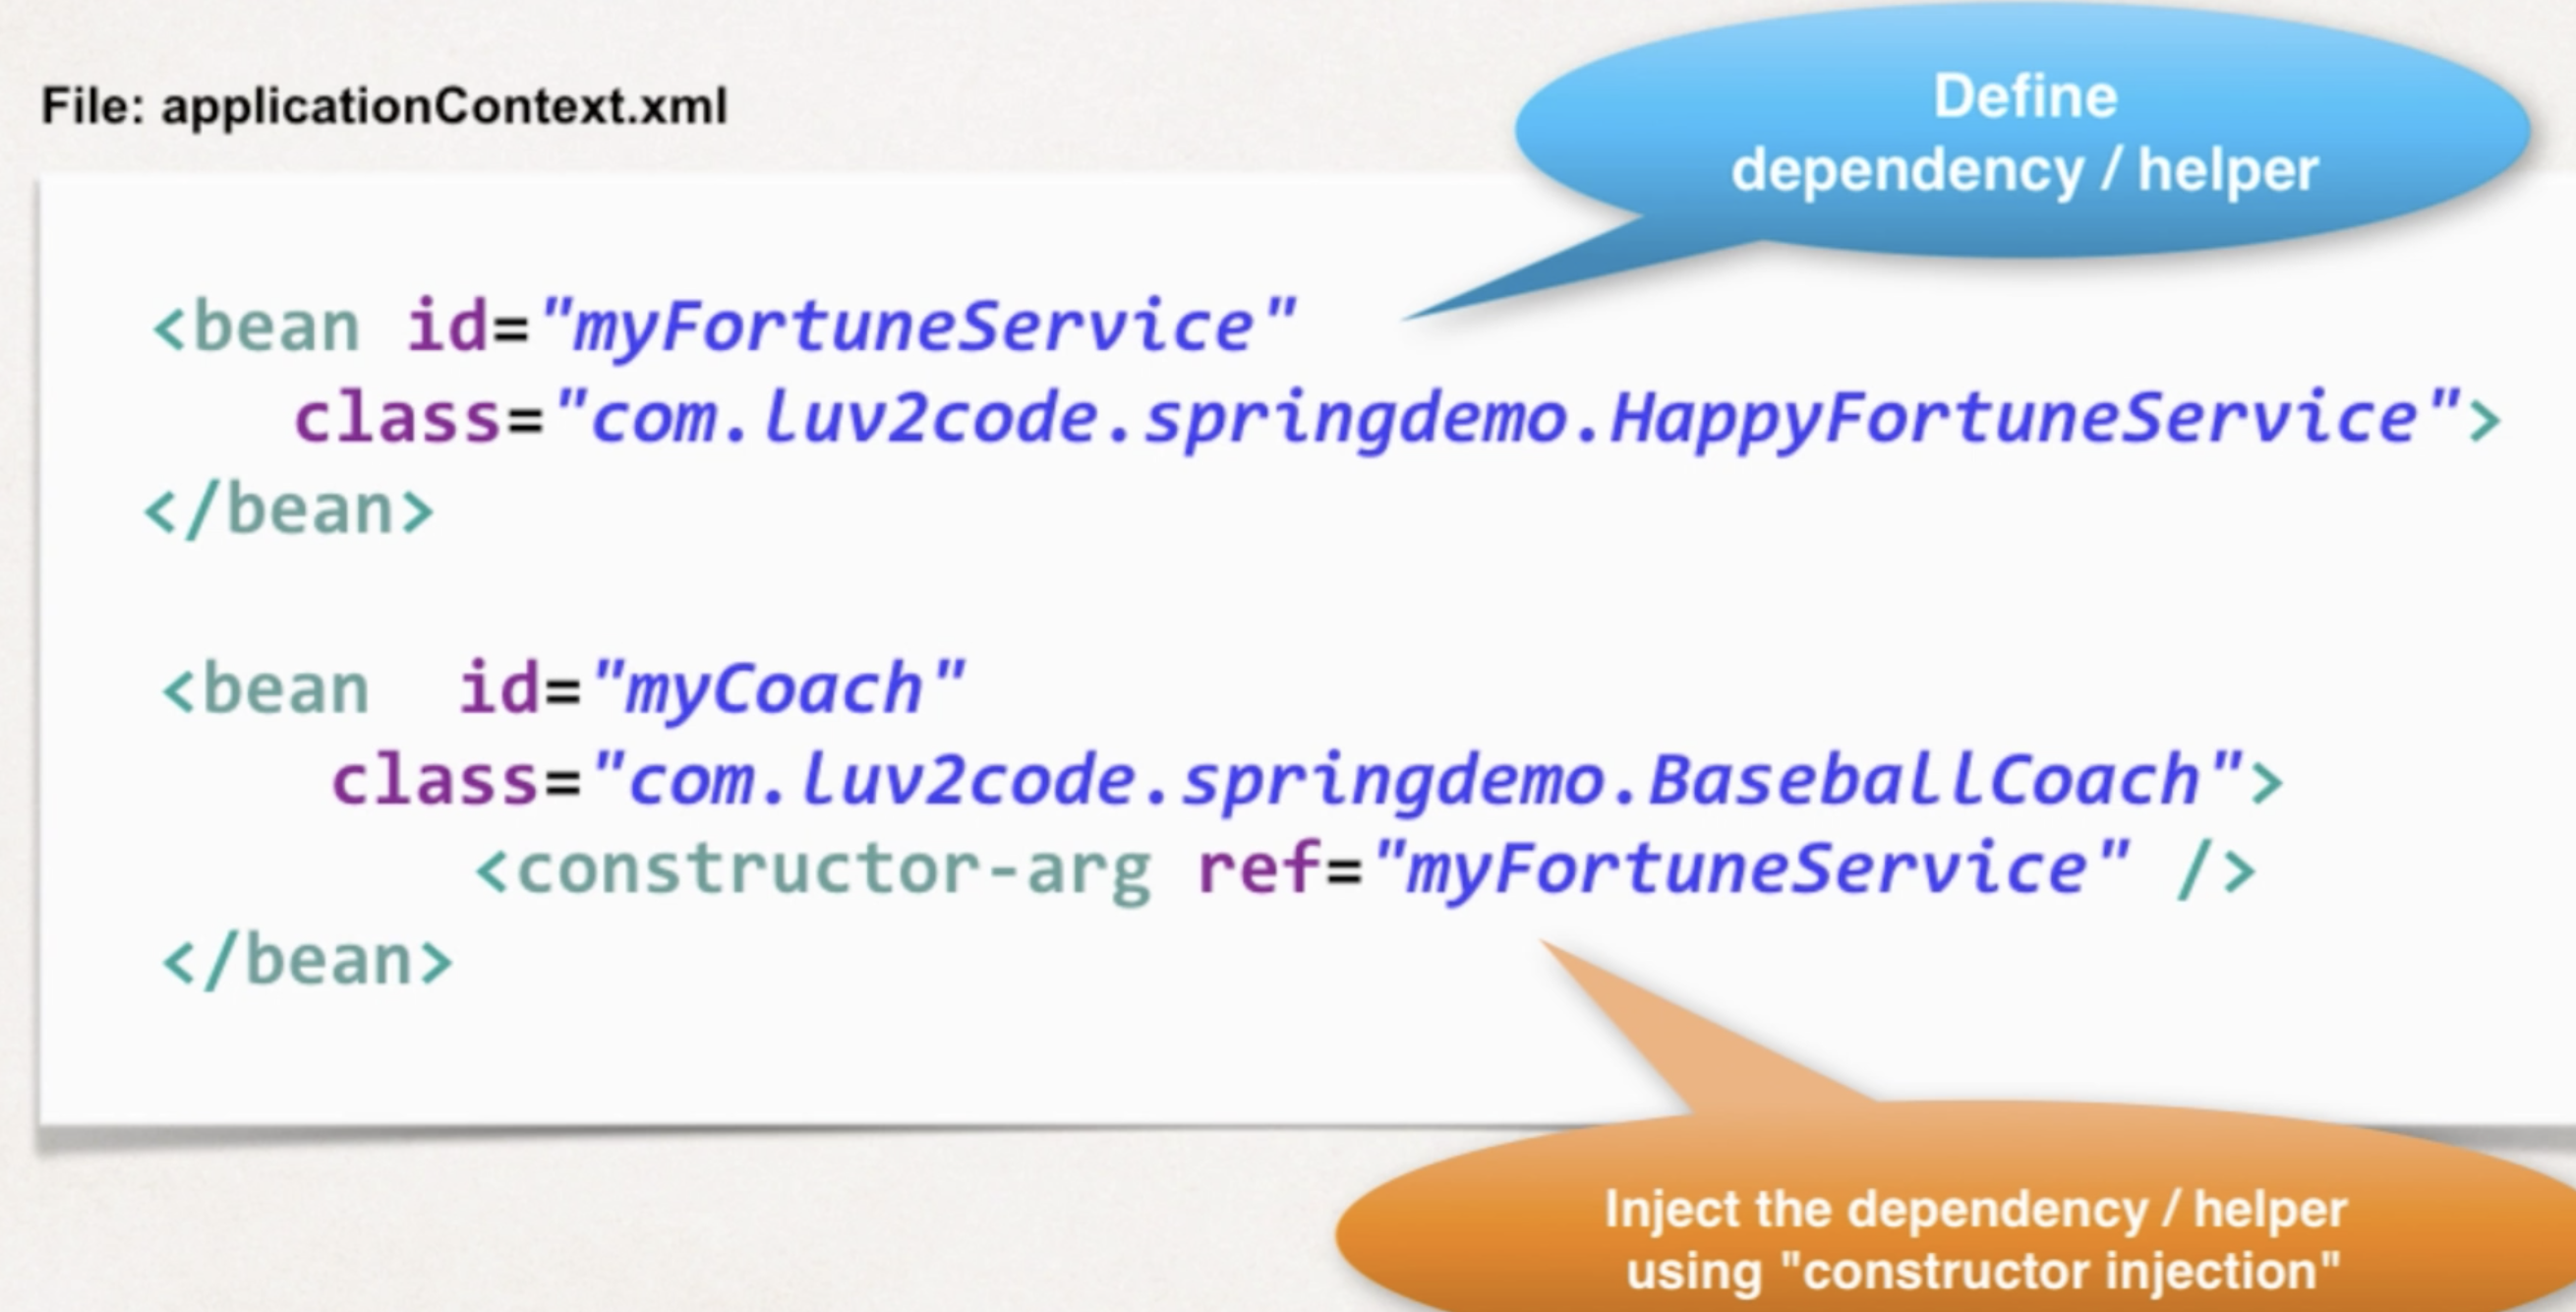
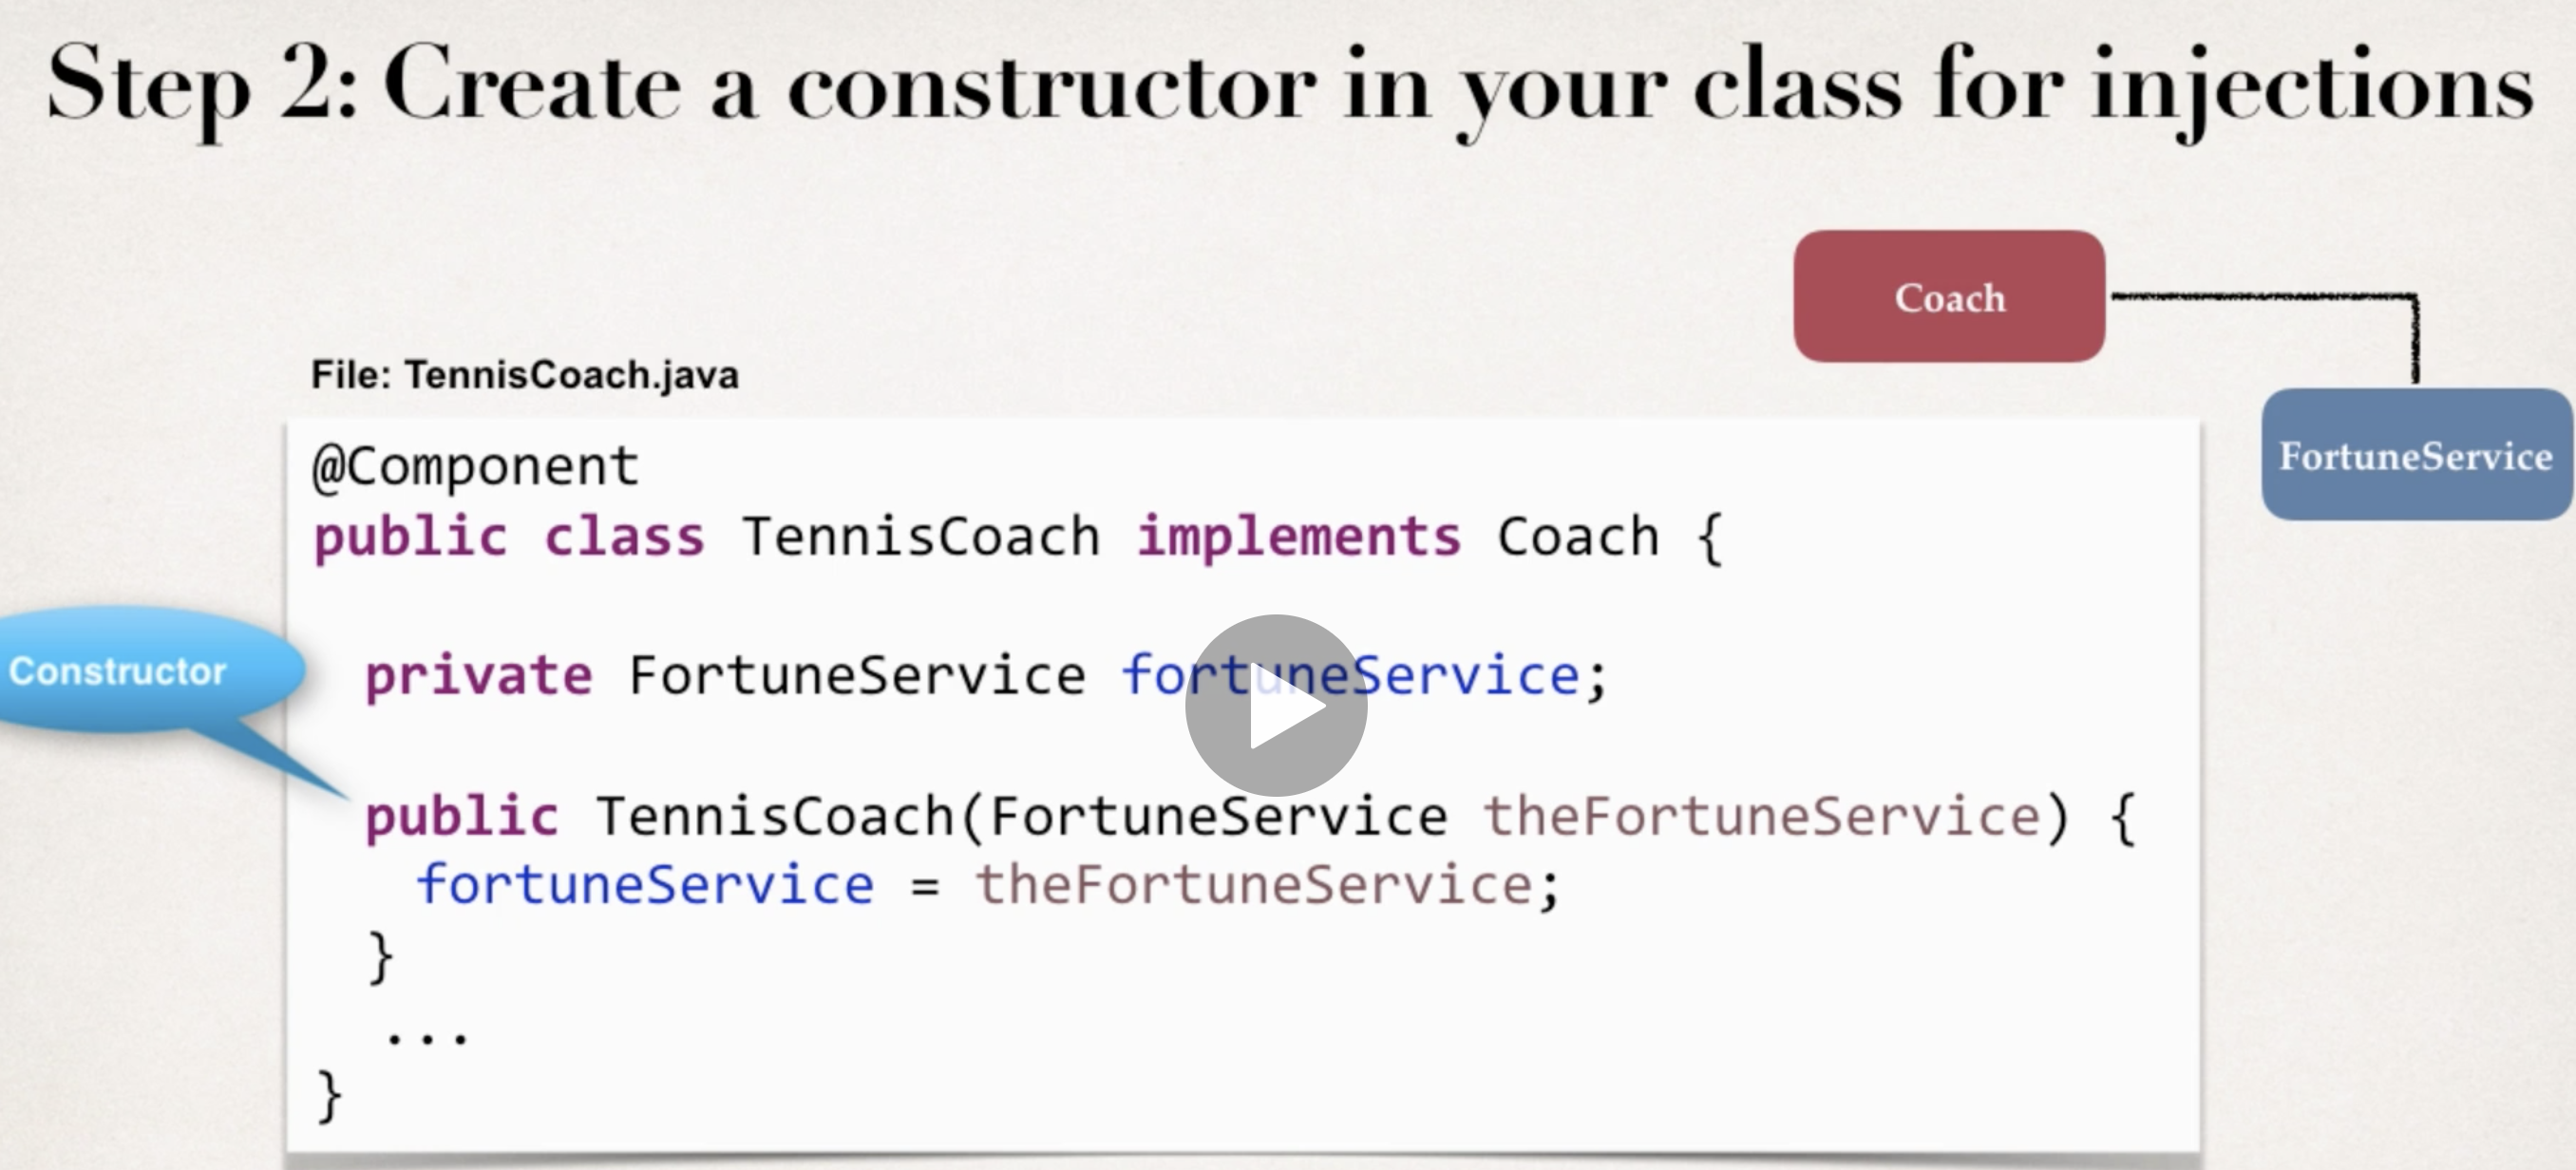
- Create a constructor in your class for injections.

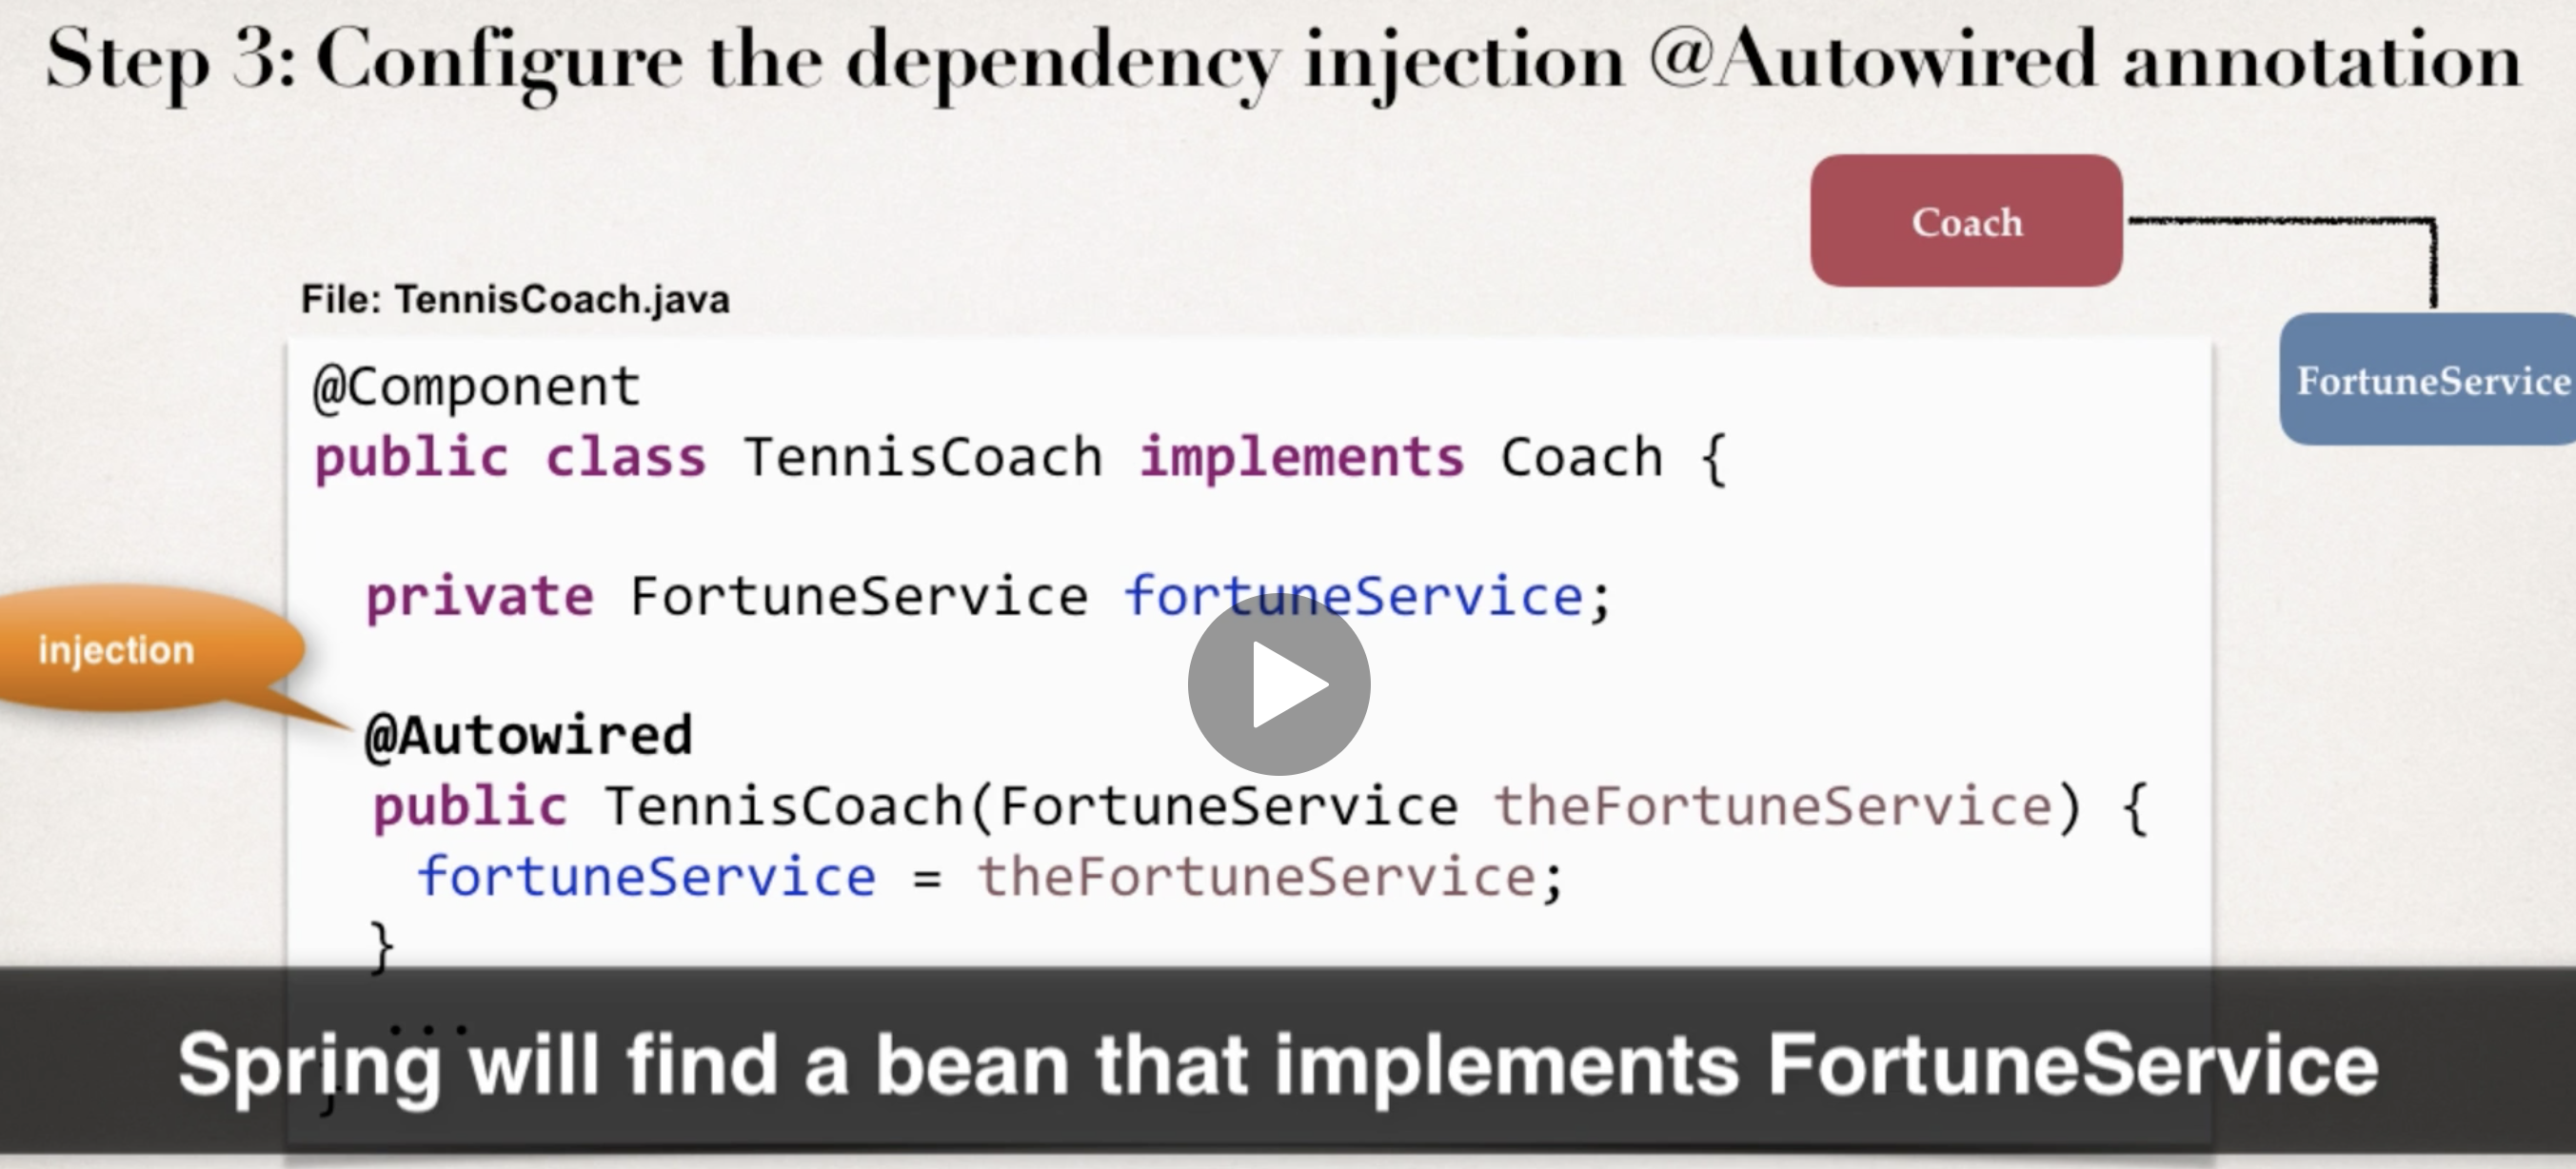
- Configure the dependency injection in your Spring config file
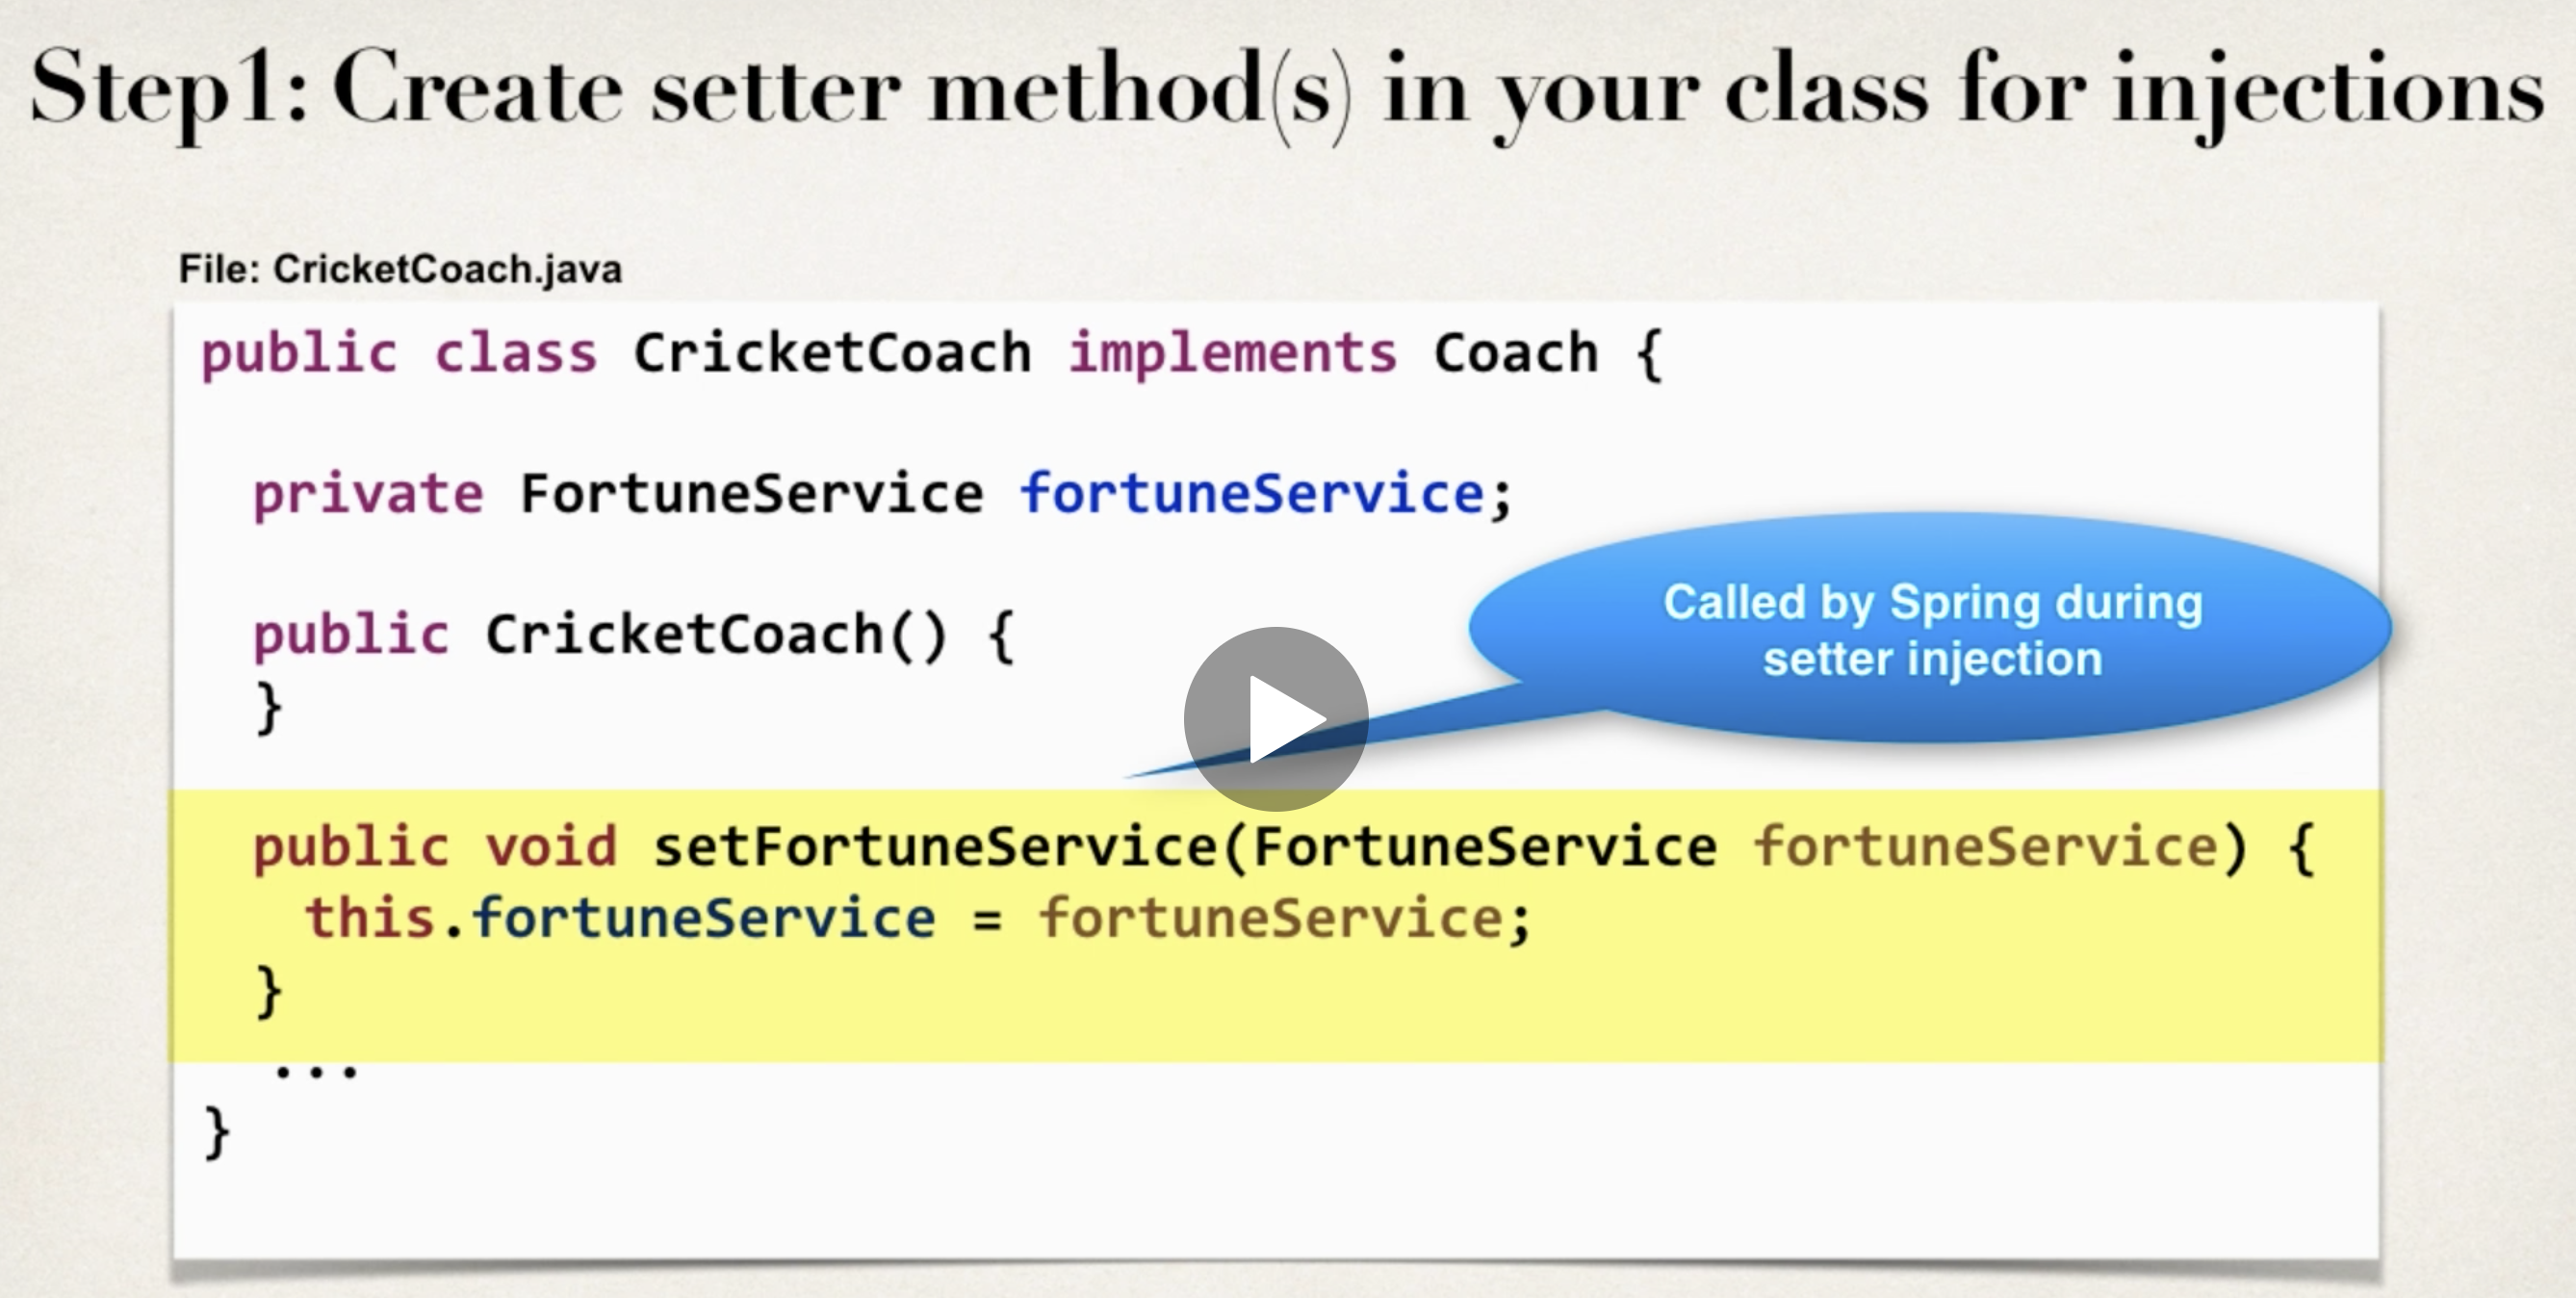
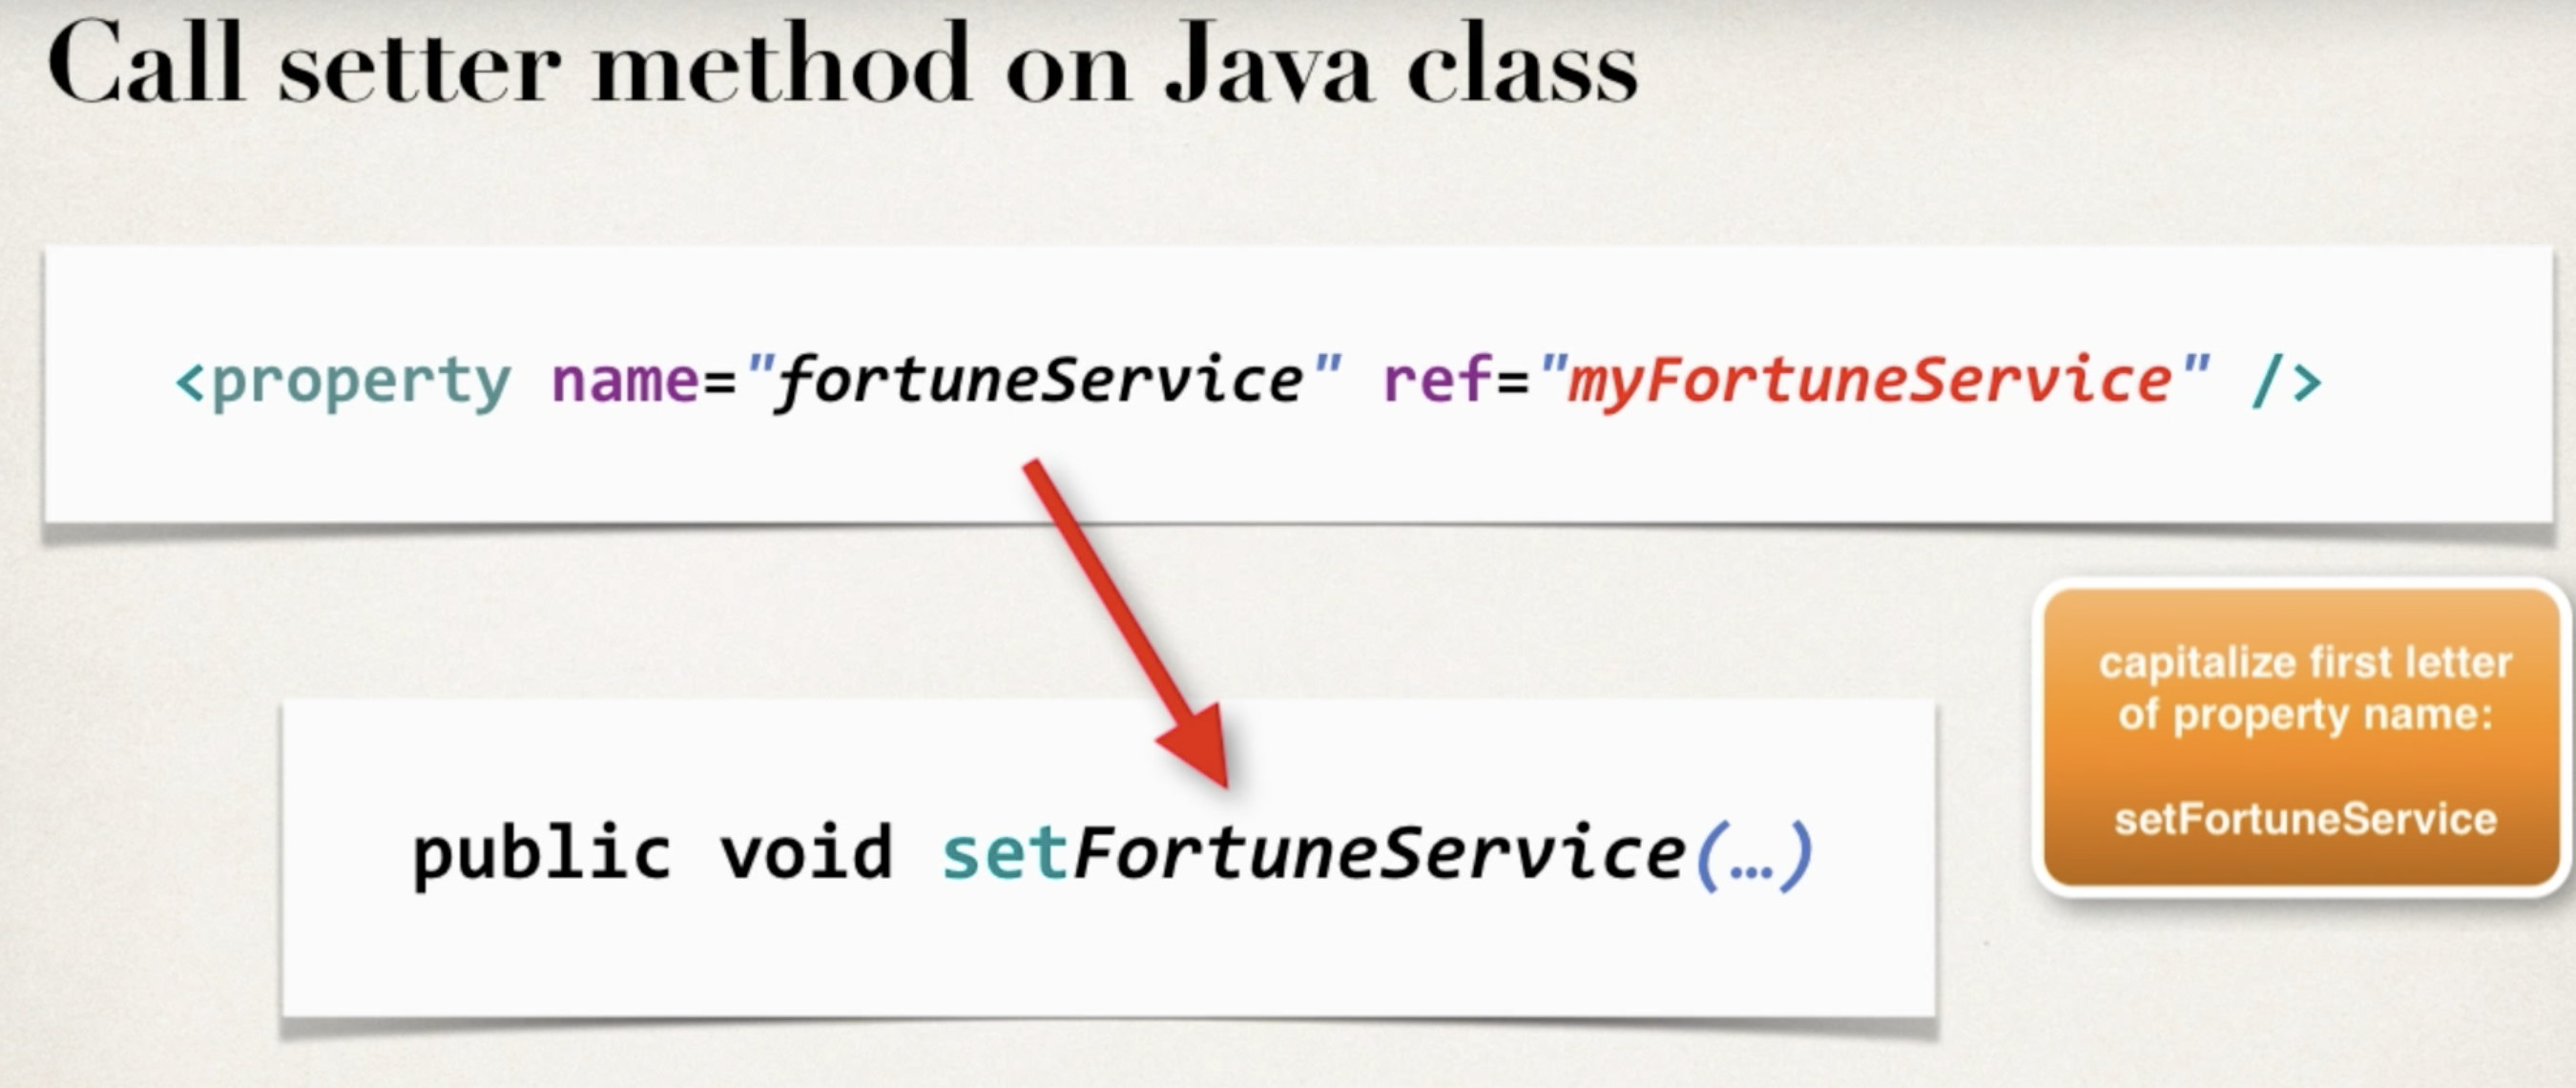
Spring Development Process - Setter Injection
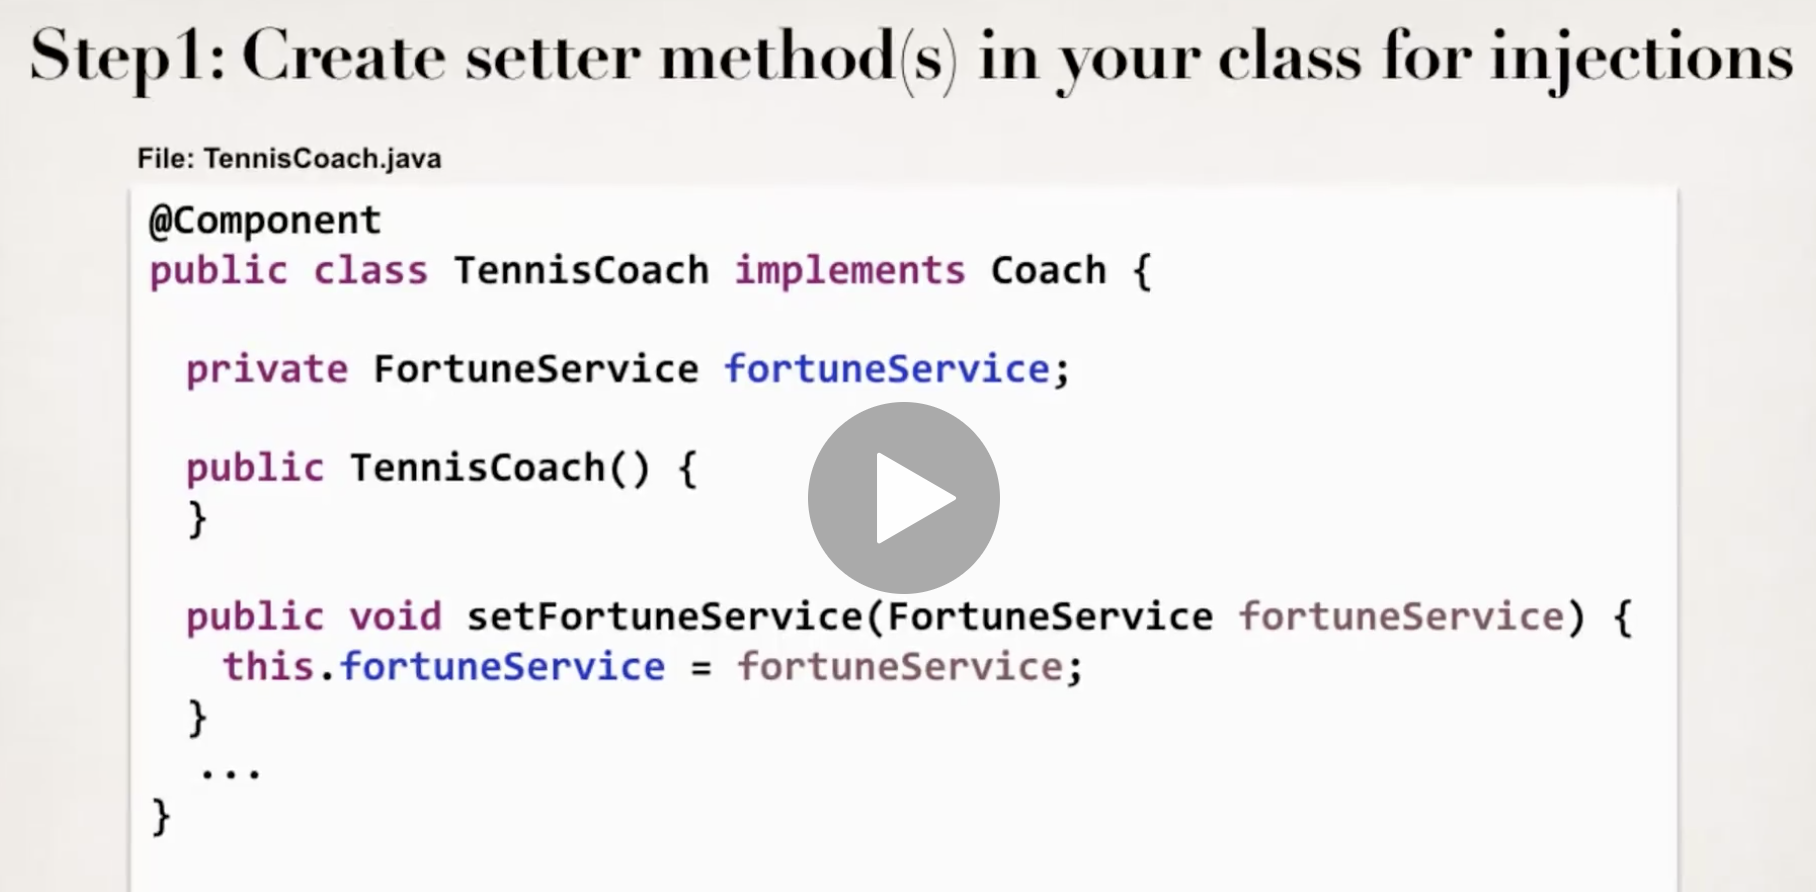
- Create setter method(s) in your class for injections
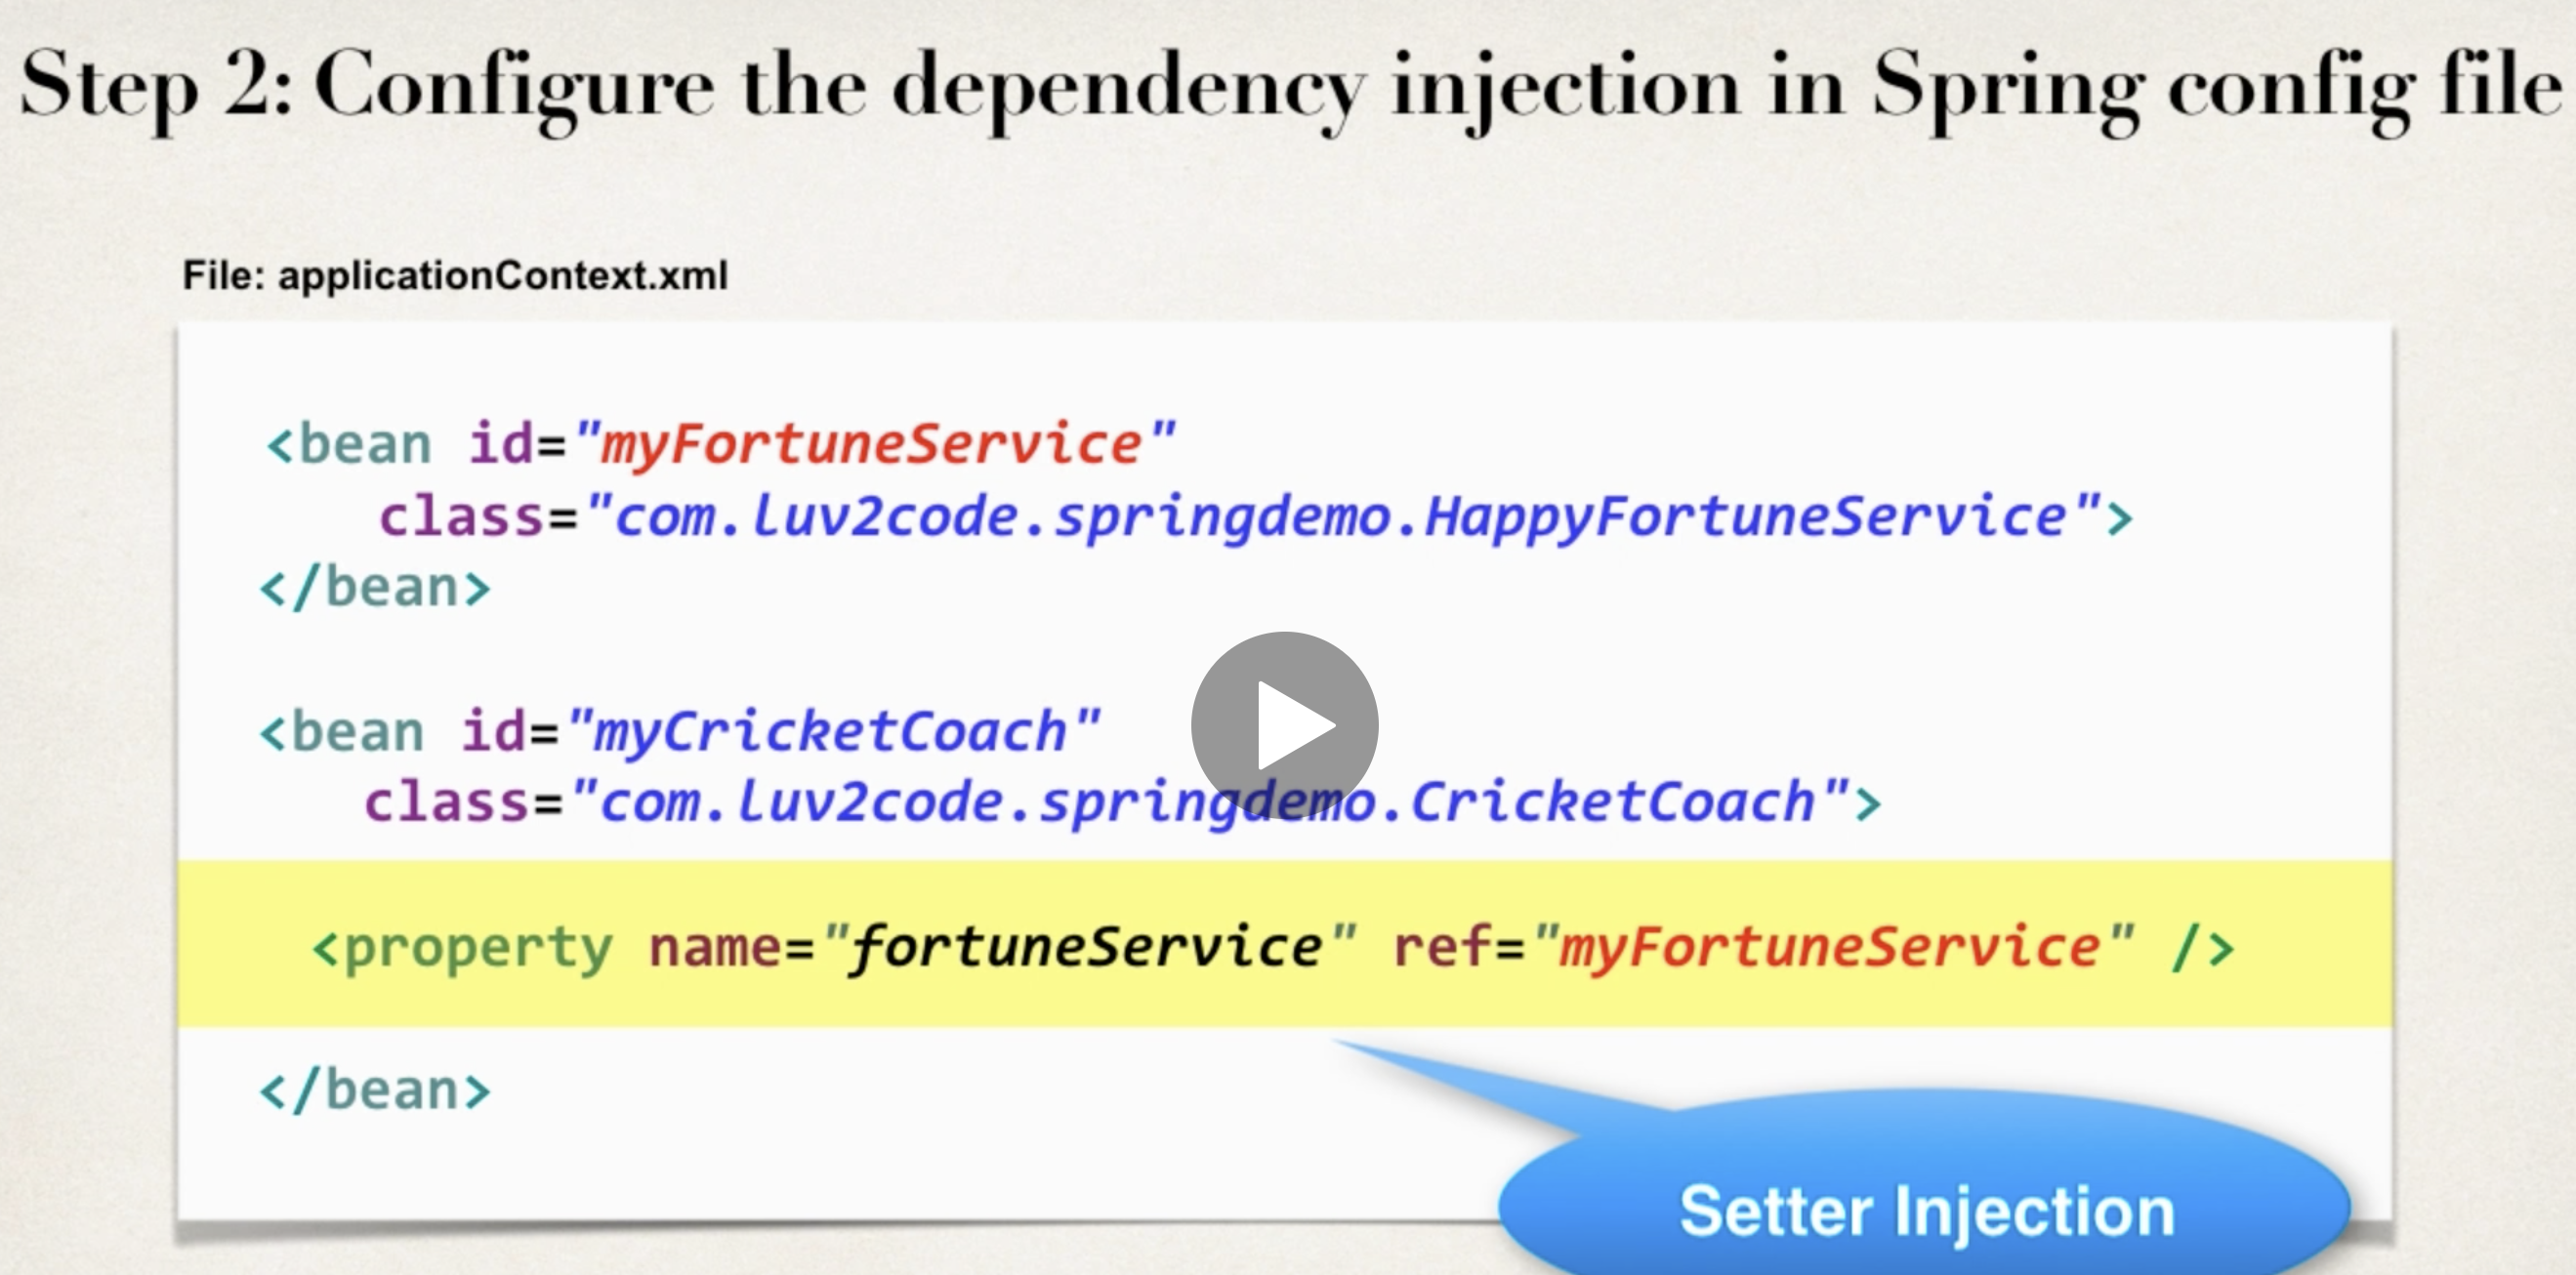
- Configure the dependency injection in the Spring config file.
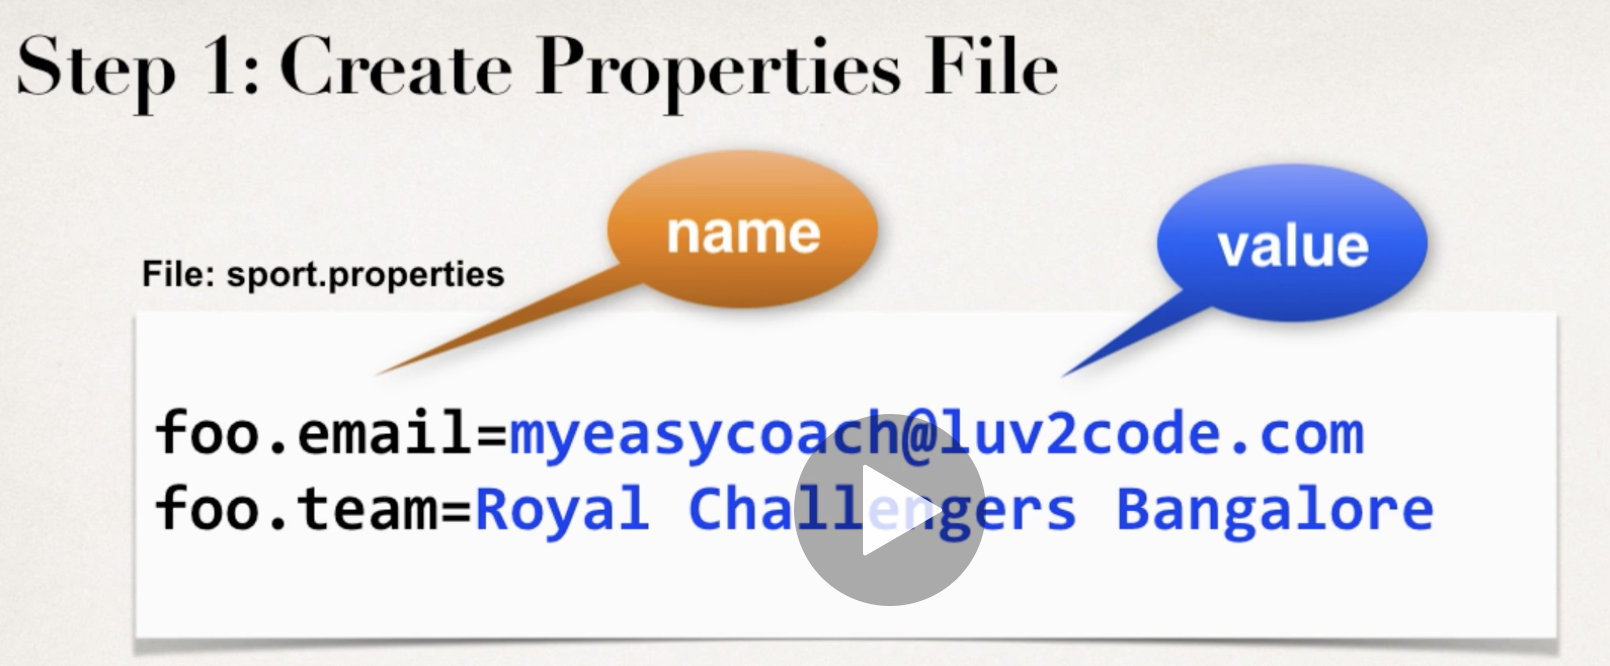
Injection Values from a Properties file
- Create Properties file
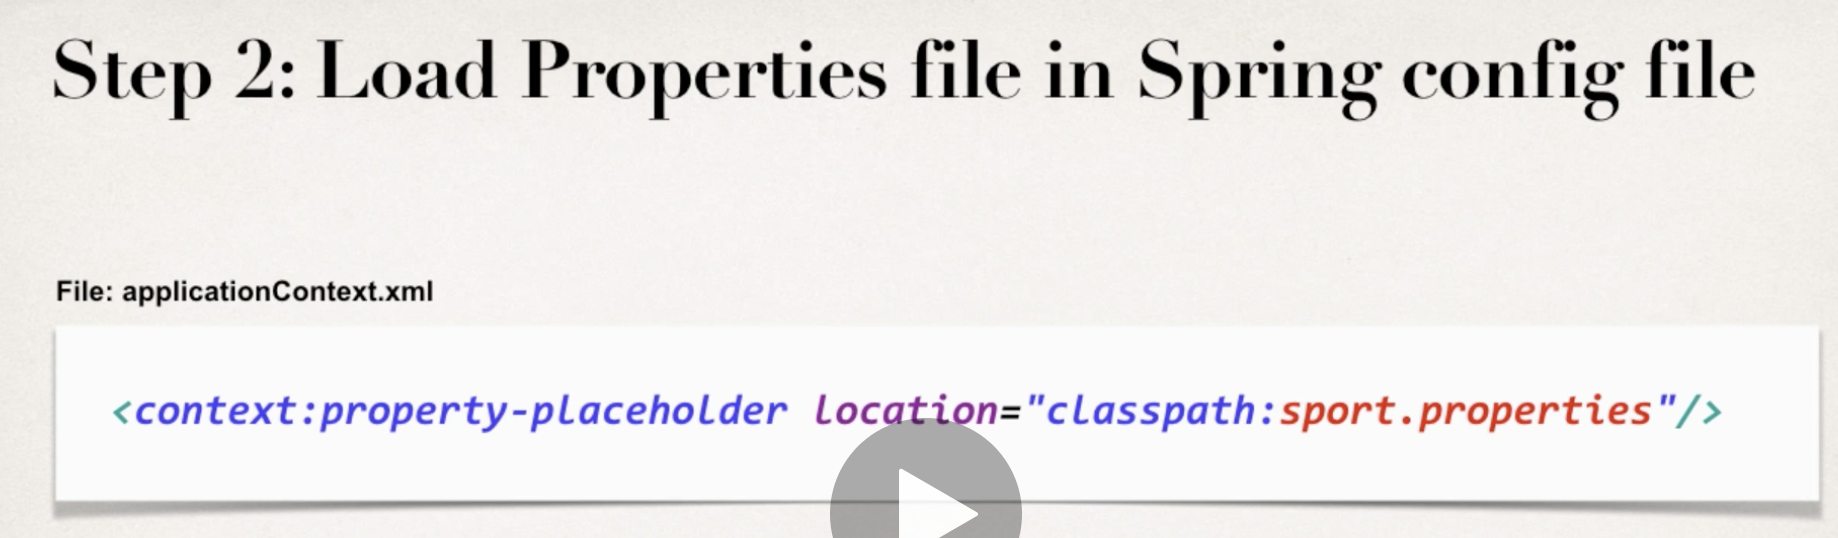
- Load Properties file in Spring config file
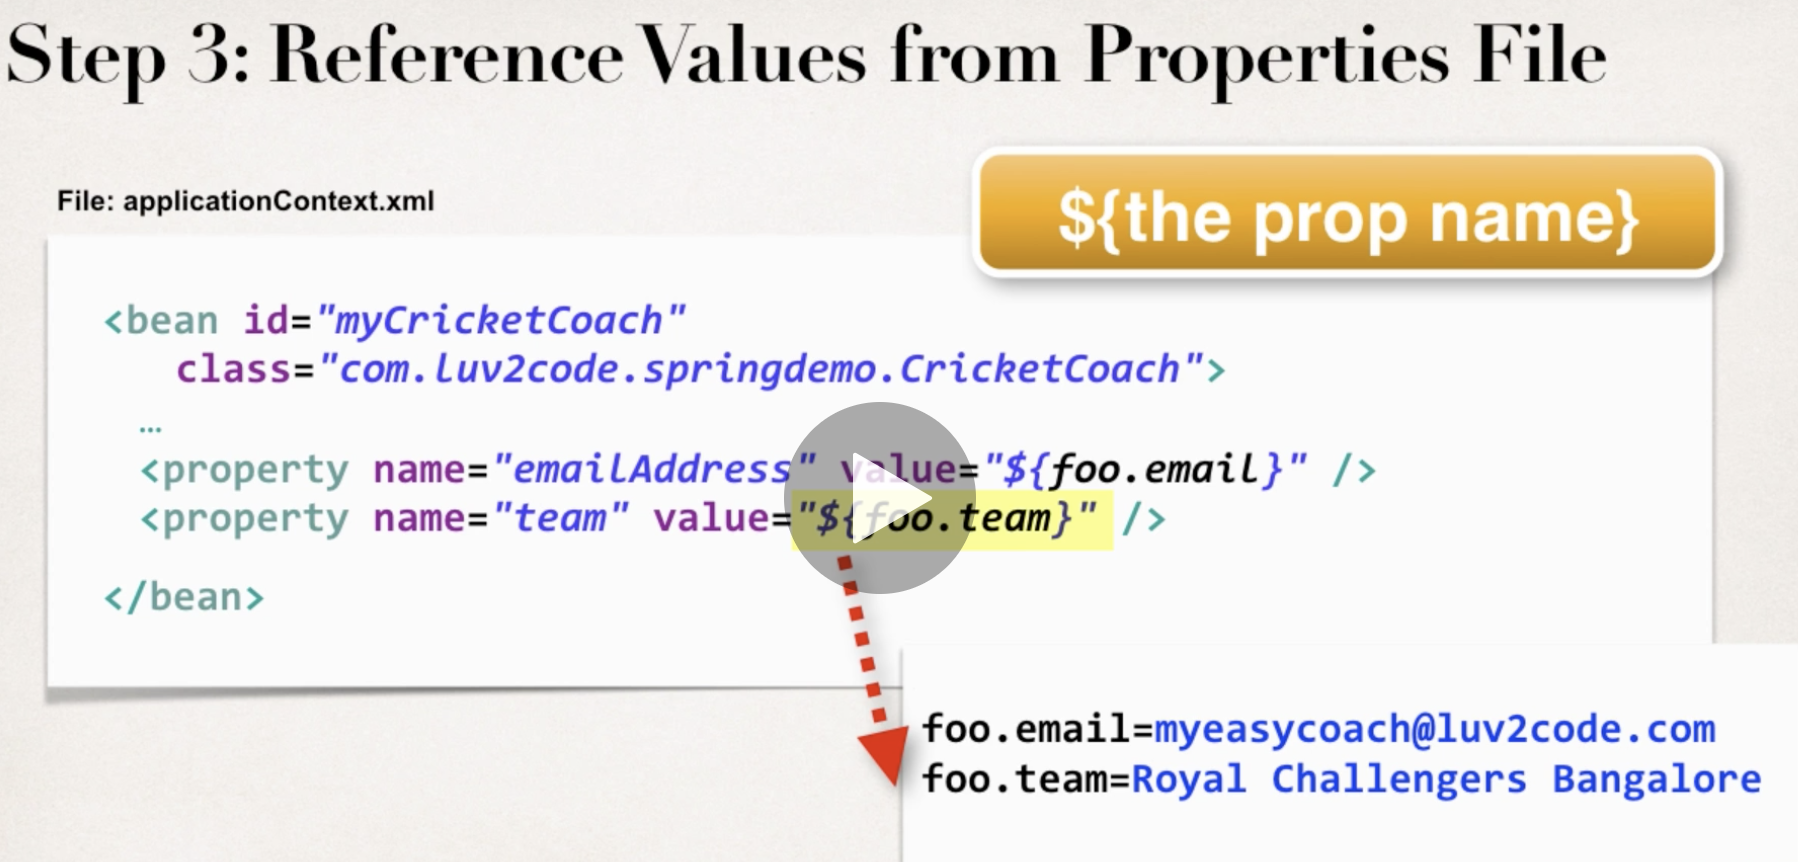
- Reference Values from Properties files
Spring Bean Scopes and Lifecycle
Bean Scopes
- Spring Container only creates one instance of the bean, by default
- It is cached in the memory.
- All requests for the bean will return a SHARED reference to the SAME bean
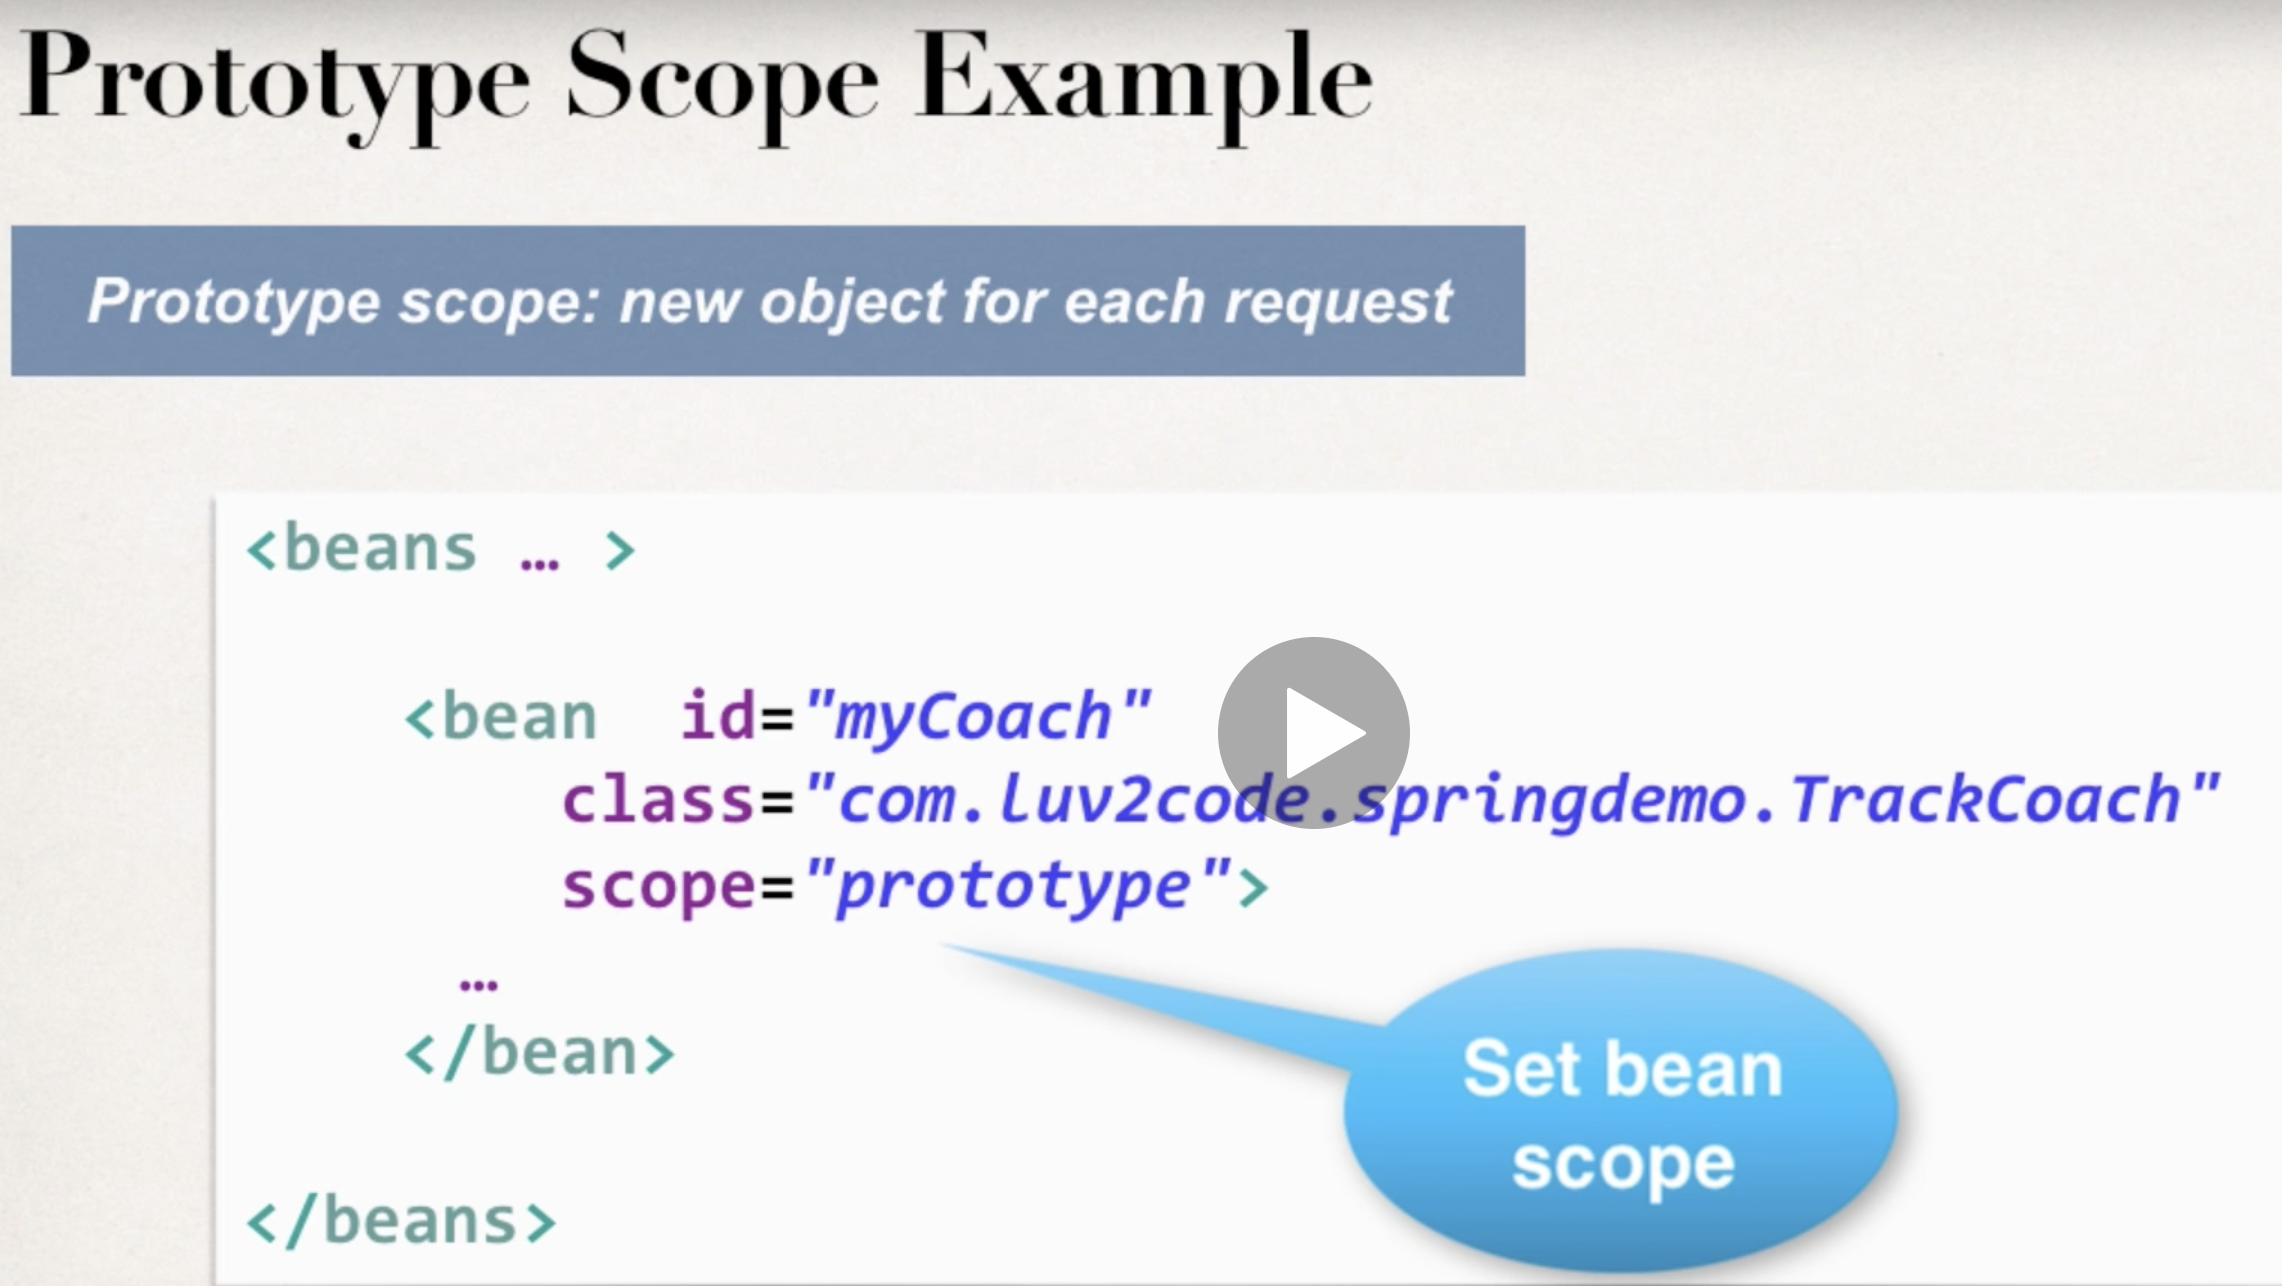
Additional Spring Bean Scopes
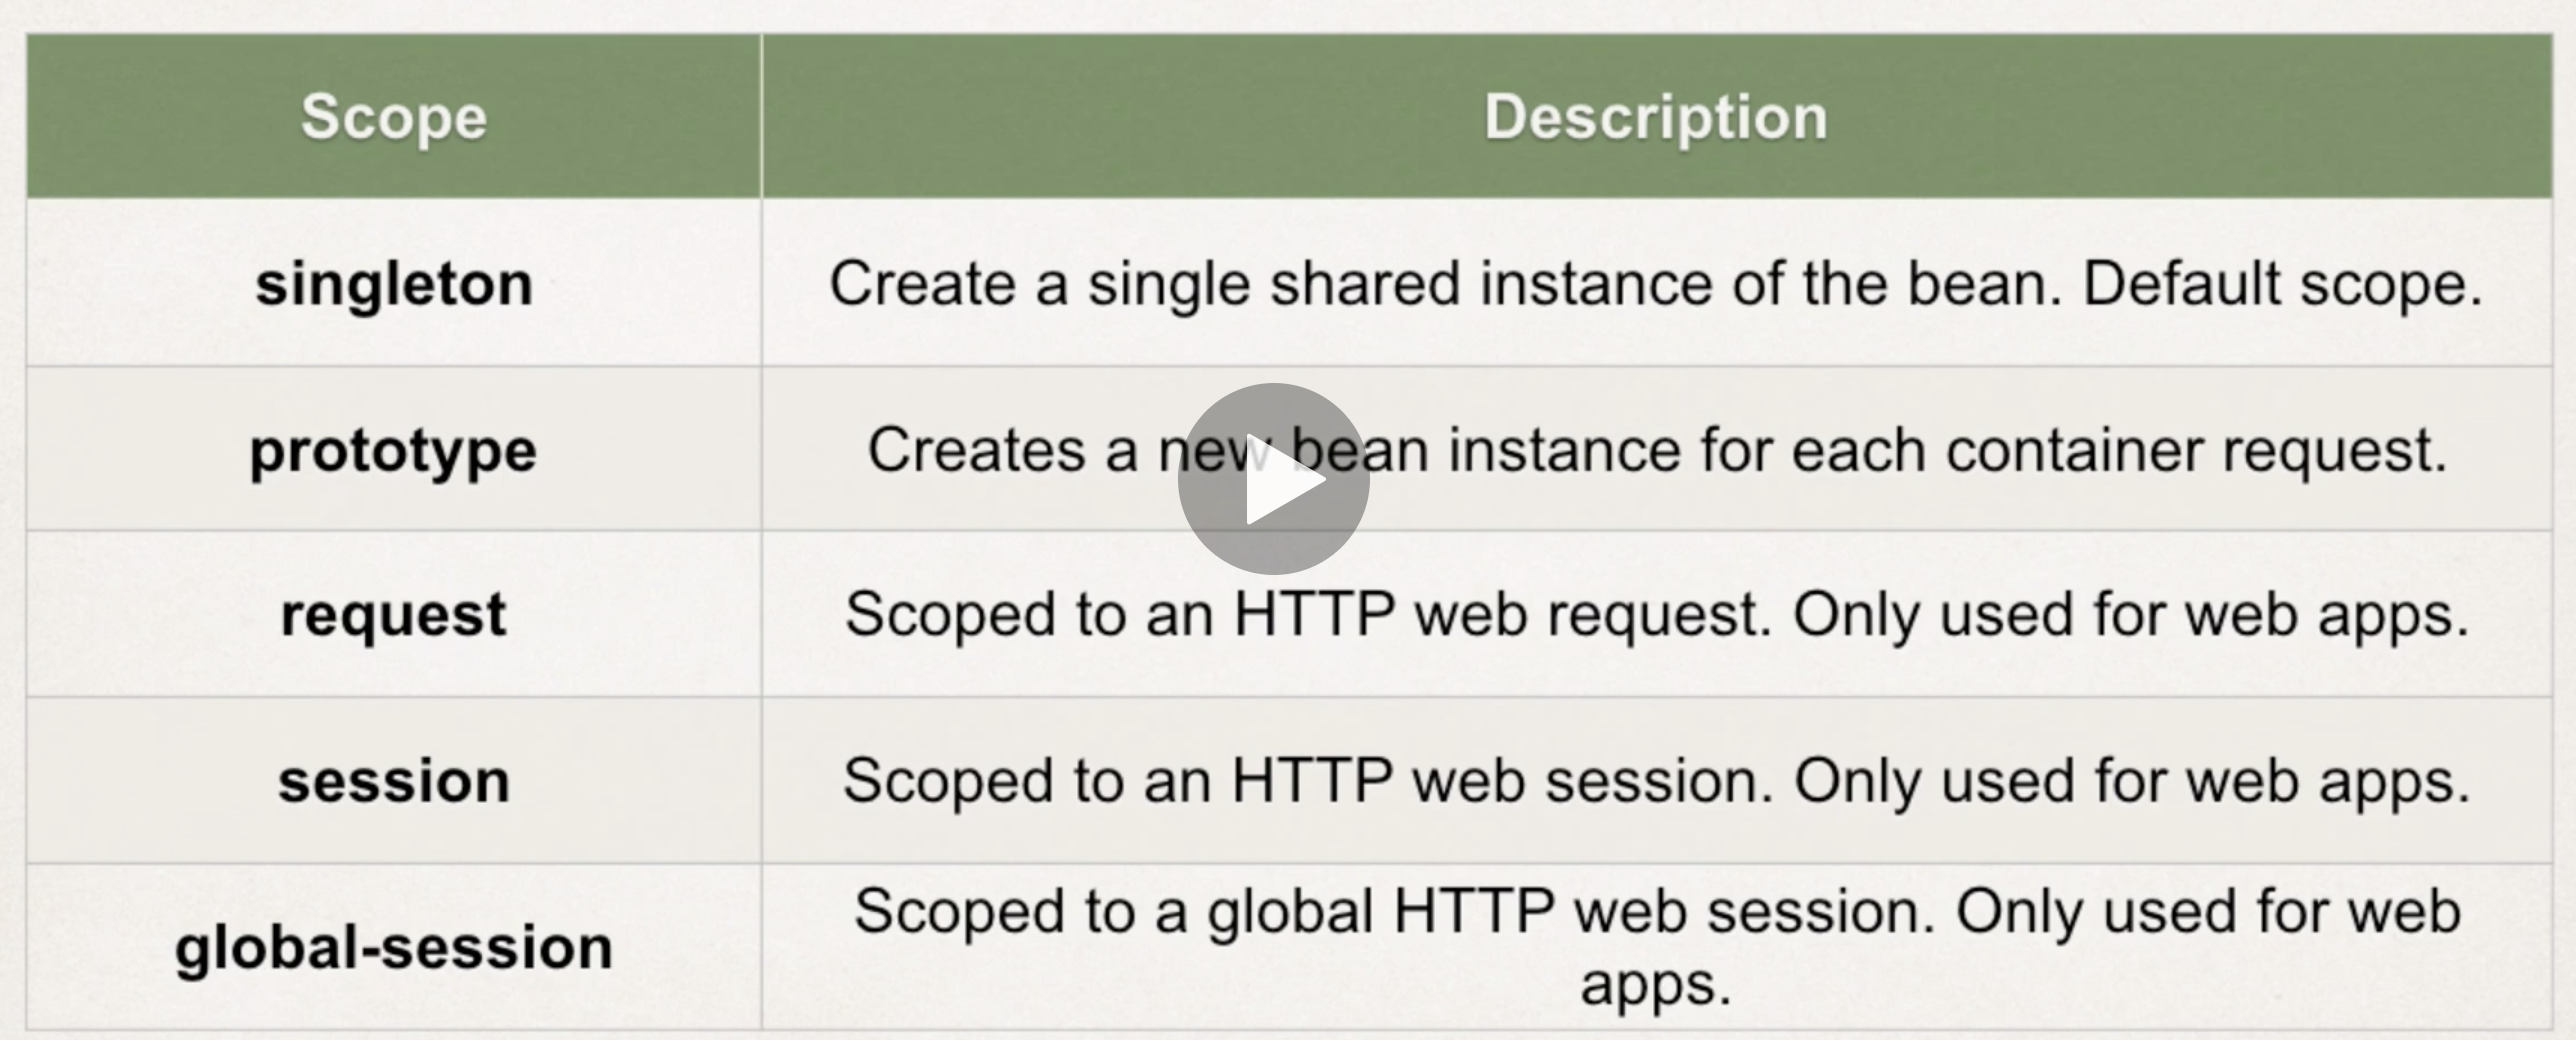
example:
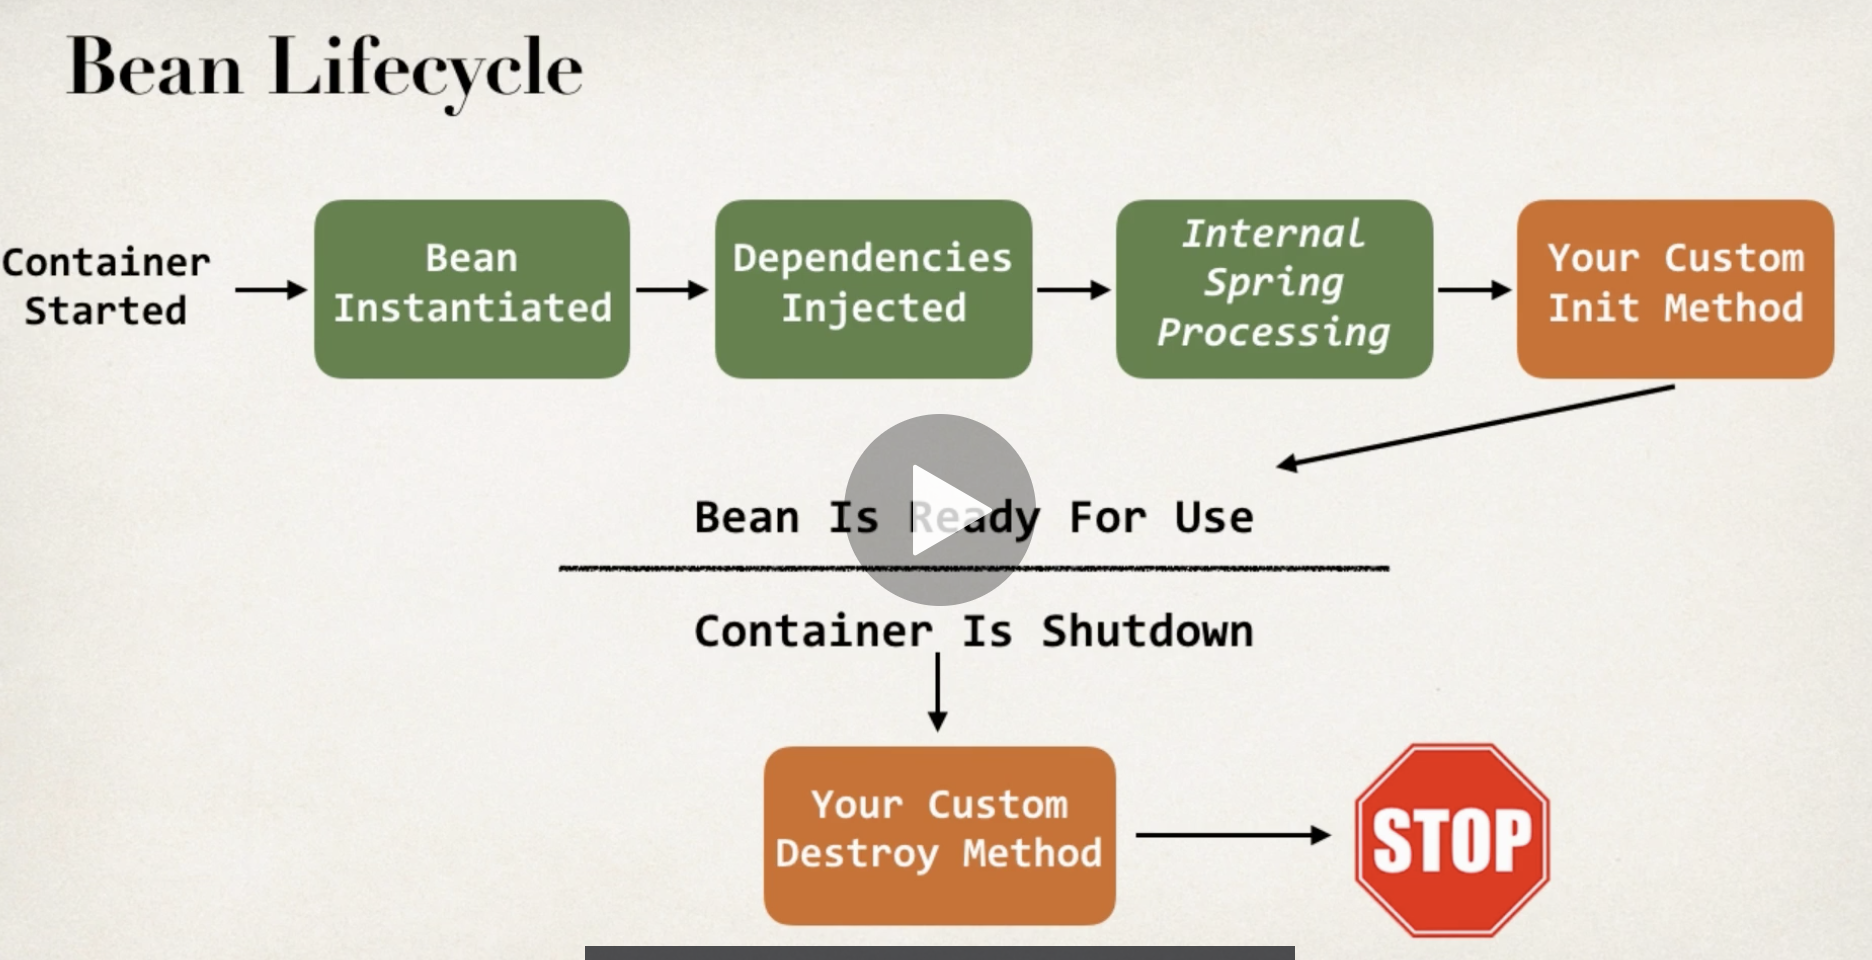
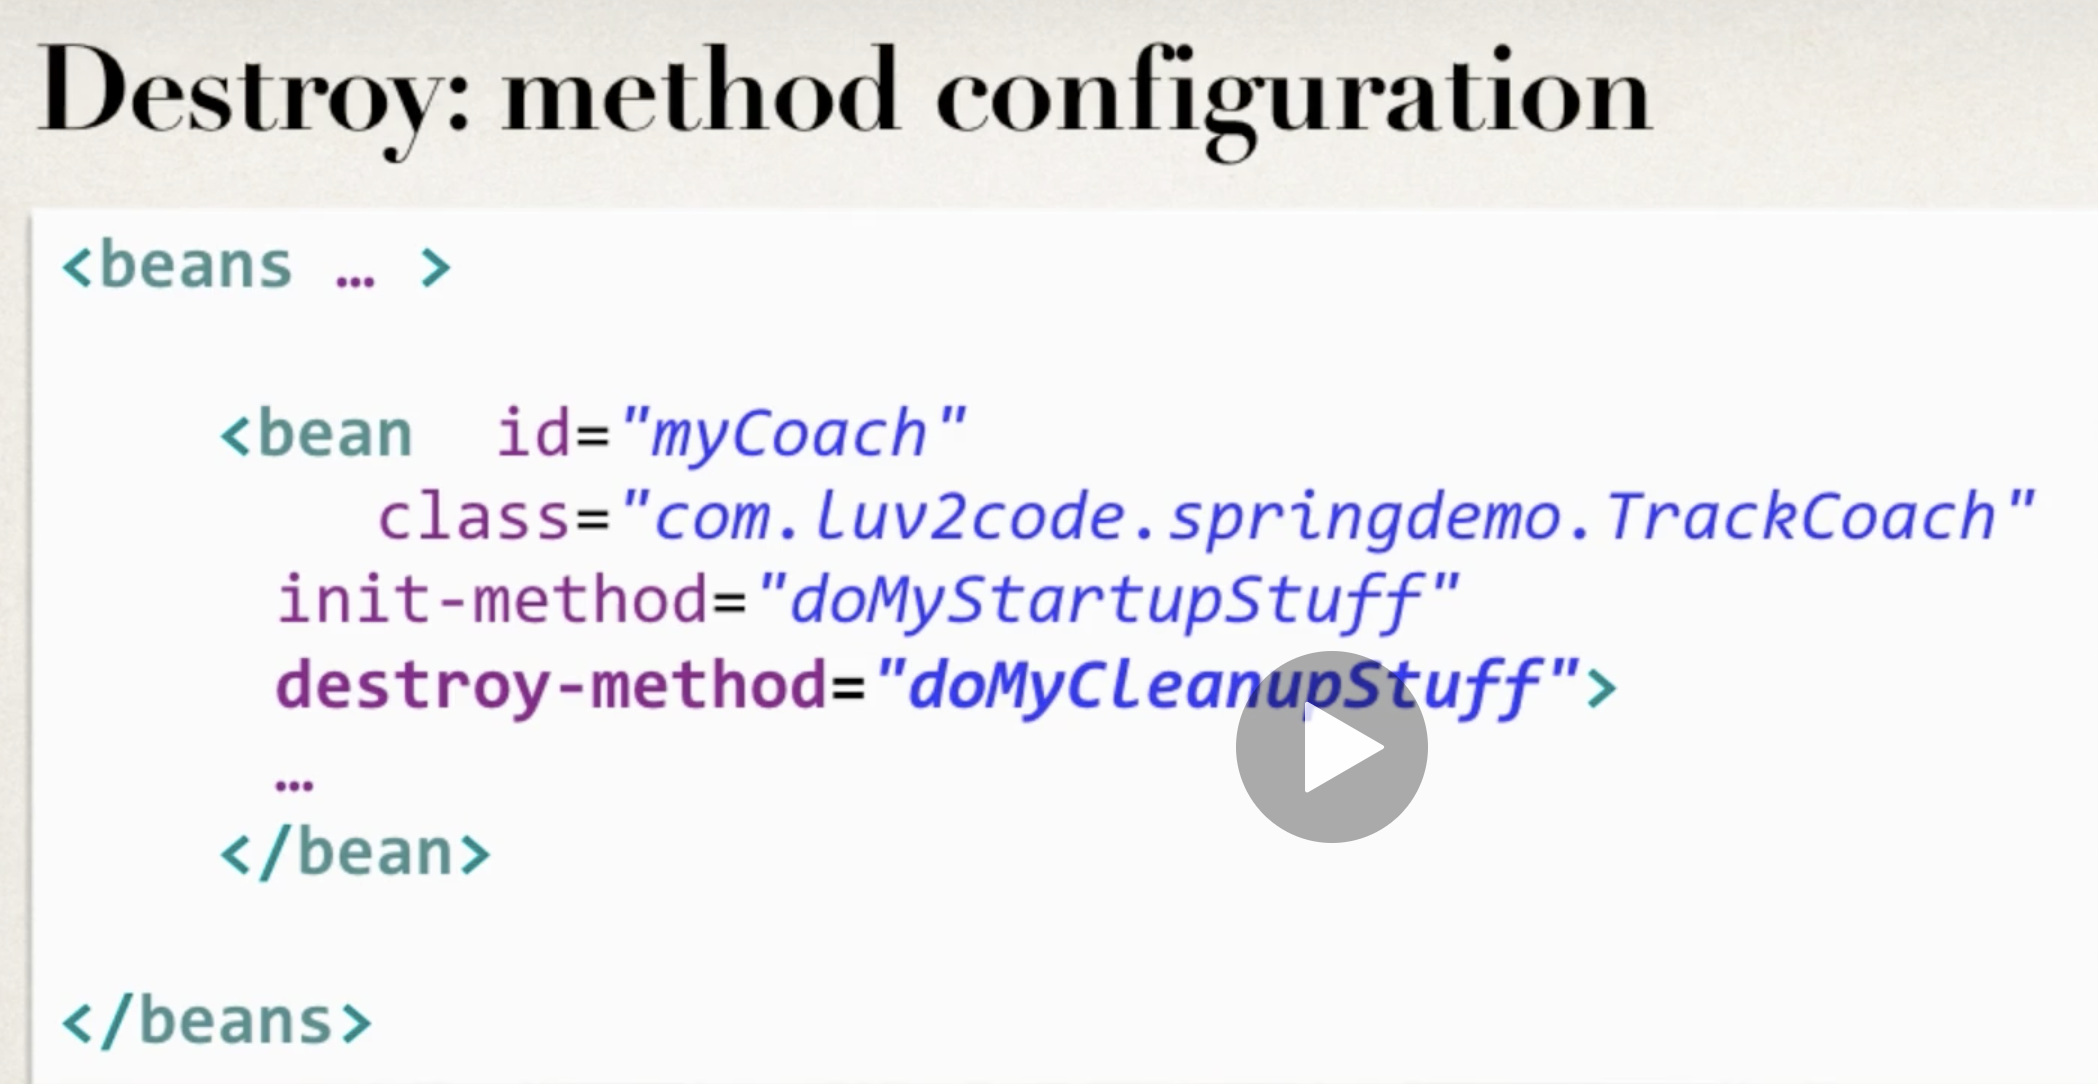
Bean Lifecycle
You can add custom code during bean initialization and destruction.
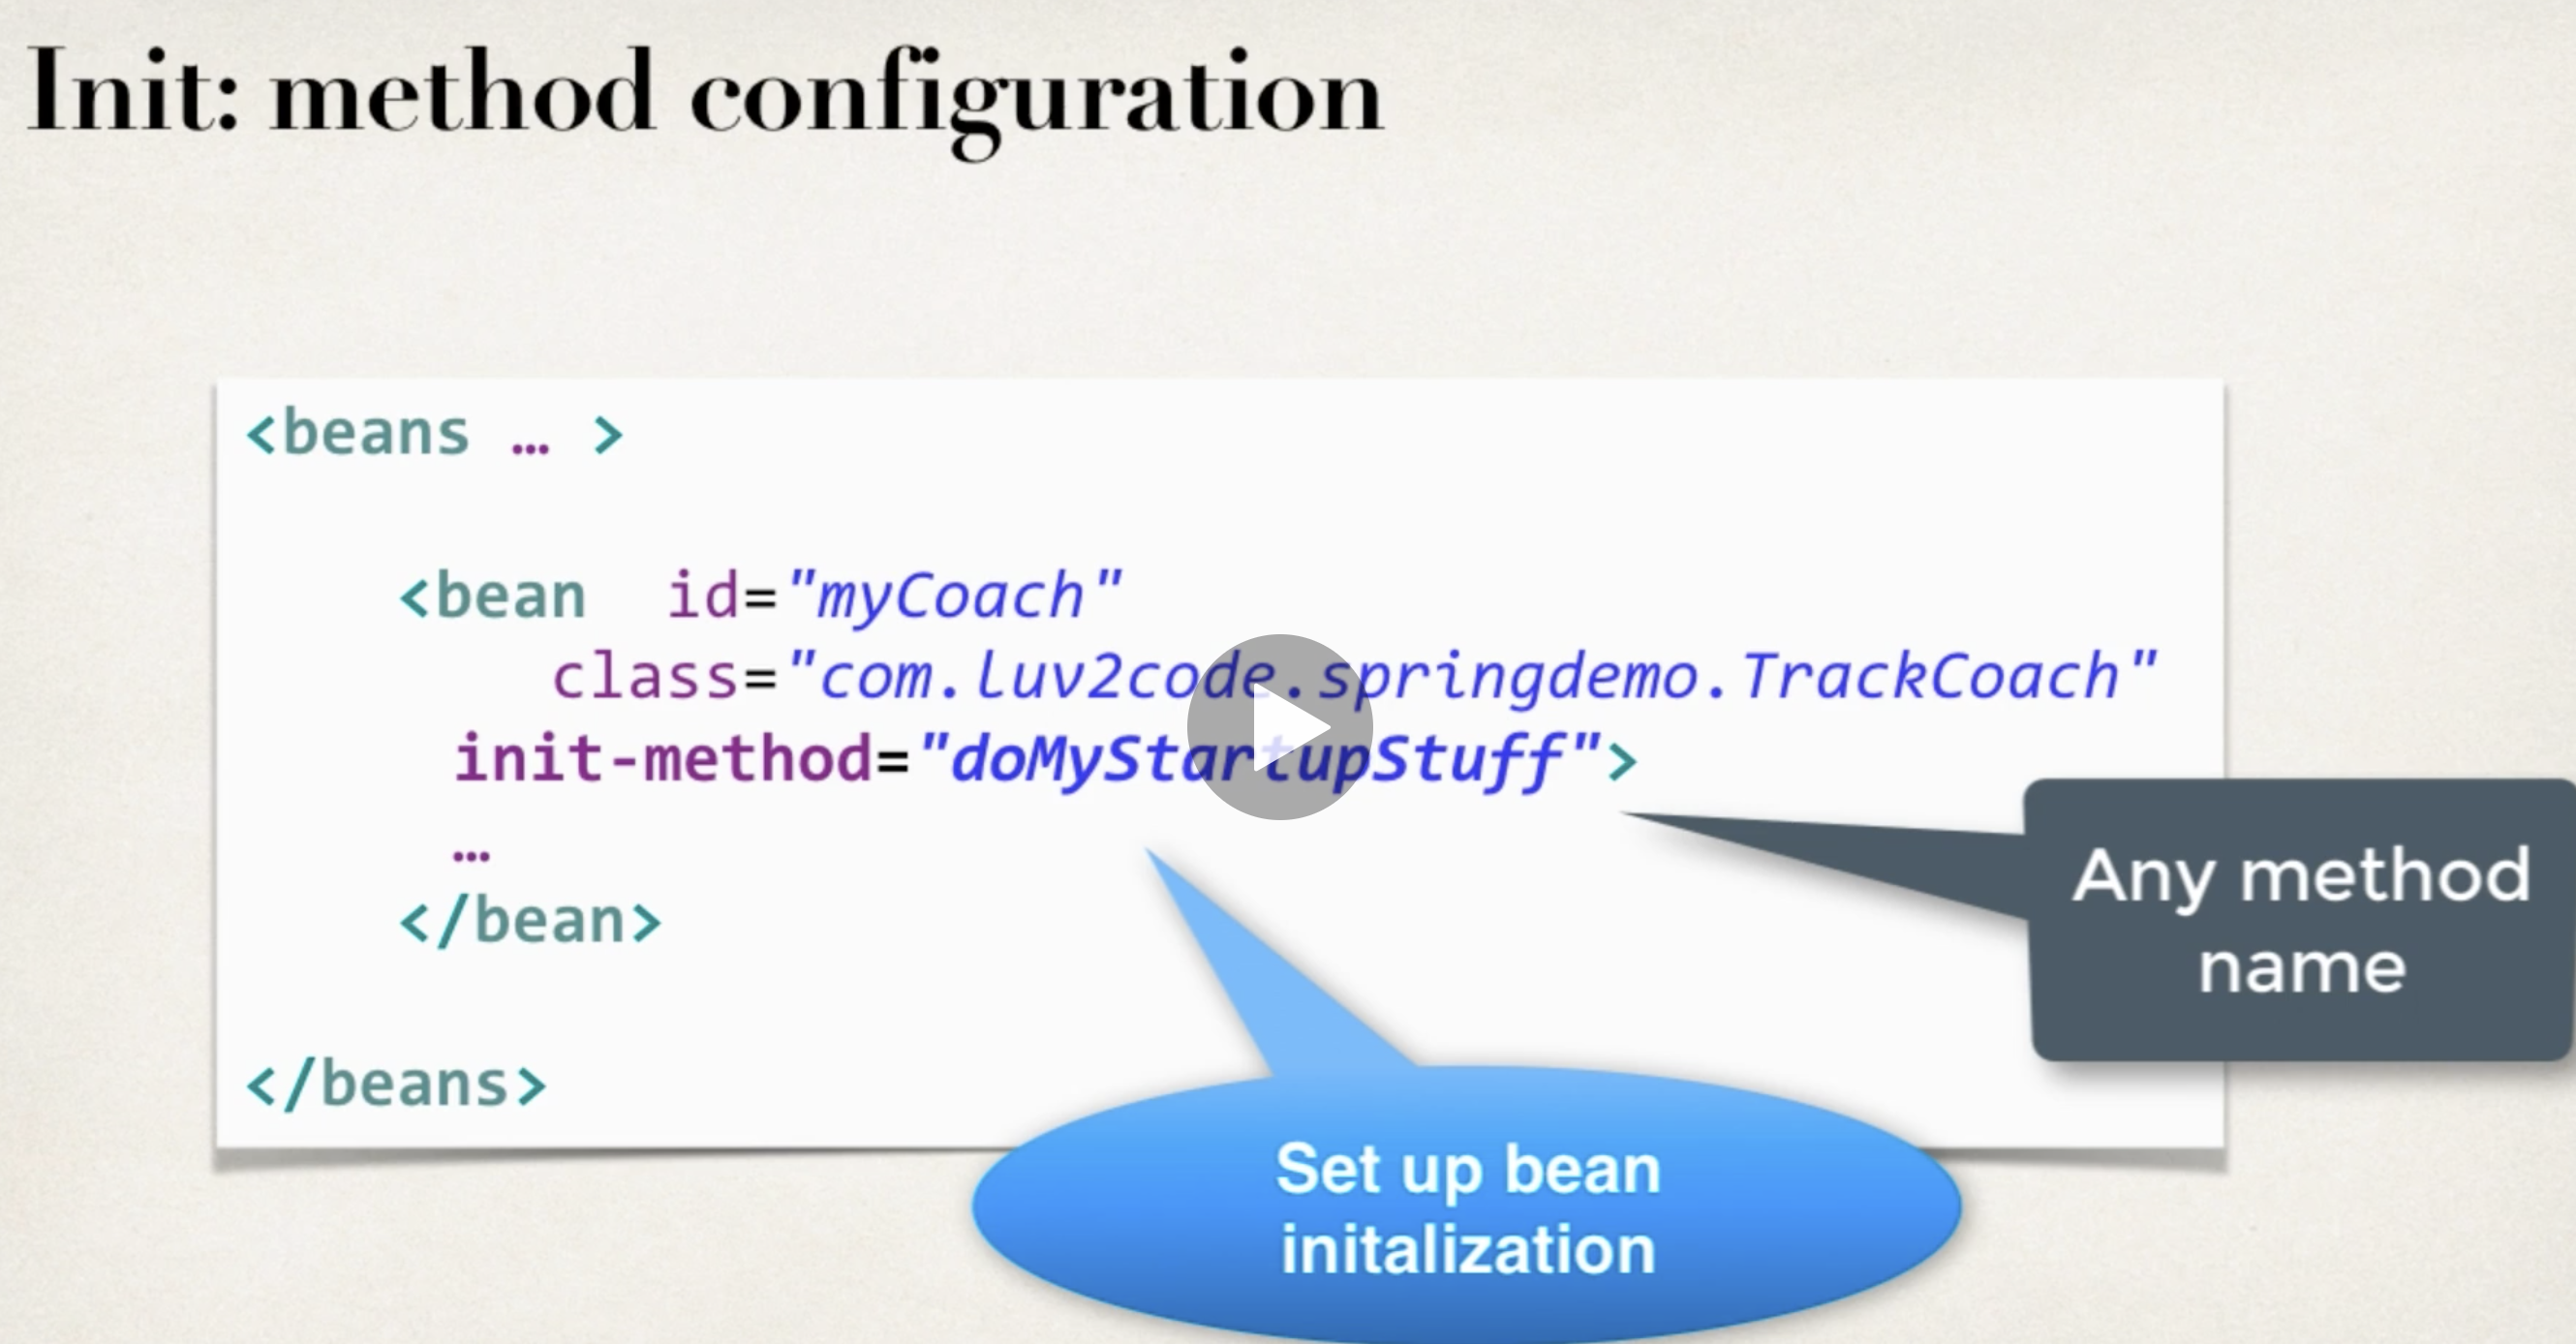
Init method example:
Destroy method example:
Access modifier
The method can have any access modifier (public, protected, private)
Return type
The method can have any return type. However, “void’ is most commonly used. If you give a return type just note that you will not be able to capture the return value. As a result, “void” is commonly used.
Method name
The method can have any method name.
Arguments
The method can not accept any arguments. The method should be no-arg.
No destroy method for prototype scope bean
In contrast to the other scopes, Spring does not manage the complete lifecycle of a prototype bean: the container instantiates, configures, and otherwise assembles a prototype object, and hands it to the client, with no further record of that prototype instance.
Thus, although initialization lifecycle callback methods are called on all objects regardless of scope, in the case of prototypes, configured destruction lifecycle callbacks are not called. The client code must clean up prototype-scoped objects and release expensive resources that the prototype bean(s) are holding.
Spring Configuration with Java Annotations - Inversion of Control
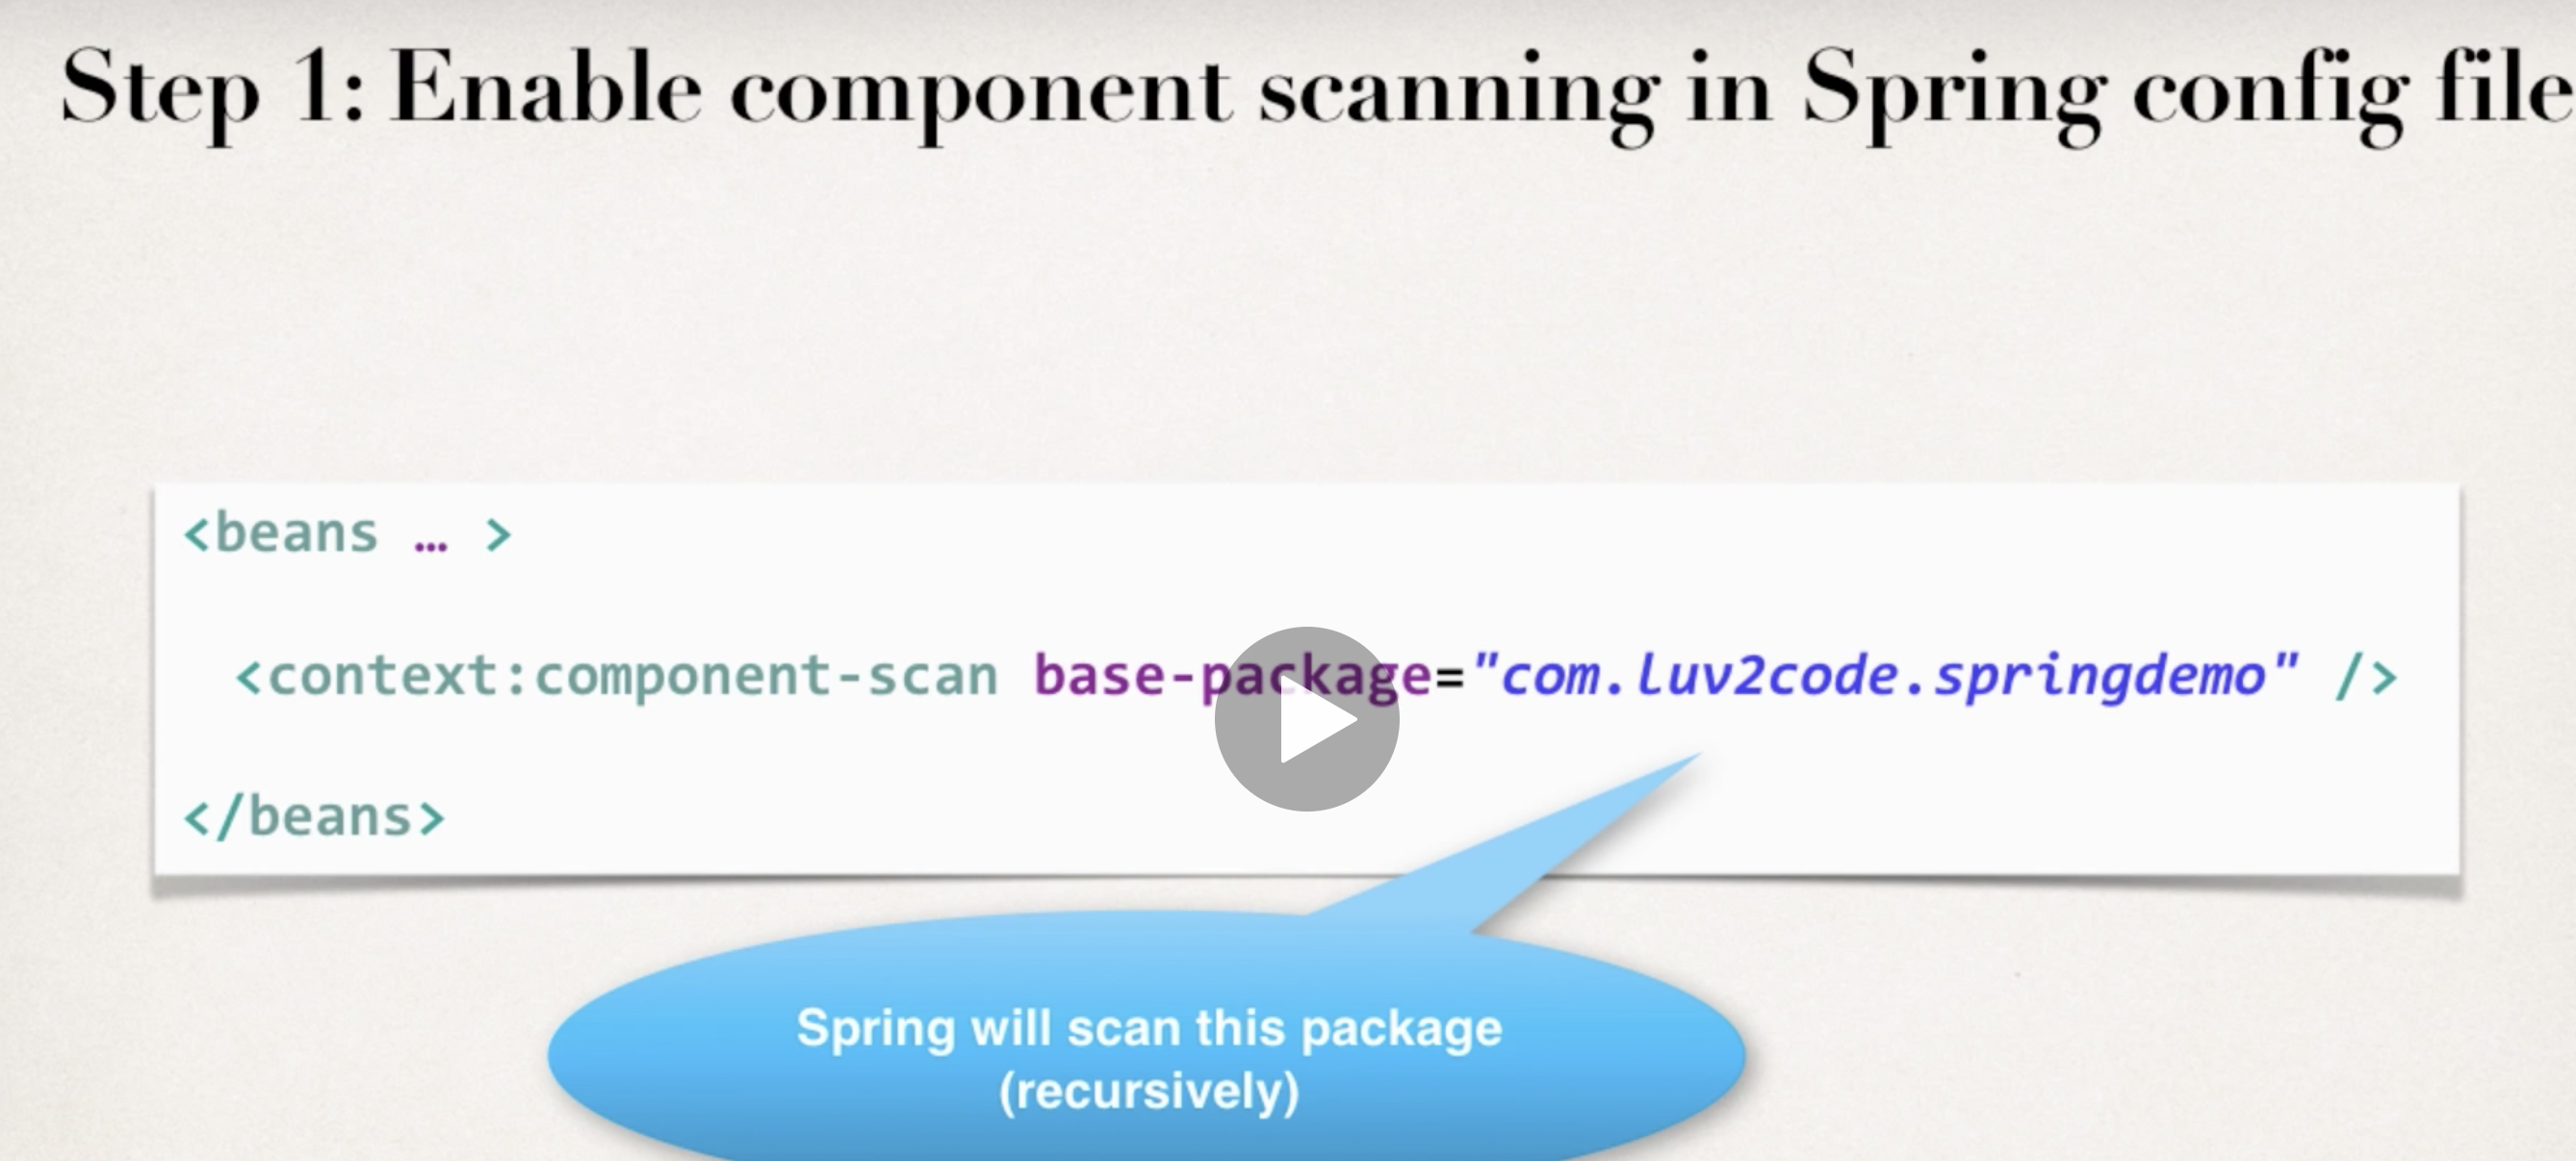
Component Scanning
Spring will scan your java classes for special annotations. Then, automatically register Beans in the spring container.
Component Scanning - Development Process
- Enable Component Scanning in Spring config file.
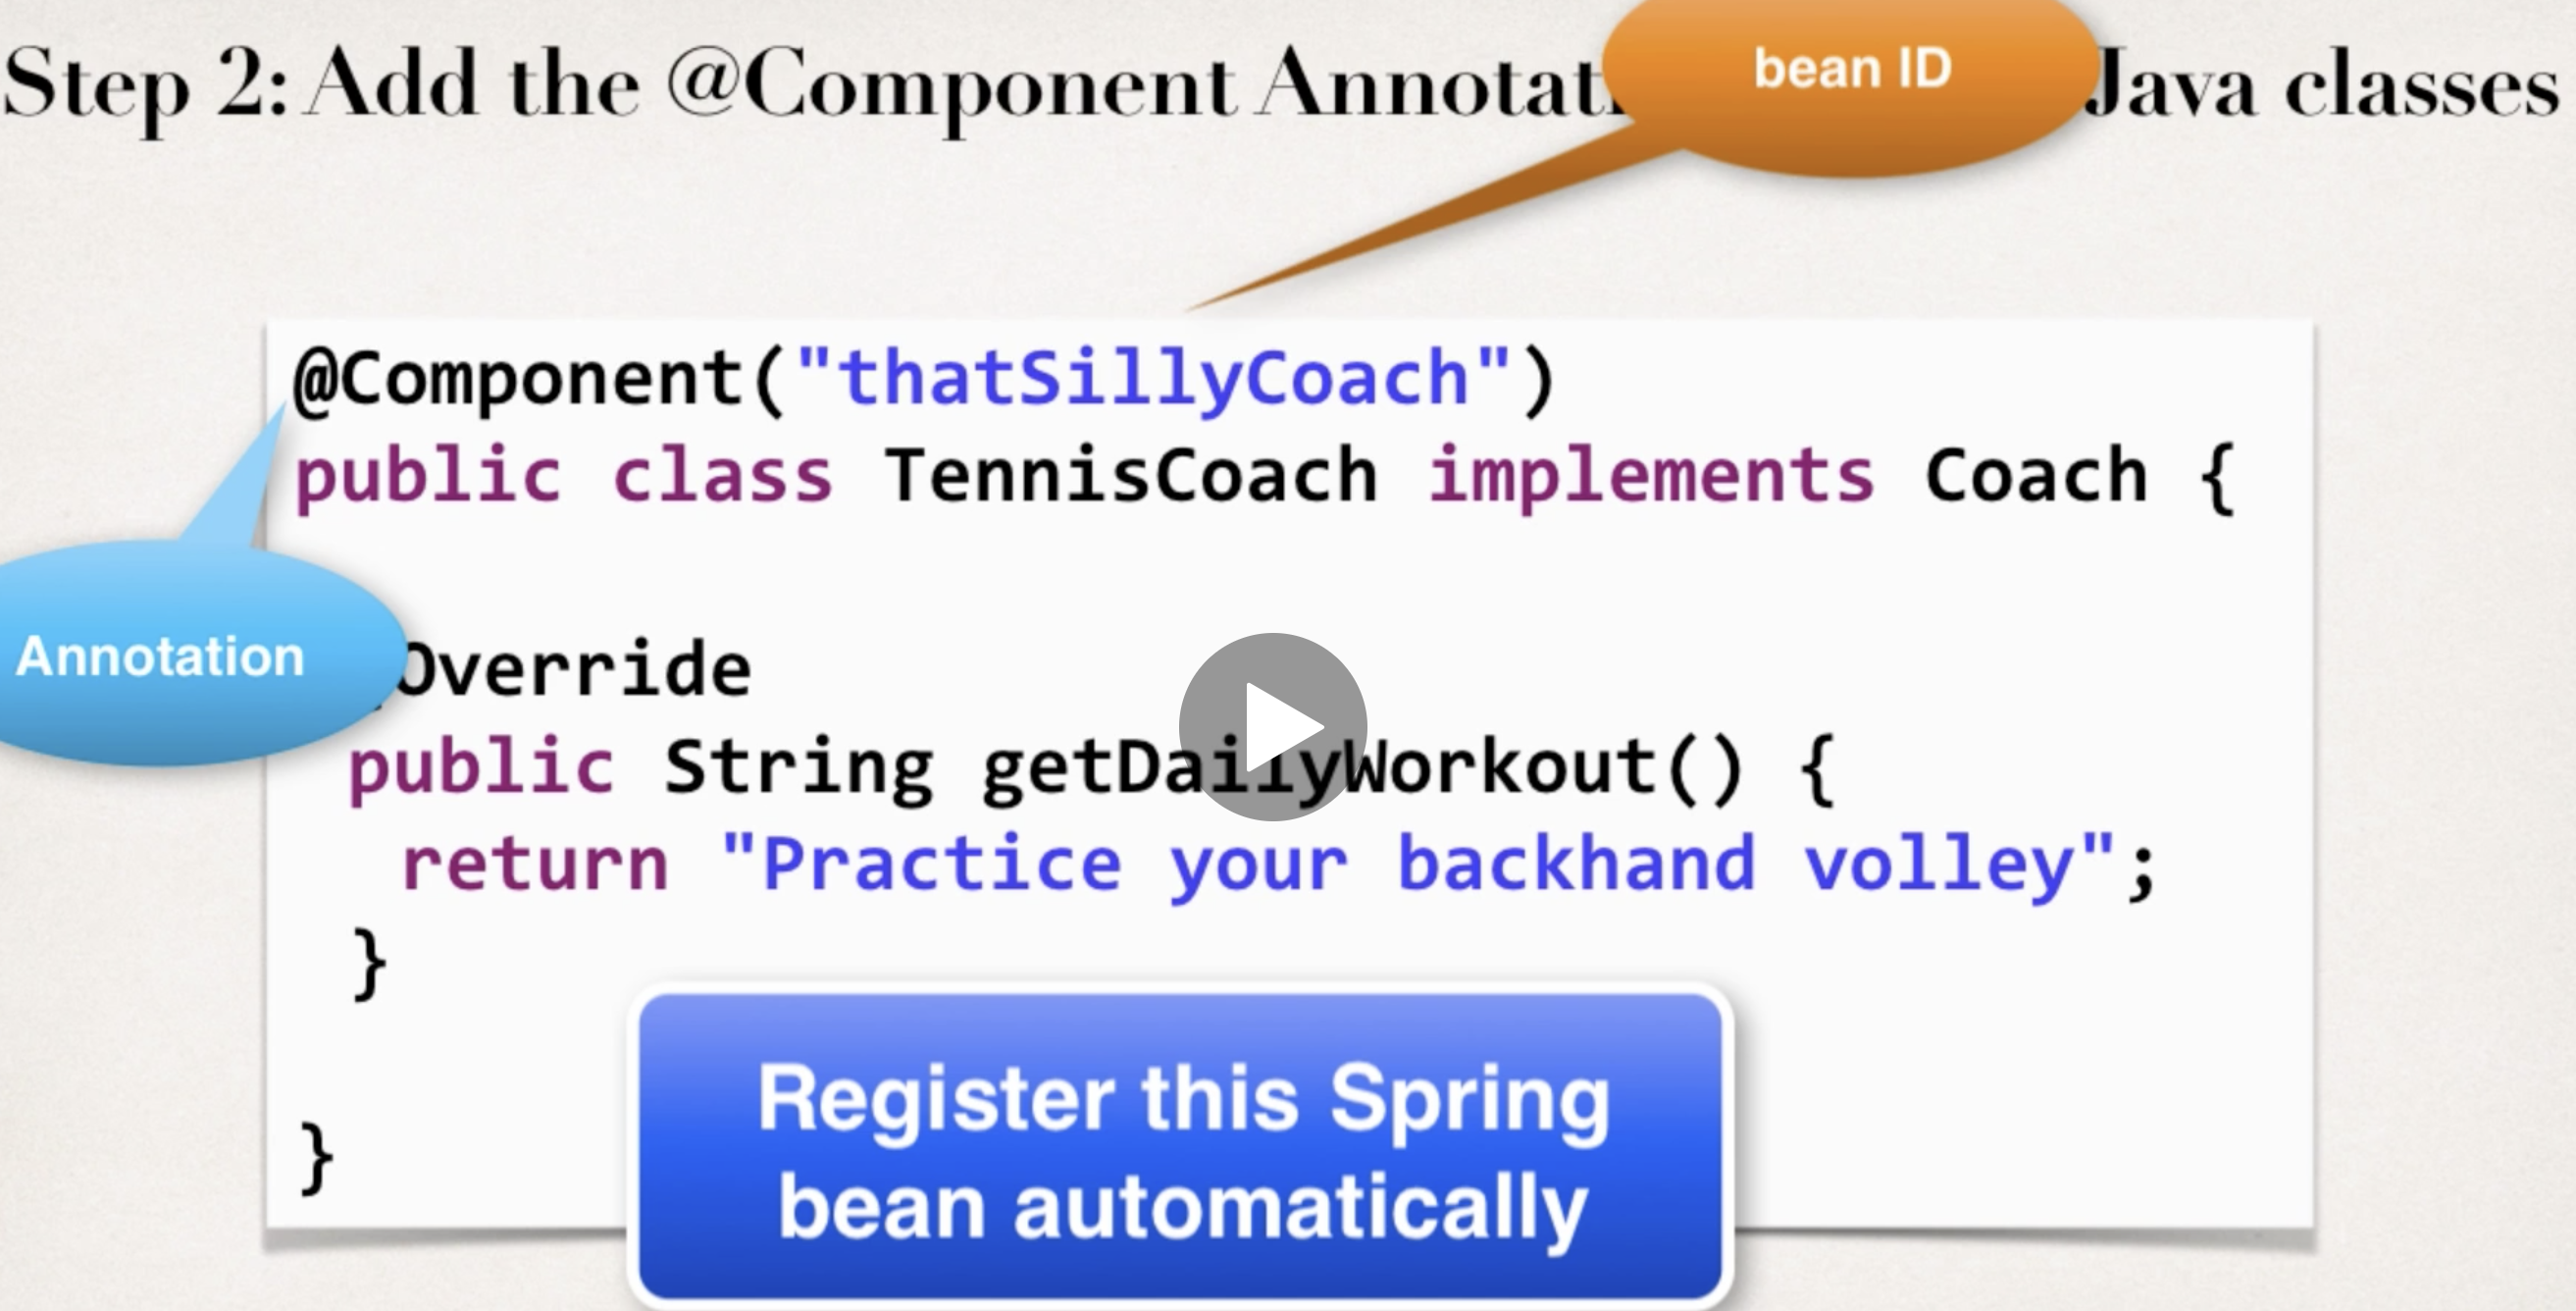
- Add the @Component Annotations to your java classes.
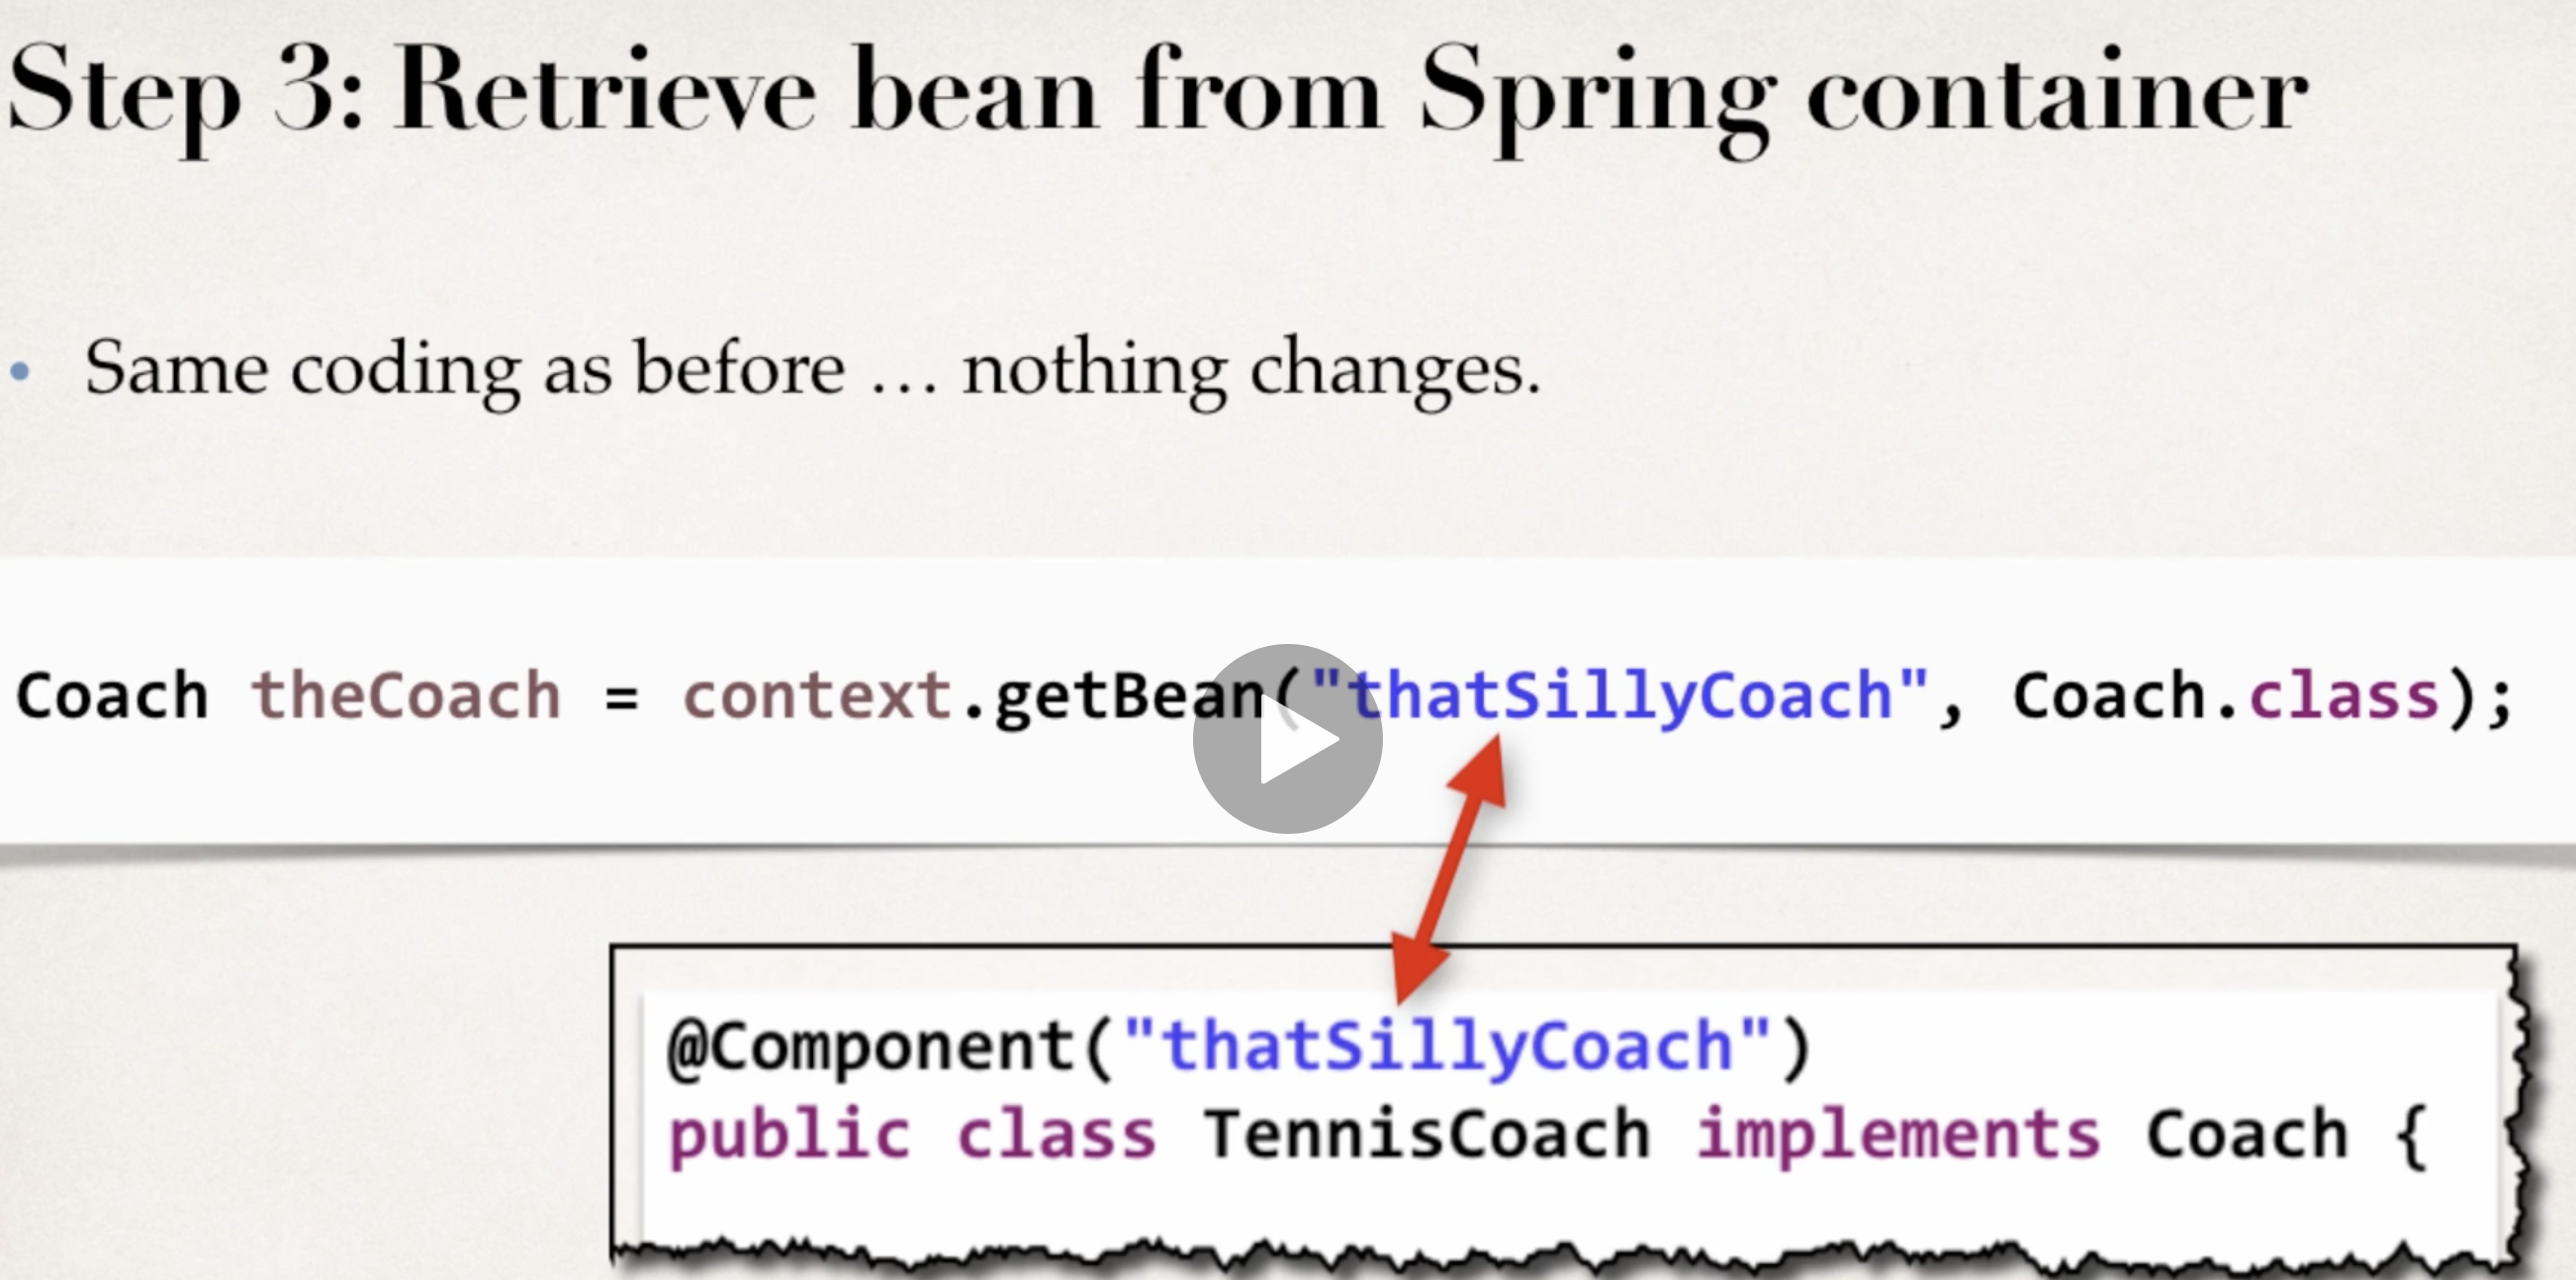
- Retrieve beans from your spring container.
Default Bean id
We can specific Bean id for each java class by using @Component(“Bean ID”).
Spring also supports default Bean ID. For example, if the class name is TennisCoach, the default bean id is tennisCoach It’s the class name, but the first letter lower-case.
Spring Configuration with Java Annotations - Dependency Injection
Spring automatically inject all dependencies(Autowiring). Spring will scan all components and find the implementation of the interface and inject it. There are 3 kinds of dependency injection: constructor injection, setter injection, field injection.
Constructor Injection - Development Process
- Define the dependency class and interface.
- Create a constructor in your class for injection.
- Configure the dependency with
@AutowiredAnnotation.
Autowired is optional
As of Spring Framework 4.3, an @Autowired annotation on such a constructor is no longer necessary if the target bean only defines one constructor to begin with. However, if several constructors are available, at least one must be annotated to teach the container which one to use.
I personally prefer to use the @Autowired annotation because it makes the code more readable. But as mentioned, the @Autowired is not required for this scenario.
Setter Injection - Development Process
- Create Setter method(s) in your java classes for injections.
- Configure the dependency injection with
@AutowiredAnnotation.
Add the @Autowired annotation on the setter method.
The method name doesn’t matter. It’s not required to use setter methods. You can use any methods with @Autowired to inject dependencies.
Field Injection - Development Process
Configure the dependency injection with @Autowired Annotation.
- Apply directly to the field.
- No need for setter methods.
Example:
    @Autowired
    private FortuneService fortuneService
Multiple implementations of one interface
Spring has special support to handle this case. Use the @Qualifier annotation. It can apply to all types of dependency injection.
Example:
    @Autowired
    @Qualifier("happyFortuneService") // Bean ID
    private FortuneService fortuneService
How to inject properties file using Java annotations
- Create a properties file to hold your properties. It will be a name value pair.
New text file: src/sport.properties
    foo.email=myeasycoach@luv2code.com
    foo.team=Silly Java Coders
Note the location of the properties file is very important. It must be stored in src/sport.properties
- Load the properties file in the XML config file.
File: applicationContext.xml
Add the following lines:
<context:property-placeholder location="classpath:sport.properties"/>
This should appear just after the <context:component-scan …/> line
-
Inject the properties values into your Swim Coach: SwimCoach.java @Value(“${foo.email}") private String email;
 @Value("${foo.team}")
 private String team;
Spring Configuration with Java Annotations - Bean Scopes and Lifecycle
Specific Bean Scope with Java Annotation
Example:
    @Component
    @Scope("singleton") //@Scope("prototype")
    public class TennisCoach implements Coach{}
Specific Bean Lifecycle method with Java Annotation
Add @PostConstruct and @PreDestroy to your methods for init and destroy.
If you are using Java 9 or higher, then you will encounter an error when using @PostConstruct and @PreDestroy in your code.
Eclipse is unable to import @PostConstruct or @PreDestroy. This happens because of Java 9 and higher. When using Java 9 and higher, javax.annotation has been removed from its default classpath.
Spring Configuration with Java Code(no xml)
3 ways of configuring java container
- Full XML Config file. We only use config file to configure spring container. We define all beans, dependencies in the xml file.
- XML Component Scan. We set component scan in the xml file and use java annotations in java classes.
- Java Configuration Class. No XML.
Development Process - Spring Configuration with Java Code(no xml)
-
Create a java class and annotation as @Configuration
@Configuration public class SpringConfig{} -
Add component scanning support: @ComponentScan(optional)
@Configuration @ComponentScan("com.luv2code.springcode") public class SpringConfig{} -
Read Spring Java Configuration Class.
AnnotationConfigApplicationContext context = new AnnotationConfigApplicationContext(SpringConfig.class); -
Retrieve bean from Spring Container.
Coach theCoach = context.getBean("tennisCoach", Coach.class);
Define Spring Beans with Java Code (no xml)
-
Define method to expose bean. In this step, we define all beans in our configuration class. The method name is bean id. Inside the method, we create an instance and return it. We don’t need to scan components by this way, because all beans are inside configuration class.
@Configuration public class SpringConfig{ @Bean public Coach swimCoach(){ SwimCoach mySwimCoach = new SwimCoach(); return mySwimCoach; } } -
Inject bean dependencies. We can create a method to return the dependency and use it for our bean.
@Configuration @ComponentScan("com.luv2.springdemo") public class SportConfig { @Bean public FortuneService getFortuneService(){ return new SadFortuneService(); } @Bean public SwimCoach swimCoach(){ return new SwimCoach(getFortuneService()); } } -
Read Spring Java Configuration Class.
AnnotationConfigApplicationContext context = new AnnotationConfigApplicationContext(SportConfig.class); -
Retrieve bean from Spring Container.
Coach theCoach = context.getBean("swimCoach", Coach.class);
It is important to note that this method has the @Bean annotation. The annotation will intercept ALL calls to the method “swimCoach()". Since no scope is specified the @Bean annotation uses singleton scope. Behind the scenes, during the @Bean interception, it will check in memory of the Spring container (applicationContext) and see if this given bean has already been created.
If this is the first time the bean has been created then it will execute the method as normal. It will also register the bean in the application context. So that is knows that the bean has already been created before. Effectively setting a flag.
The next time this method is called, the @Bean annotation will check in memory of the Spring container (applicationContext) and see if this given bean has already been created. Since the bean has already been created (previous paragraph) then it will immediately return the instance from memory. It will not execute the code inside of the method. Hence this is a singleton bean.
The code for
     SwimCoach mySwimCoach = new SwimCoach();
     return mySwimCoach;
is not executed for subsequent requests to the method public Coach swimCoach() . This code is only executed once during the initial bean creation since it is singleton scope.
A real-time use case for @Bean
Here is a real-time use case of using @Bean: You can use @Bean to make an existing third-party class available to your Spring framework application context.
For example, I was recently working on a global real-time project using Amazon Web Services. The project made use of the Amazon Simple Storage Service (AWS S3). This is remote service that provides object storage in the cloud. You can think of AWS S3 at a high-level as a remote file server for storing files (pdfs, pngs etc).
Our Spring application needed to integrate with AWS S3 and store pdf documents. Amazon provides an AWS SDK for integrating with AWS S3. Their API provides a class, S3Client. This is a regular Java class that provides a client interface to the AWS S3 service. We needed to share the S3Client object in various services in our Spring application. However, the S3Client does not have the @Component annotation. The S3Client does not use Spring.
Since the S3Client is part of the AWS framework, we can’t modify the source code for the S3Client directly. We can’t simply add the @Component annotation to the S3Client source code. As a result, we need an alternative solution.
But no problem, by using the @Bean annotation, I can wrap this third-party class, S3Client, as a Spring bean. And then once it is wrapped using @Bean, it is as a singleton object and available in our Spring framework application context. I can now easily share this bean in my app using dependency injection and @Autowired. So think of the @Bean annotation was a wrapper / adapter for third-party classes. You want to make the third-party classes available to your Spring framework application context.
Injecting values from properties file
Example:
Spring Configuration file(sport.properties is the properties file):
    @Configuration
    @PropertySource("classpath:sport.properties")
    public class SportConfig{}
Use values in the properties file:
    @Value("${foo.eamil}")
    private String email;
Spring MVC
Spring MVC Configuration
-
Configure Spring DispatchServlet. Give the servlet reference by using
servlet-nameandservlet-class. Tell the location of Spring context configuration file by usinginit-param.
-
Set up URL Mappings to Spring MVC DispatchServlet. You can use slash for all requests. You can specific different pattern by
url-pattern. But theservlet-nameshould be the same as the step 1.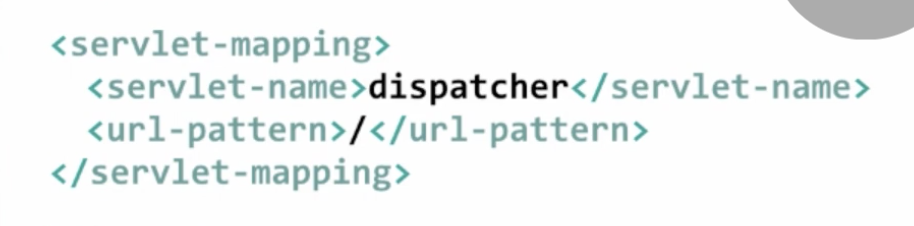
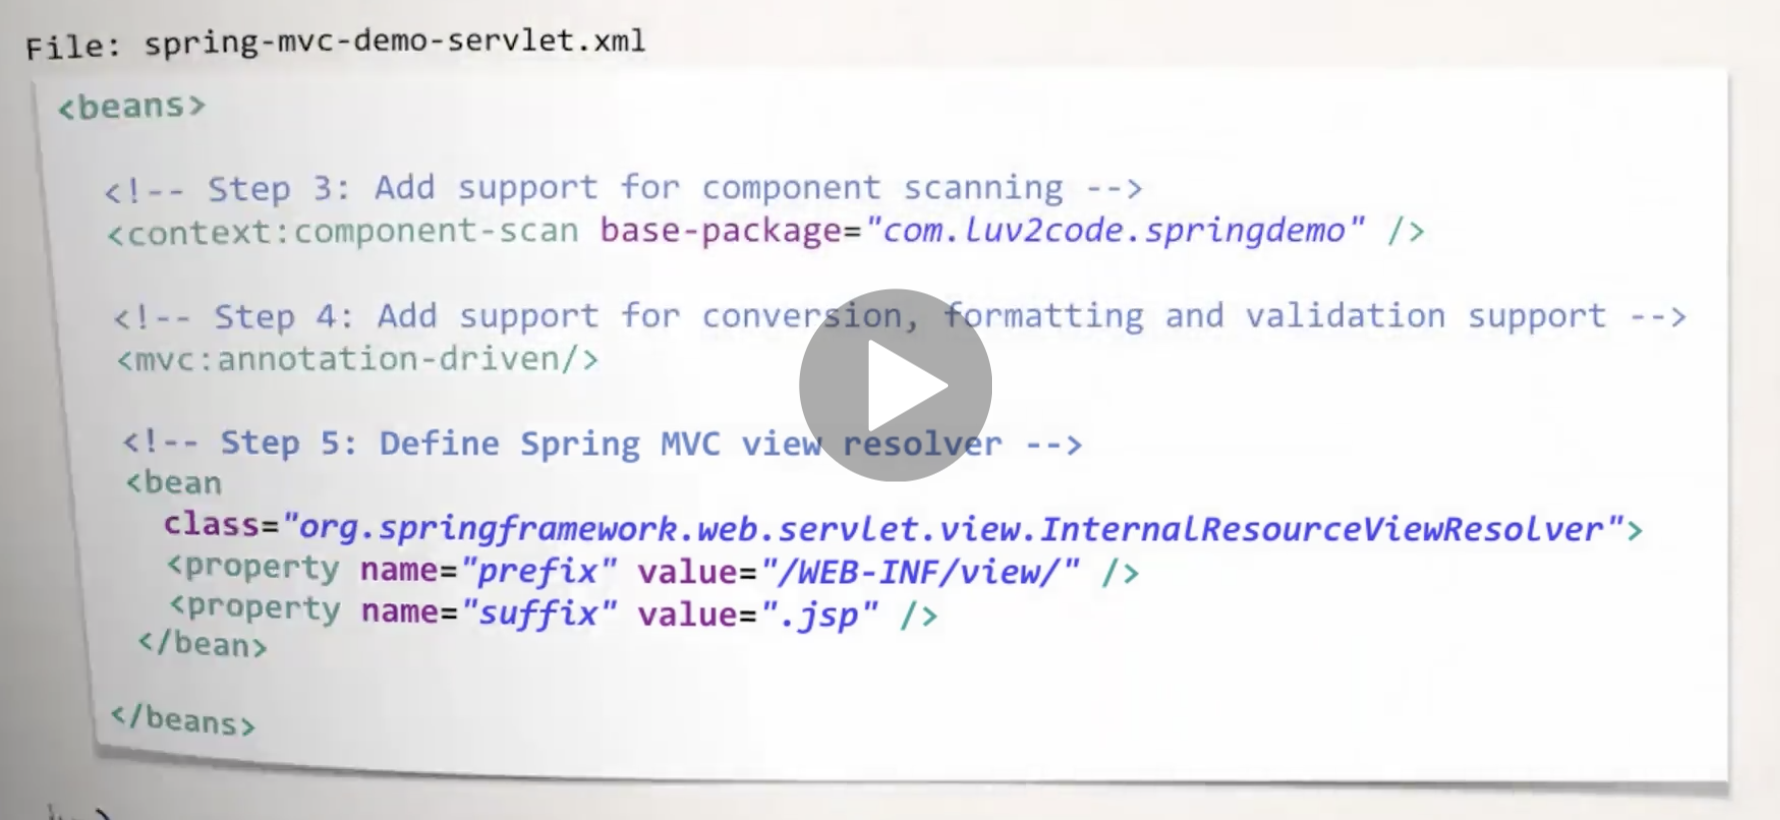
-
Add support for Spring Component Scan.
-
Add support for conversion, formatting and validation. You can perform these operations on your form data.
-
Configure Spring MVC Resolver. This can enable Spring to find the view file.
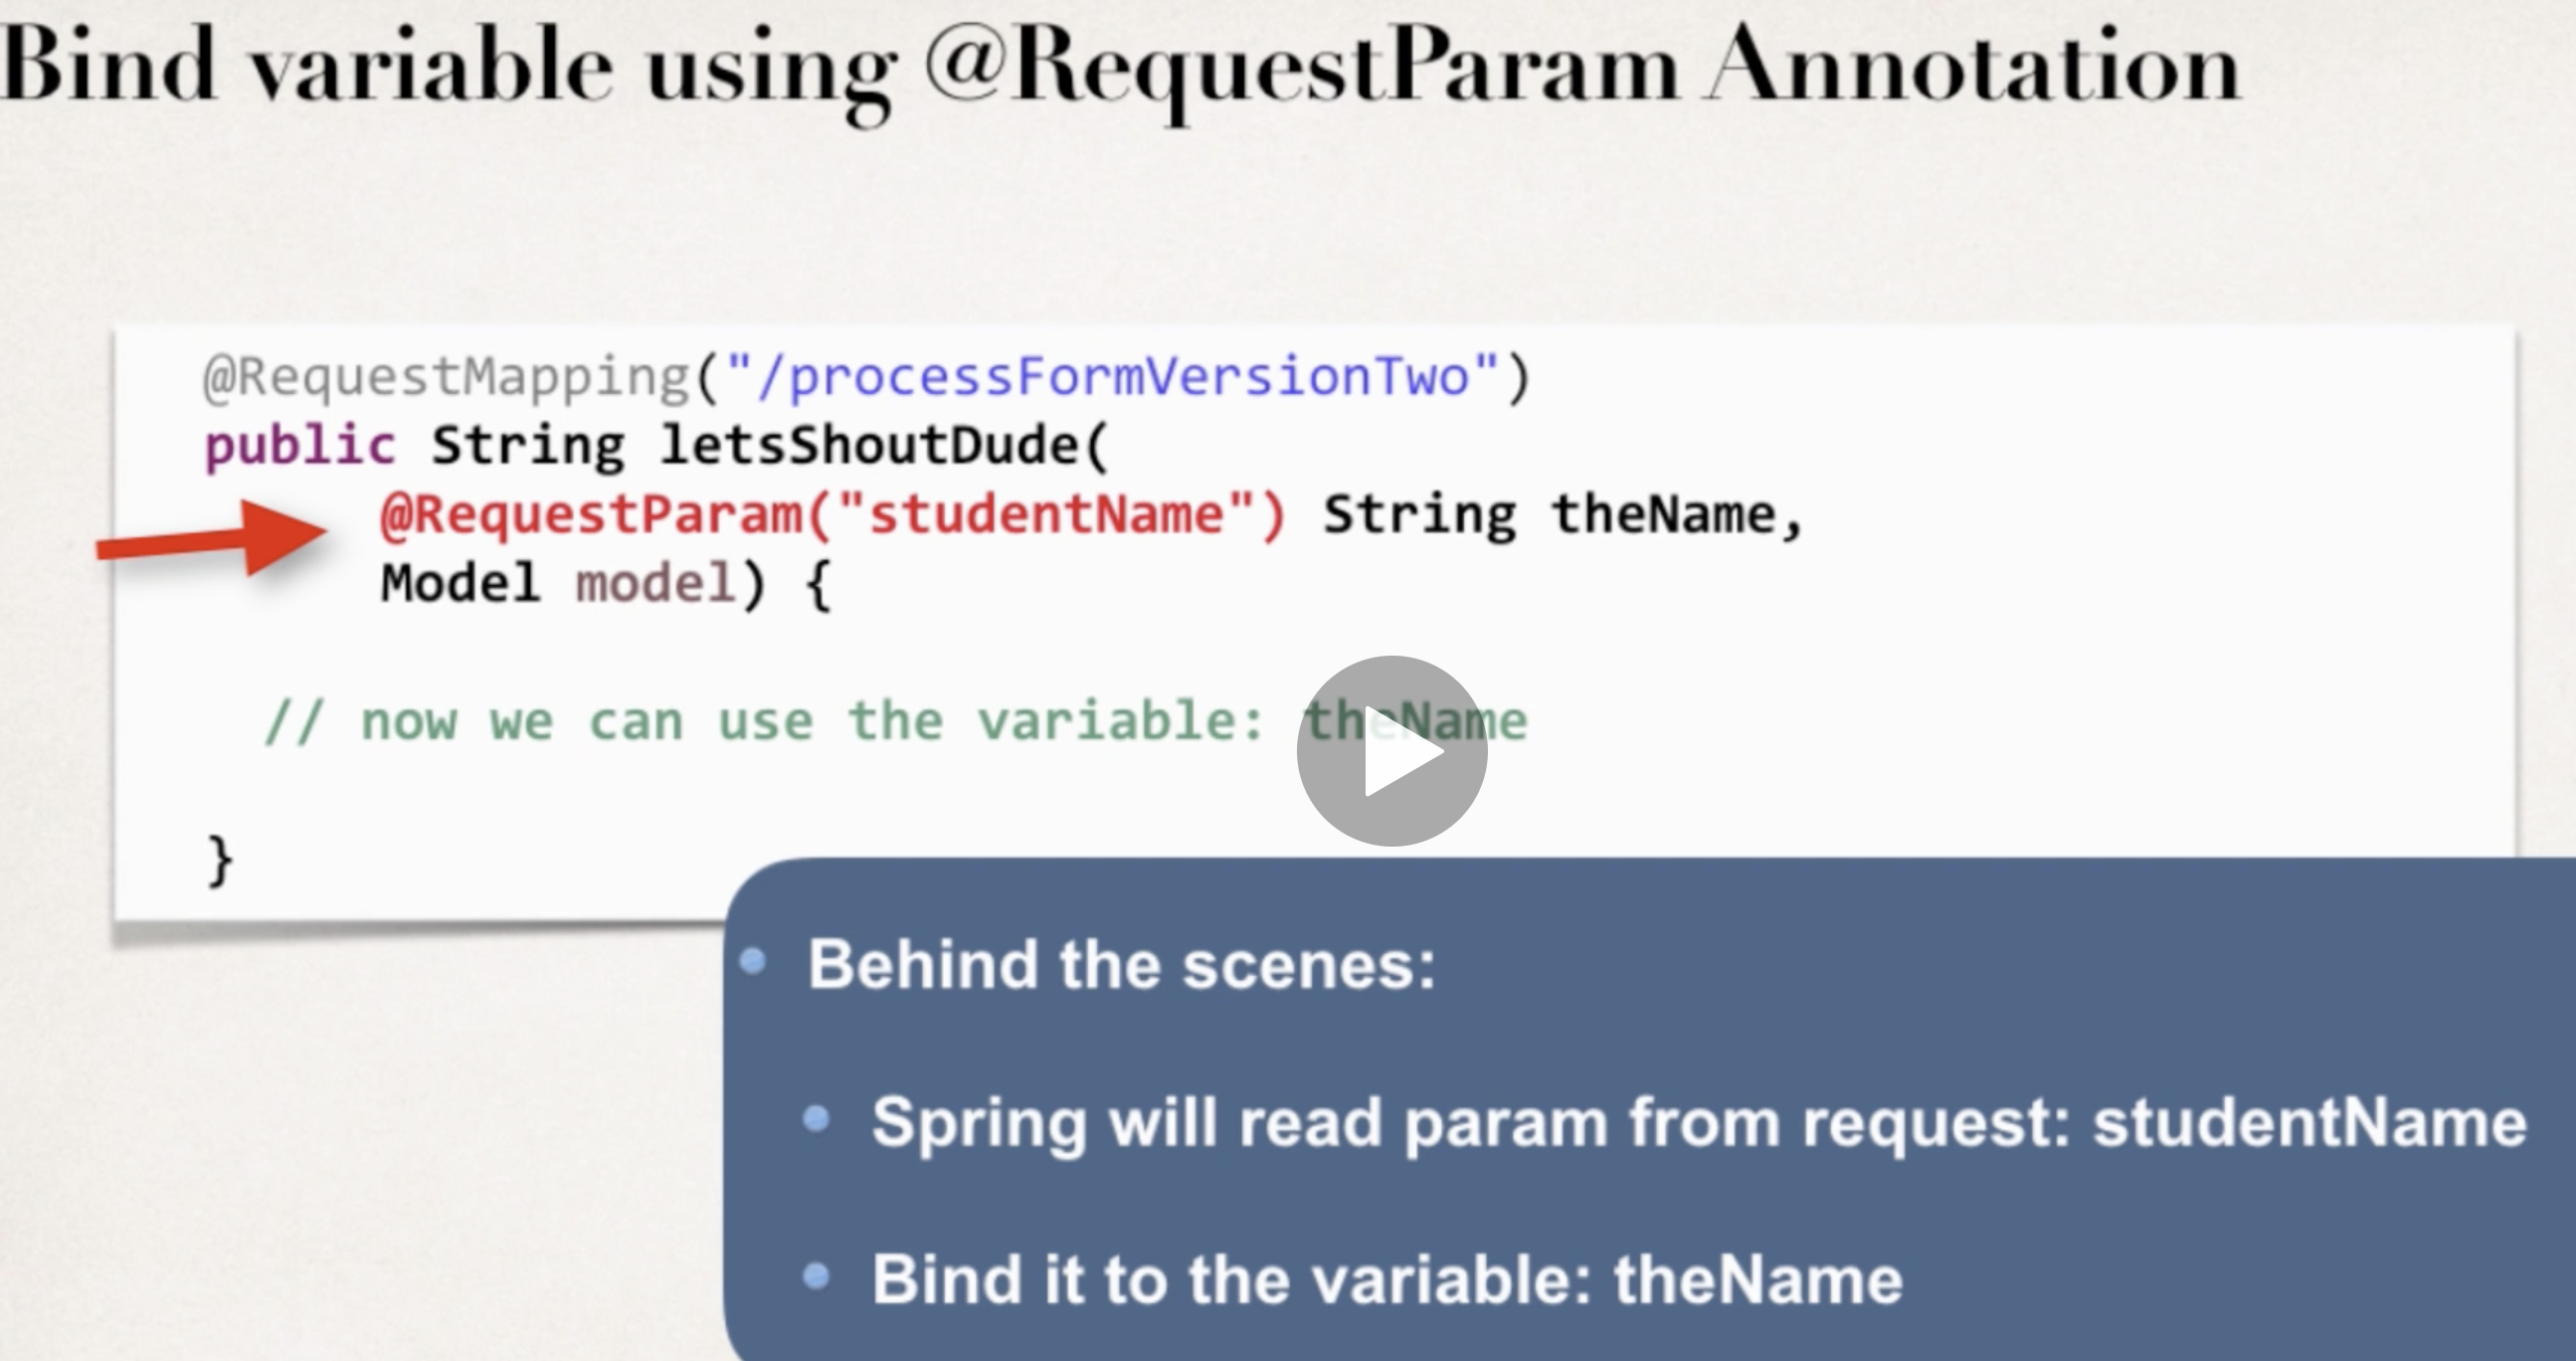
Bind variable using @RequestParam Annotation
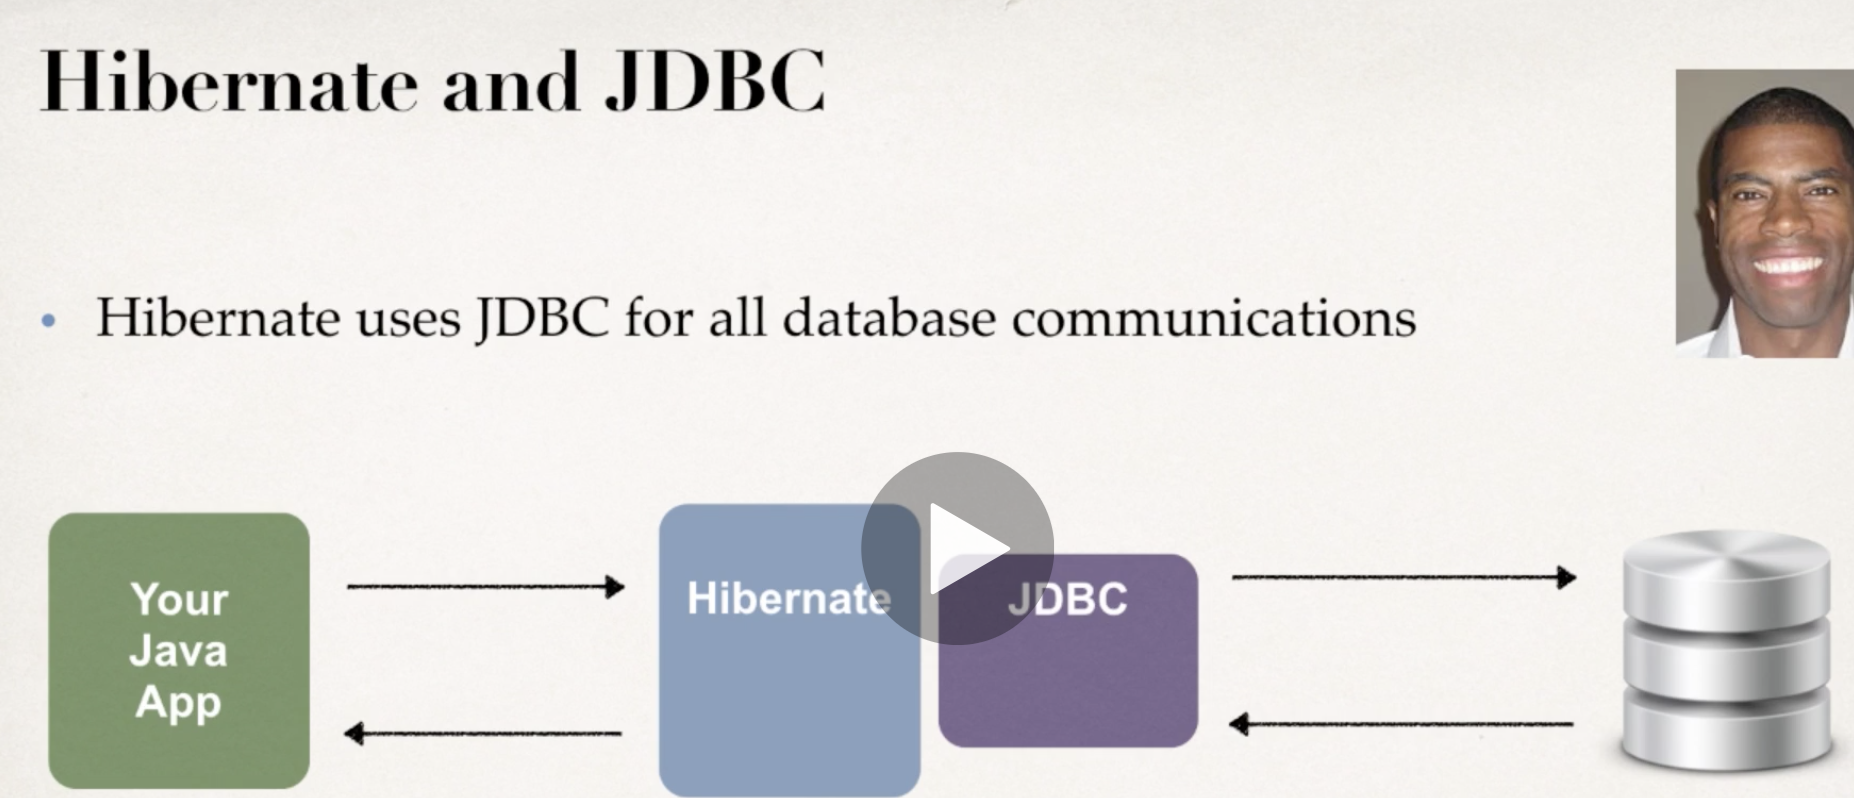
Hibernate
A framework for persisting/ saving java objects in a database.
Benefits
- Hibernate handles all of the low-level SQL
- Minimize the amount of JDBC code you have to develop
- Hibernate provides Object-to-Relational Mapping.
Examples of using Hibernate
    //create java object
    Student theStudent = new Student("John","email@email.com");

    //save it to database
    int theId = (Integer) session.save(theStudent);

    //now retrieve from database using the primary key
    Student mystudent =  session.get(Student.class, theId);

    //query all student objects
    Query query = session.createQuery("from Student");
    List<Student> students = query.list();
Map class to database table & map fields to database columns
    @Entity
    @Table(name="student") //database table name
    public class Student{

        @Id  //primary key
        @Column(name="id") //column name
        private int id;
    }
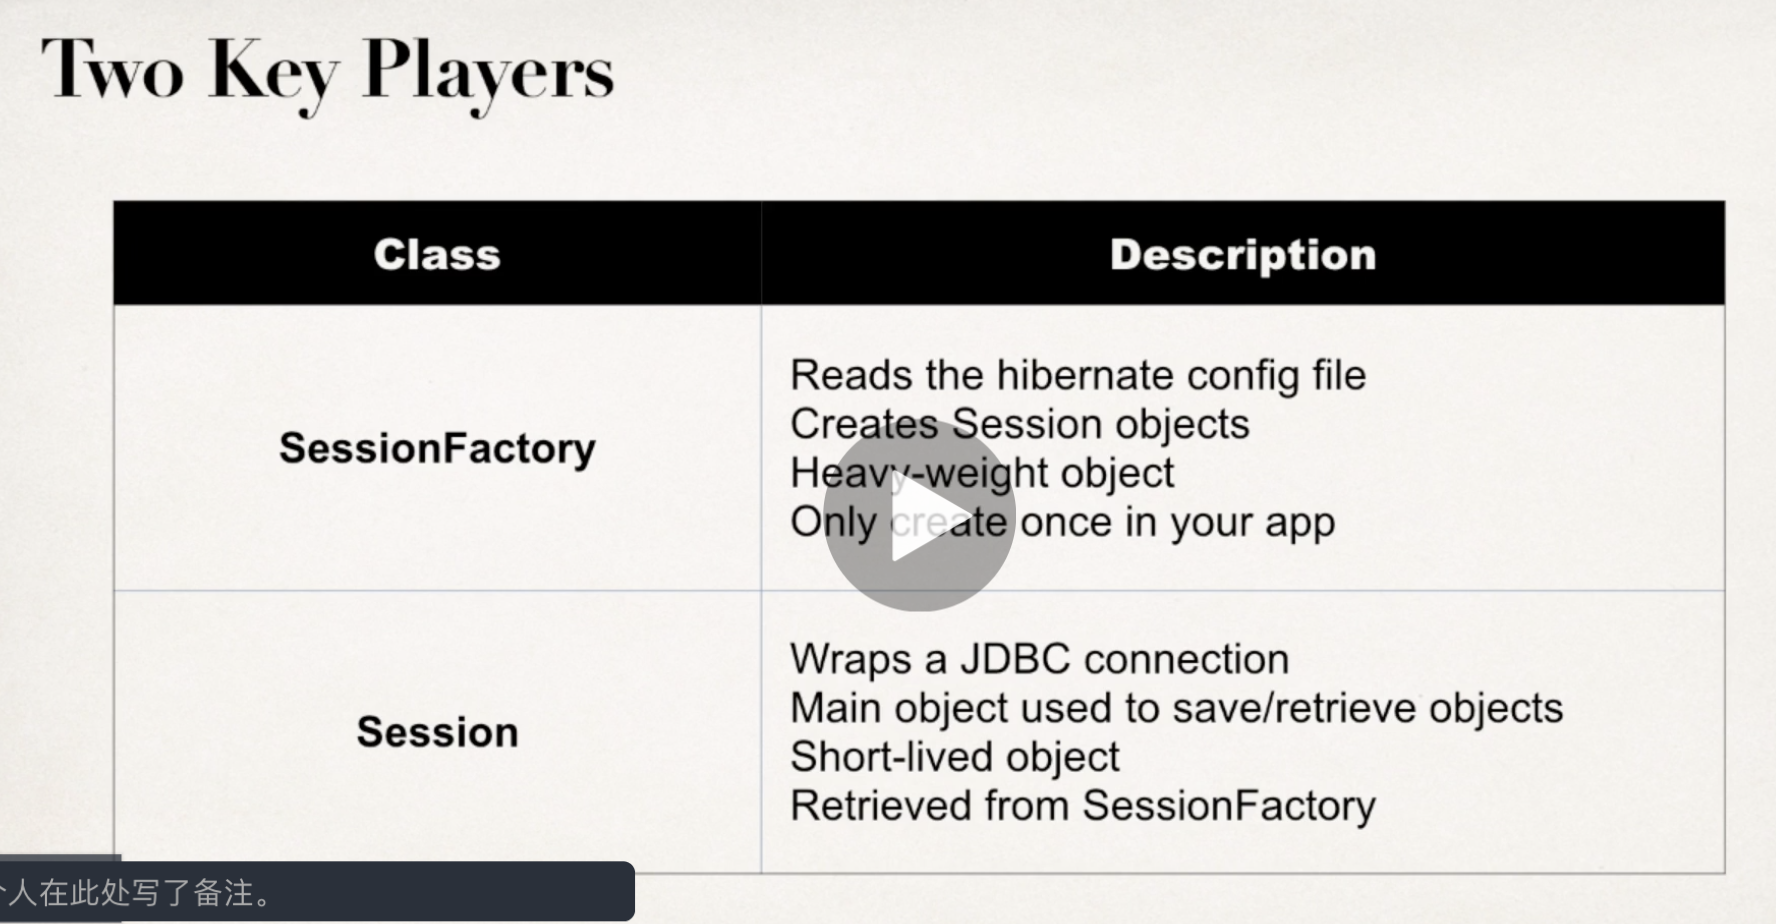
Session and SessionFactory in Hibernate
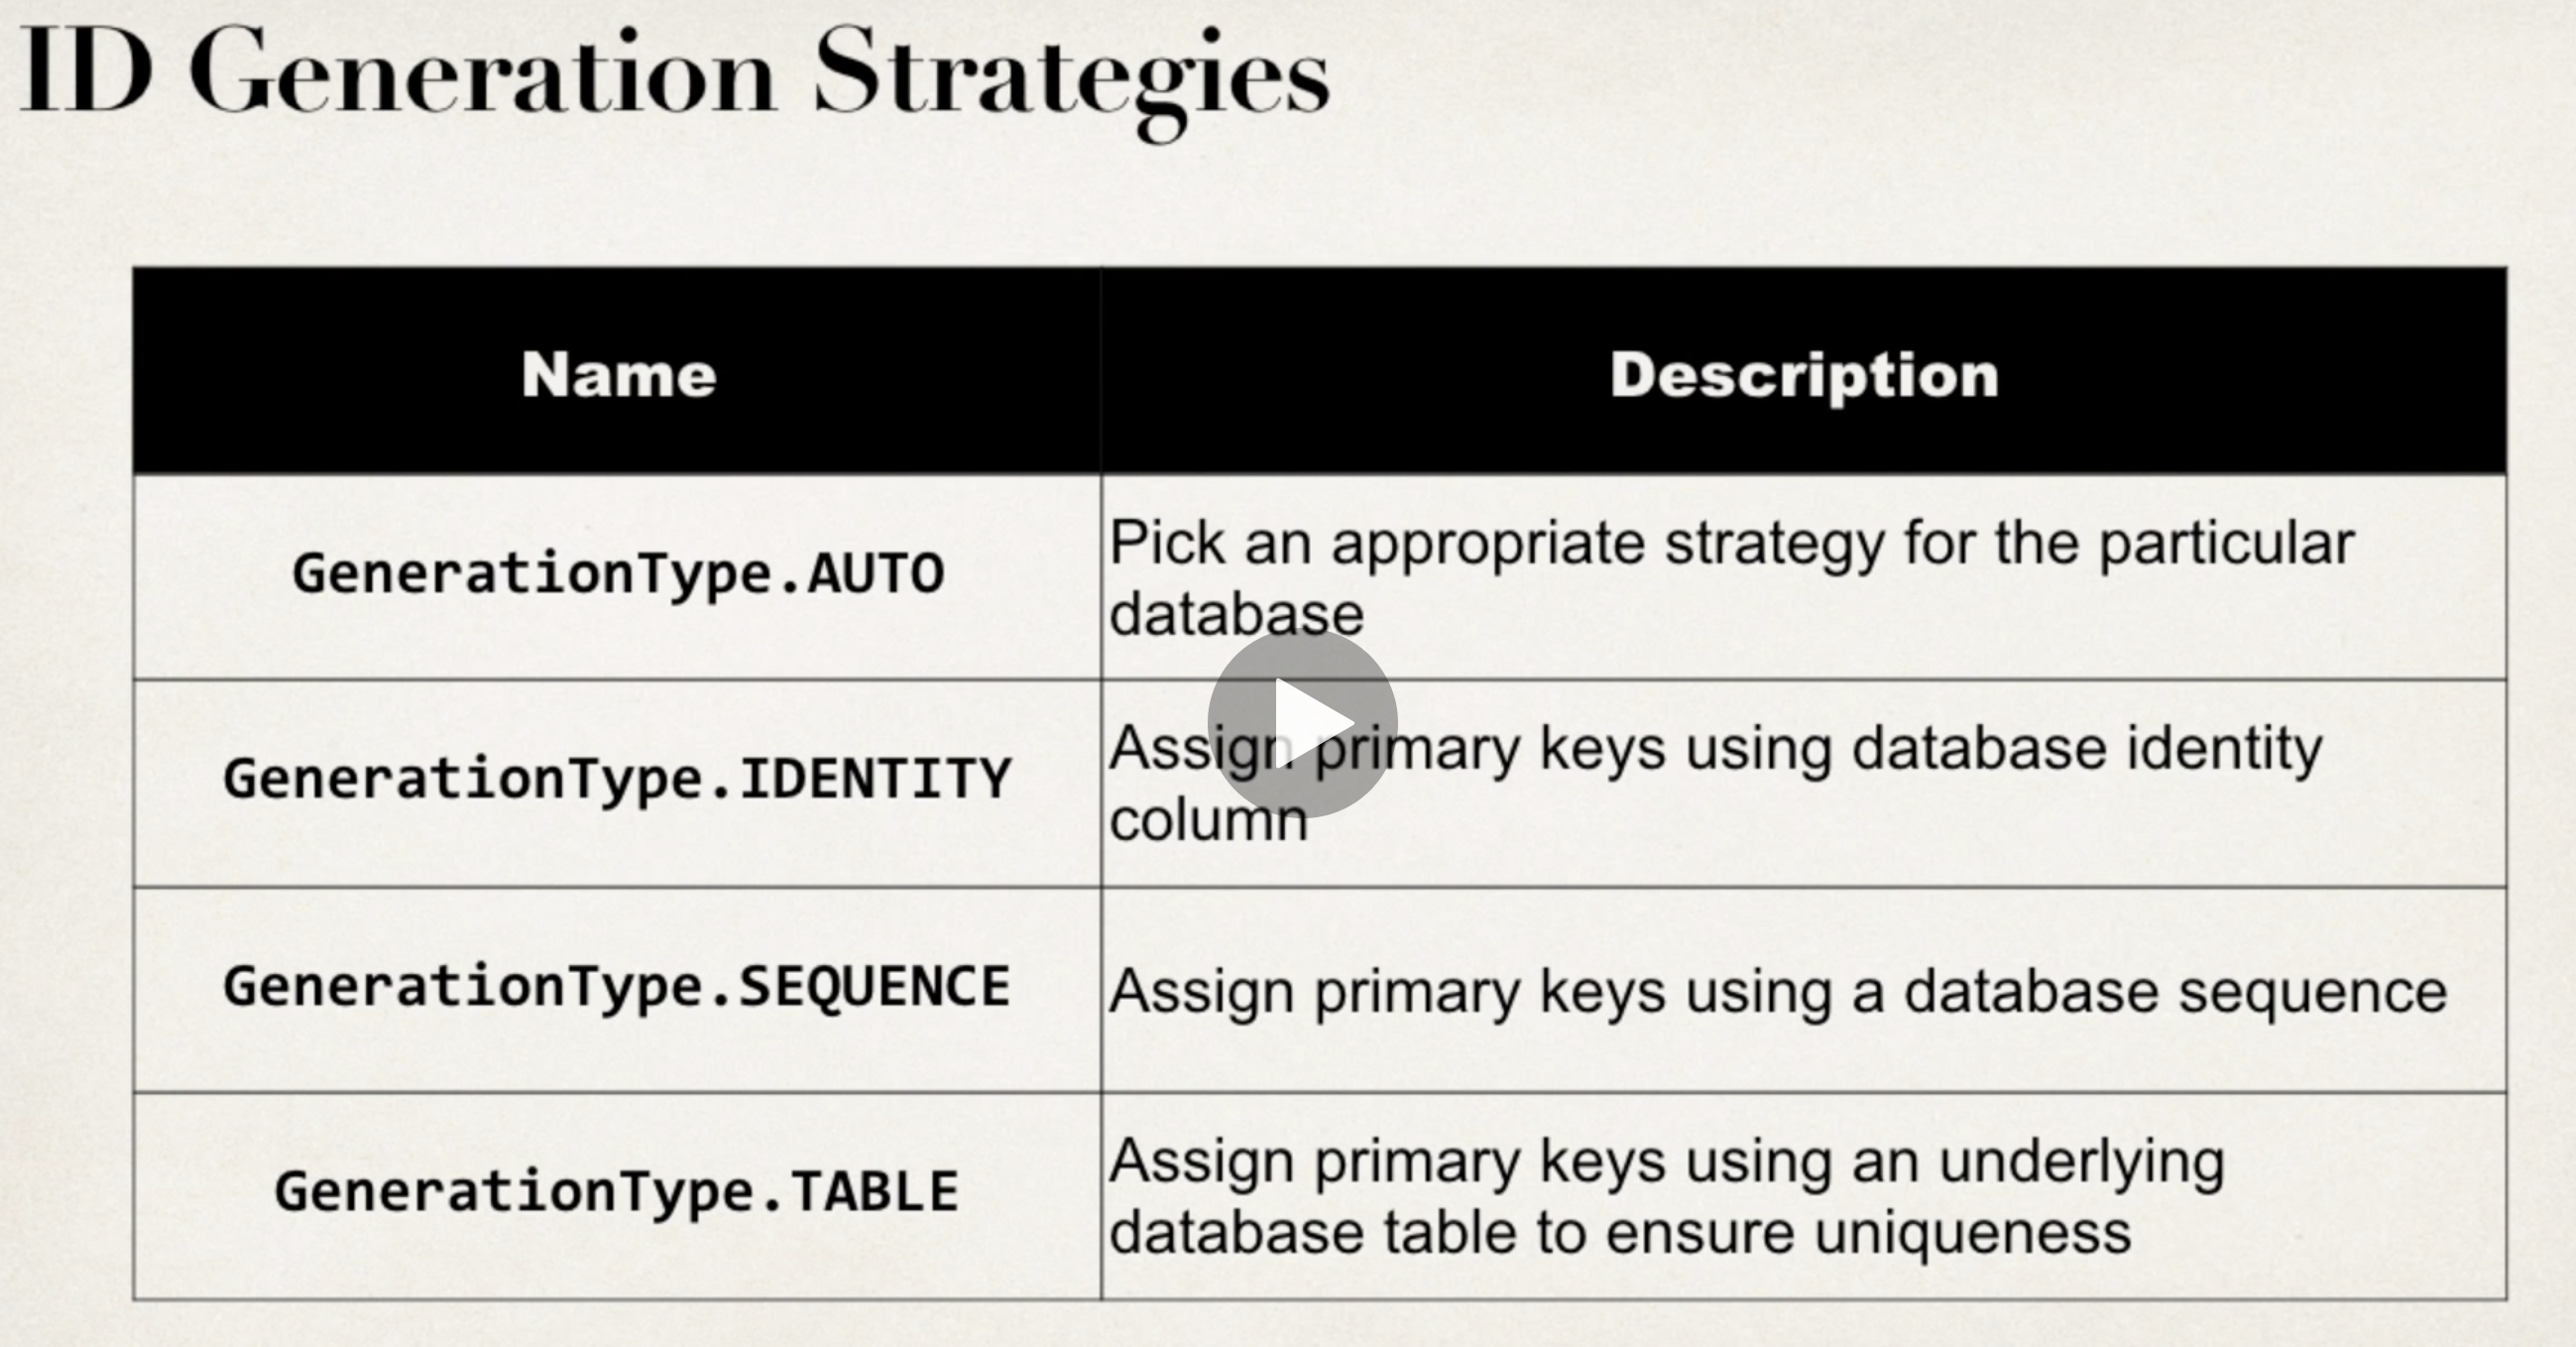
Generate auto_increment ID
At first you need to set your column in Mysql to AUTO_INCREMENT.
Then, add @GeneratedValue. Mysql will follow this strategy to generate values.
    @Entity
    @Table(name="student") //database table name
    public class Student{

        @Id  //primary key
        @GeneratedValue(strategy = GenerationType.IDENTITY)
        @Column(name="id") //column name
        private int id;
    }
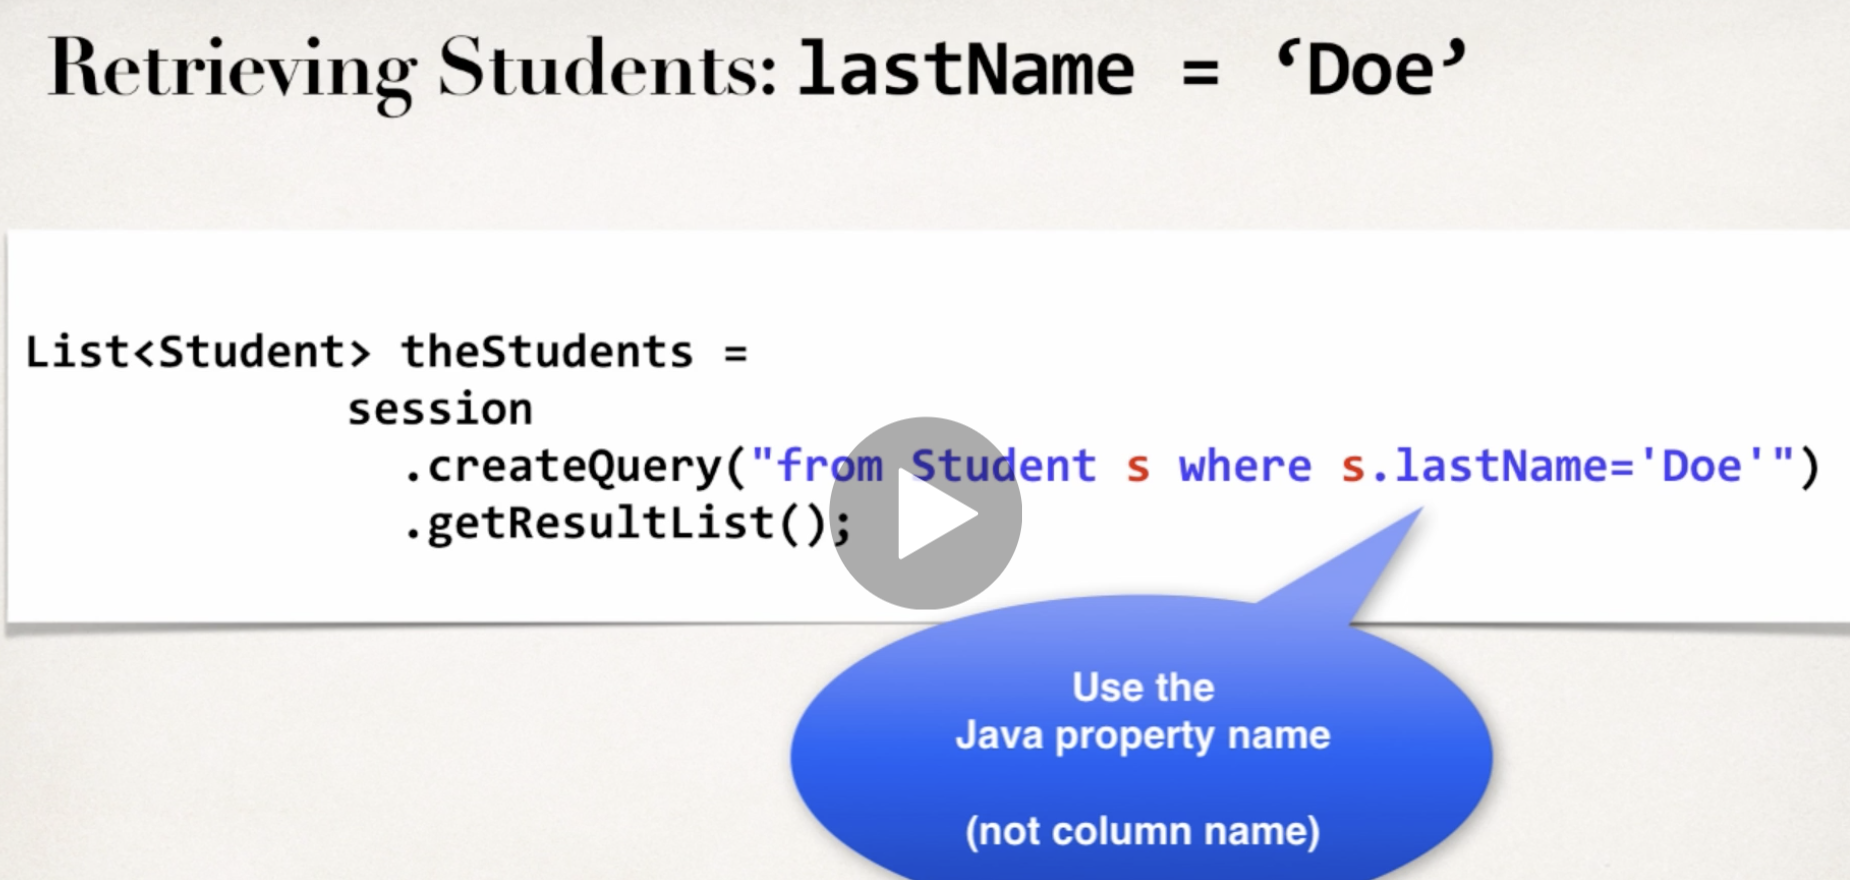
Querying objects with hibernate
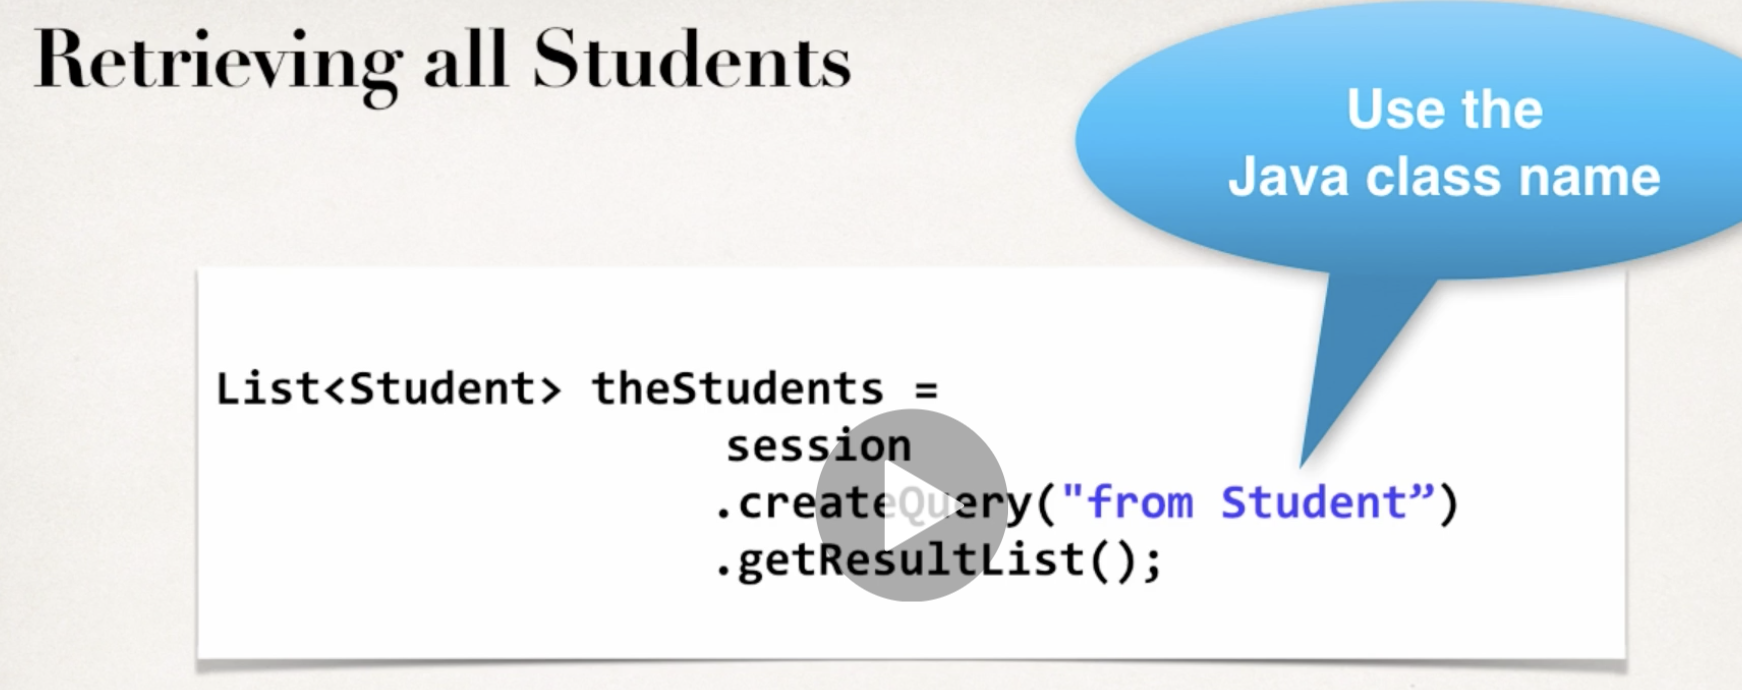
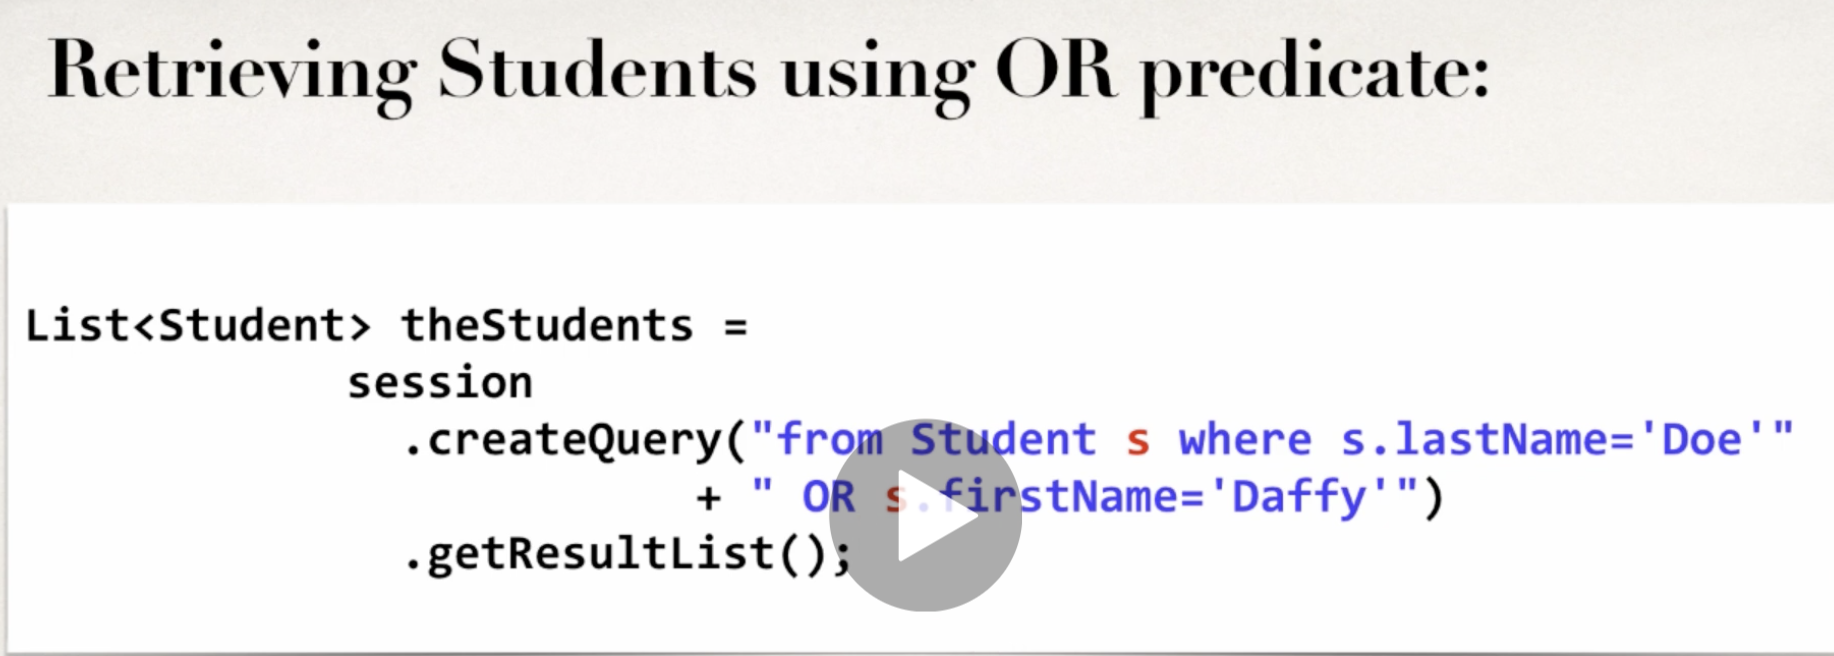
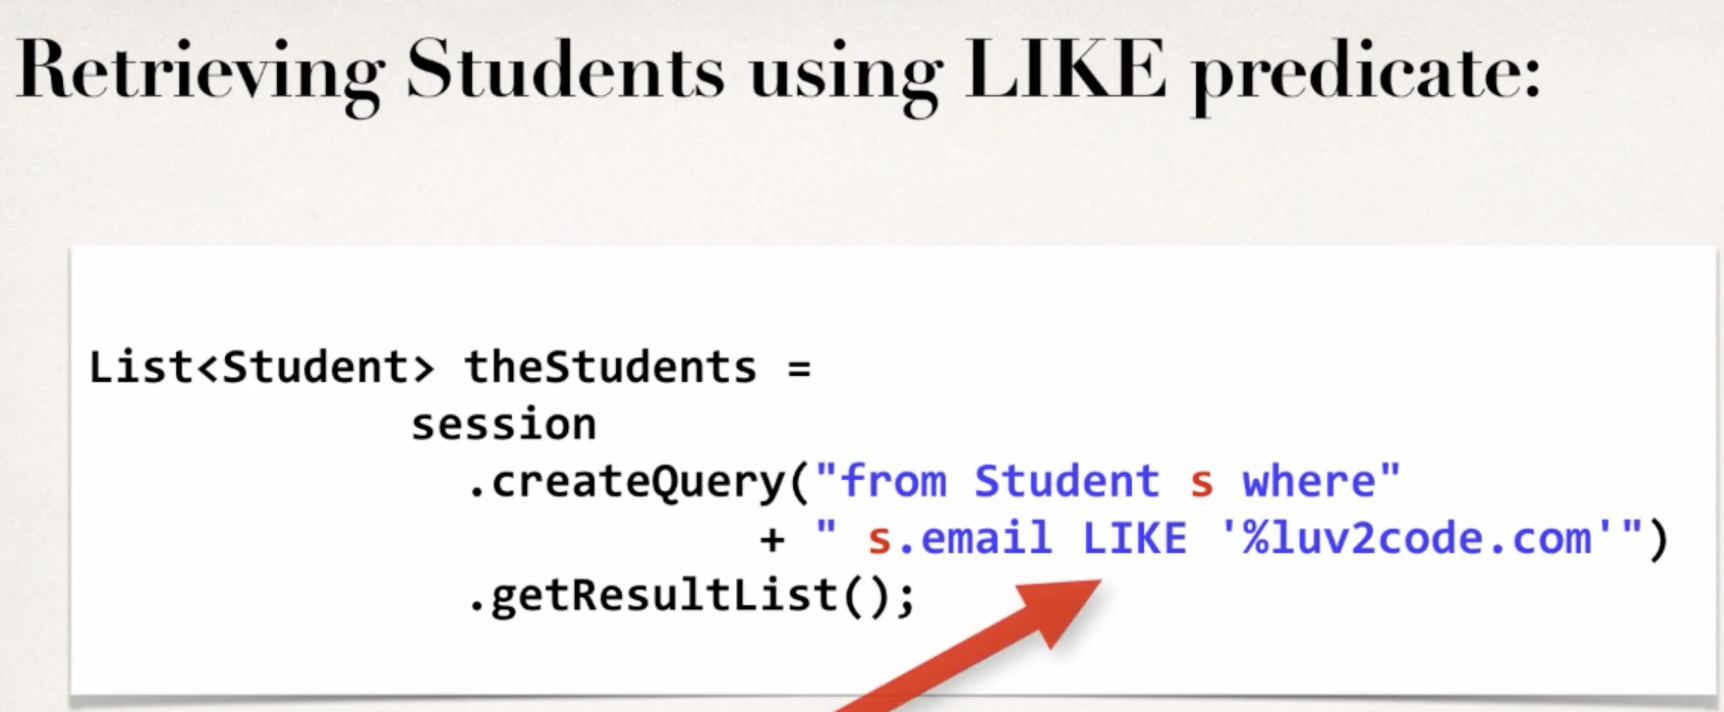
If you are using Hibernate 5.2 or higher, you should replace session.createQuery("from Student").list() with session.createQuery("from Student").getResultList().
Cascade
For example, you have an entity of Instructor and InstructorDetail, they have same ID. If you delete\save Instructor,
you will do the same operation on InstructorDetail.